ZTP Juniper devices with Sky Enterprise
1.0 - ZTP Overview
Arguably, the best feature of Sky Enterprise is its ability to make Zero Touch Provisioning (ZTP) of Juniper devices a breeze. You no longer need to mess around with DHCP options, nor do you need to ensure your config files are accessible via FTP.
Sky Enterprise allows you to ZTP your devices through the concept of "ZTP Templates". A ZTP template is the Junos configuration you wish to apply to a device, exported in XML format (instead of the normal C-like syntax of Junos), with some variables added in - allowing you to re-use the same template across multiple devices.
Why you should bother with ZTP?
ZTP allows you to simply ship a device to site, install it, and plug it in -- that's it! No more pre-staging!
The device will not only download its configuration and configure itself, but will also on-board itself and start streaming telemetry to your Sky Enterprise dashboard.
While this is valuable for SRX and NFX devices, most people in the Juniper ecosystem will likely find it far more timesaving for deploying EX series switches in bulk.
ZTP Methods
There are 2 methods of ZTP on most branch Junos devices:
- Autoinstallation
- Phone-Home Client
Both options are typically present in the factory default config.
Autoinstallation
Autoinstallation is traditional ZTP that relies on DHCP options.
system {
    autoinstallation {
        traceoptions {
            level verbose;
            flag {
                all;
            }
        }
        interfaces {
            ge-0/0/0 {
                bootp;
            }
            ge-0/0/15 {
                bootp;
            }
        }
    }
}
Autoinstallation does not require external WAN access to provision the device, but does typically take more effort to get working. This guide will not discuss ZTP via the Autoinstallation method.
Phone-Home Client
With the Phone-Home Client method (which both Sky Enterprise and Contrail SD-WAN use), the device will continuously call home and present its serial number to redirect.juniper.net.
system {
    phone-home {
        server https://redirect.juniper.net;
        rfc-complaint;
    }
}
When you add a new ZTP device with Sky Enterprise, your device serial number is automatically added to the redirect.juniper.net server.
When the device reaches redirect.juniper.net, the server checks to see if the serial number of the device is present in its database. The serial number is associated with the location (and associated certificate) the device can retrieve its configuration from - in this case, the FQDN of the bootstrap server of Sky Enterprise:
go.oneconfig.com/restconf/data/juniper-zerotouch-bootstrap-server:devices/device=<DEVICE-SERIAL-NUMBER>/notification
The device will then contact and present its serial number to this new server.
Sky Enterprise will not respond with the configuration of the device until an Administrator authorizes the ZTP process within the UI - this provides an additional layer of security in case the device is lost or stolen.
If the device serial number is not present within redirect.juniper.net, the device will not be redirected anywhere and the phone-home process will continue to loop until removed from configuration.
ZTP Requirements
Network Requirements
As you won't be pre-staging your devices, they will need to use DHCP to obtain network settings and perform the initial connection to complete the ZTP process.
The devices require: * IP address * Default Route * DNS server(s).
DNS is especially important, as without it, the device will not be able to resolve redirect.juniper.net; causing ZTP to fail.
Software Requirements
For the phone-home client to be present in the factory default configuration, the minimum software requirements are: * SRX devices: Junos 15.1X49-D110 or above. * EX devices: Junos 18.2R1 or above (18.3R1 or above for Contrail SD-WAN 5.0)
Cabling Requirements
- EX devices will automatically obtain a DHCP lease at boot via the Out-of-Band Management Port on the
vme.0interface. - SRX devices will automatically obtain a DHCP lease at boot via port
ge-0/0/0for in-band management, andfxp0(MGMT Port) for Out-of-Band management. - The 4G/LTE mPIM can also be used for SRX ZTP, as this will (in most cases) automatically obtain IP connectivity from the carrier.
2.0 - Zero Touch Provisioning (ZTP) with Sky Enterprise
This section will walk through the process of creating a ZTP template, loading it into Sky Enterprise, and using it provision a new device.
Baseline example ZTP templates are provided as a starting point.
ZTP Templates
A ZTP template is the configuration you wish to provision on a device (or group of devices), slightly modified with variables to enable it to be re-used.
Sky Enterprise requires that ZTP templates be in XML format.
The process for creating a ZTP template from scratch is as follows:
- Create your required config in Junos.
- Export the config in XML format and copy it to a text-editor (or into the example template above).
- Add variables where required (in Jinja2 format).
- Paste the template into Sky Enterprise.
Example ZTP Templates
The example templates below contain the required configuration for the device to function with Sky Enterprise. You can add your own XML config in freely.
Obtaining your XML Configuration
Do not try and create your own XML config from scratch - create the config on a Junos device then export it as XML.
To display your config as XML in Junos and save it to file:
show configuration | display xml | save /tmp/xmlconfig.xml
Get the saved file from Junos:
scp username@device-hostname:/tmp/xmlconfig.xml ~/path/to/save/file/to
Overriding Existing Configuration
Currently SkyEnterprise cannot override any existing configuration (ie: the factory default configuration).
The current workaround is to delete the section of config you wish to override, and then re-add your new config.
To delete sections of config in XML, add the delete parameter to a parent XML tag. For example:
<device xmlns="http://juniper.net/zerotouch-bootstrap-server">
  ...
  <configuration>
    <config>
      <configuration>
         ...
         ...
         <security delete="delete"/>
         <security>
            <log>
               <mode>stream</mode>
               <report></report>
            </log>
            <pki>
               ...
            </pki>
         </security>
         ...
         ...
      </configuration>
    </config>
  </configuration>

</device>
Sections of the snippet above have been omitted for brevity.
In the example above, everything under the original security section of the config is deleted. A user defined security config is then added.
Variables
There wouldn't be much point to ZTP if the same hardcoded config had to be used for every device. Likewise, it would be tedious to have to upload a different config for every device you wish to provision.
The answer to this is Variables.
Replacing hardcoded values in your ZTP template with variables allows the template to be used across multiple devices. When assigning a specific ZTP template to a device, Sky Enterprise will prompt you to fill in a value for all variables detected in the template. When a device contacts Sky Enterprise and requests its config, Sky Enterprise renders the template with the variable values given and pushes the config to the device.
Using this method, each device that uses the same template will have its own unique configuration.
Format
Sky Enterprise uses Jinja templating to render ZTP templates.
To create a variable, enclose the name of the variable within two curly brackets. For example:
{{ management_ip_and_cidr }}
management_ip_and_cidr variable.
Rules and Restrictions
When naming your variables, remember KISS (Keep It Simple Stupid):
- Do not use special characters or symbols other than underscore _
- Do not use spaces.
- Numbers are ok, but try not to start the variable with a number.
- Be descriptive so you can remember what the variable is for.
- Consider using two variables for ip/cidr notation,
eg: {{ ip }}/{{ cidr }}
- Do not use a Sky Enterprise Special or Reserved variable names (see below).
Sky Enterprise Reserved Variables
You should ensure that any ZTP template you create includes the configuration required for the device to communicate back to Sky Enterprise.
NB: The example ZTP templates from the section above already include this.
The following variables are reserved by Sky Enterprise and are automatically pre-filled when rendering the configuration from the template.
{{ ztp_username }}
{{ ztp_password }}
{{ ztp_host_id }}
{{ ztp_secret }}
Example ZTP Template with Variables
The config snippet below describes how to use the variables within a template. You can view the full example here.
This example config is for an SRX device, and simply sets the hostname, DNS nameservers, fxp0 management interface, and a default route to the gateway. Parts of the config (like the root password, and Sky Enterprise specific config) have been omitted.
<device xmlns="http://juniper.net/zerotouch-bootstrap-server">
  <unique-id>{{ serial }}</unique-id>
  <configuration>
    <config>
      <configuration>
        <system>
          <host-name>{{ hostname }}</host-name>
          <name-server>
            <name>{{ dns_server_1 }}</name>
          </name-server>
          <name-server>
            <name>{{ dns_server_2 }}</name>
          </name-server>
        </system>
        <interfaces>
           <interface delete="delete"/>
              <name>fxp0</name>
           </interface>
           <interface>
              <name>fxp0</name>
              <unit>
                 <name>0</name>
                 <family>
                    <inet>
                       <address>
                          <name>{{ oob_management_ip_and_cidr }}</name>
                       </address>
                    </inet>
                 </family>
              </unit>
           </interface>
        </interfaces>
        <routing-options>
           <static>
              <route>
                 <name>0.0.0.0/0</name>
                 <next-hop>{{ gateway_ip }}</next-hop>
              </route>
            </static>
        </routing-options>
      </configuration>
    </config>
  </configuration>
</device>
Now, when deploying this template to SkyEnterprise, we will be prompted to fill in values for each of the above variables.
Sky Enterprise will then render the template with these variables and push the config to the device when it contacts the phone-home server.
Note that the fxp0 interface is first deleted and then re-added via the template config. This is in case there is an existing fxp0 configuration (as is the case with most factory default configs).
Loading the Template into Sky Enterprise
Once you have your template completed, you're ready to load it into Sky Enterprise.
From the Sky Enterprise UI, navigate to CONFIGURATION > ZTP:
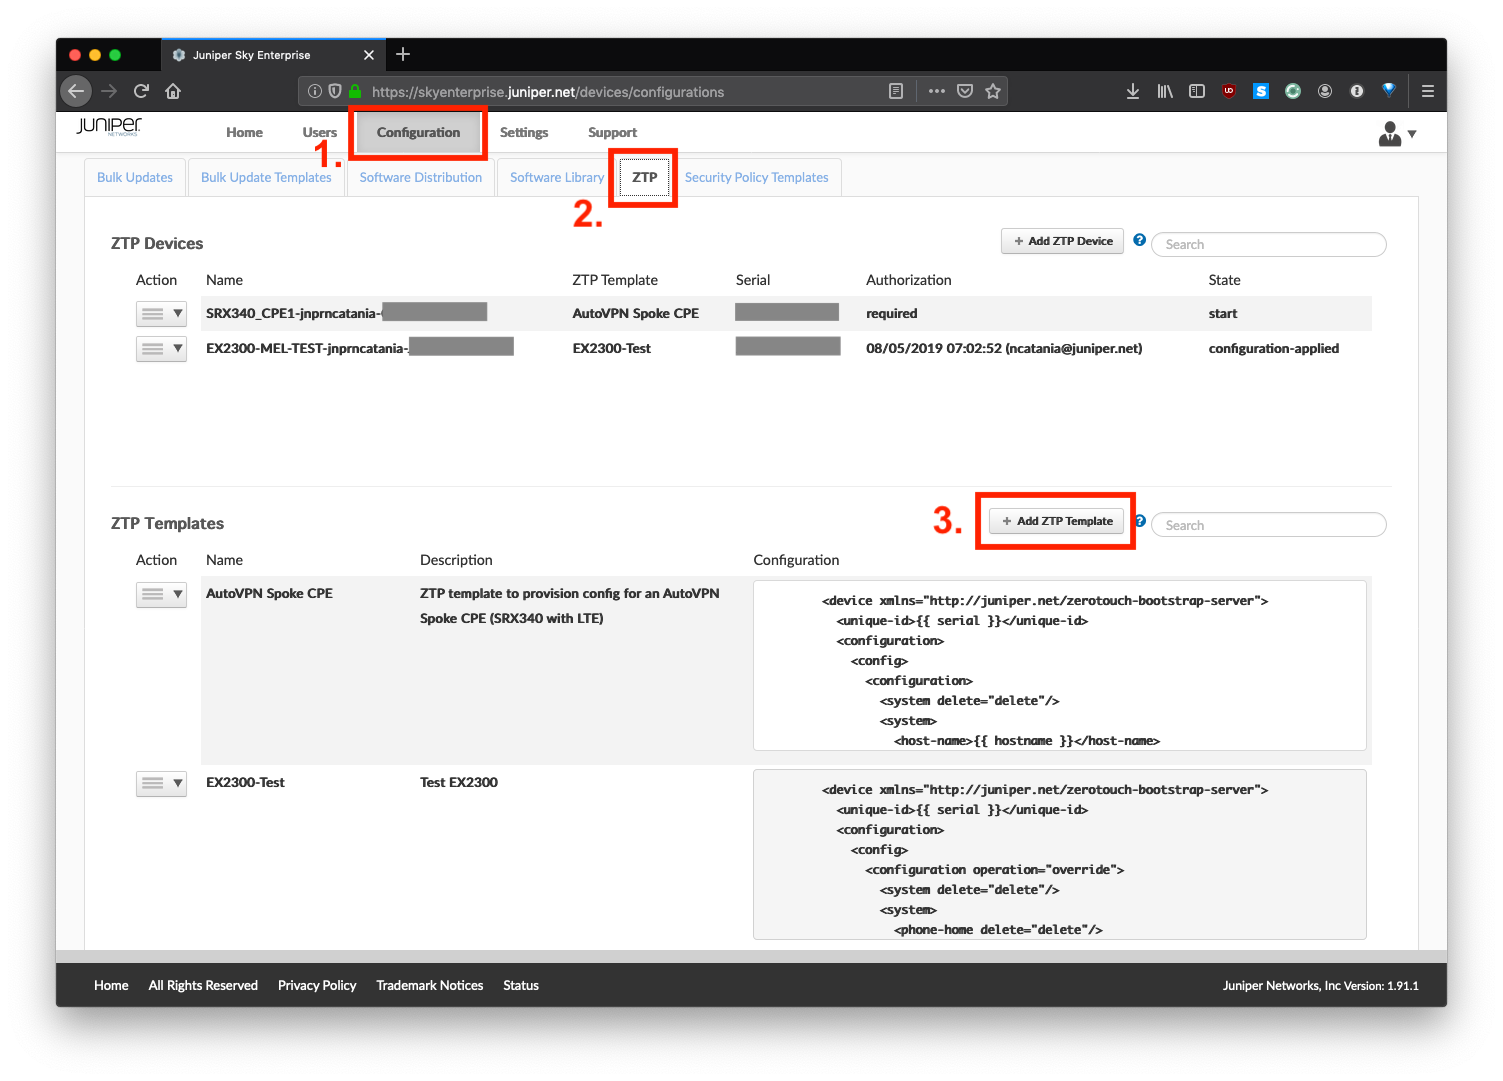
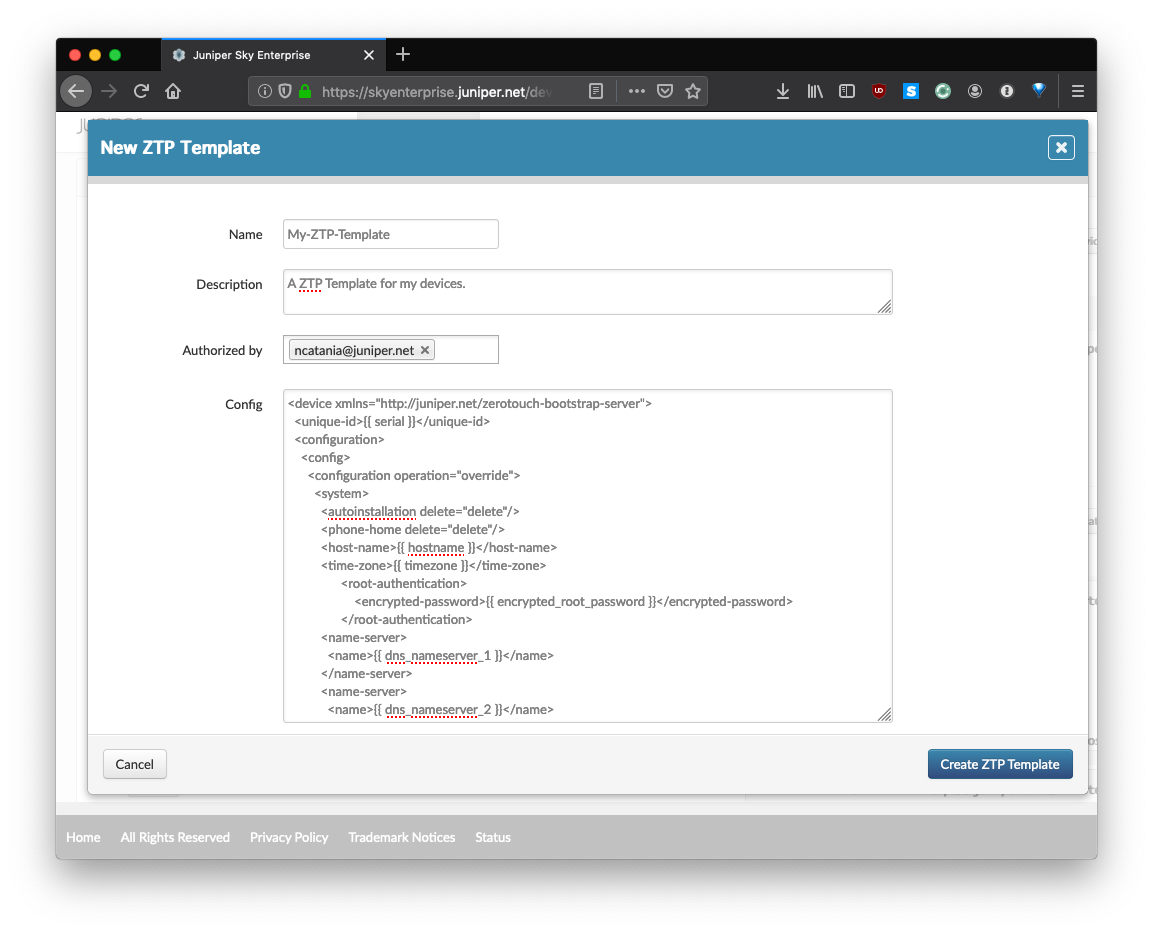
Click Add ZTP Template. Here you will give your template a name, description, and paste the entire ZTP template (in XML) that you created above.
Provisioning a New Device
Next, you will use your new template to Zero Touch a new device.
From the UI, navigate to HOME > DEVICES:
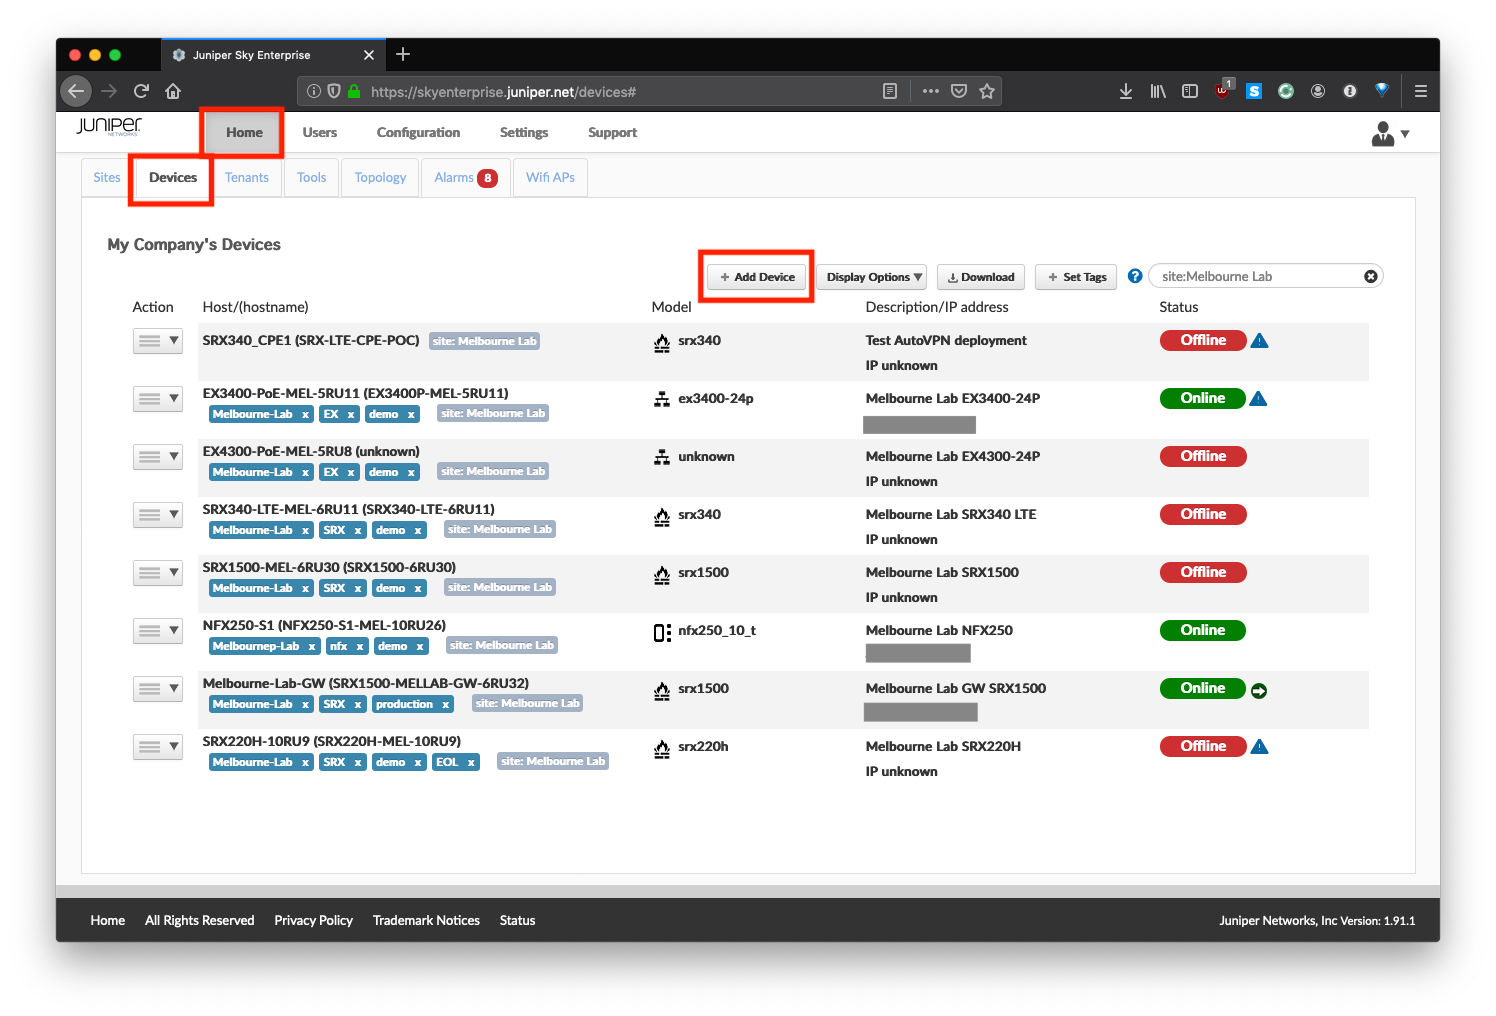
Click Add Device:
- Give your device a name (this will be displayed in the UI)
- Select whether it is a firewall (SRX), switch (EX), or NFX device.
- Select
Create ZTP Device - Populate the device Serial Number. This is added to the Juniper redirect server.
- Select the ZTP template to be used.
- Populate any variables.
- Click
Create Device
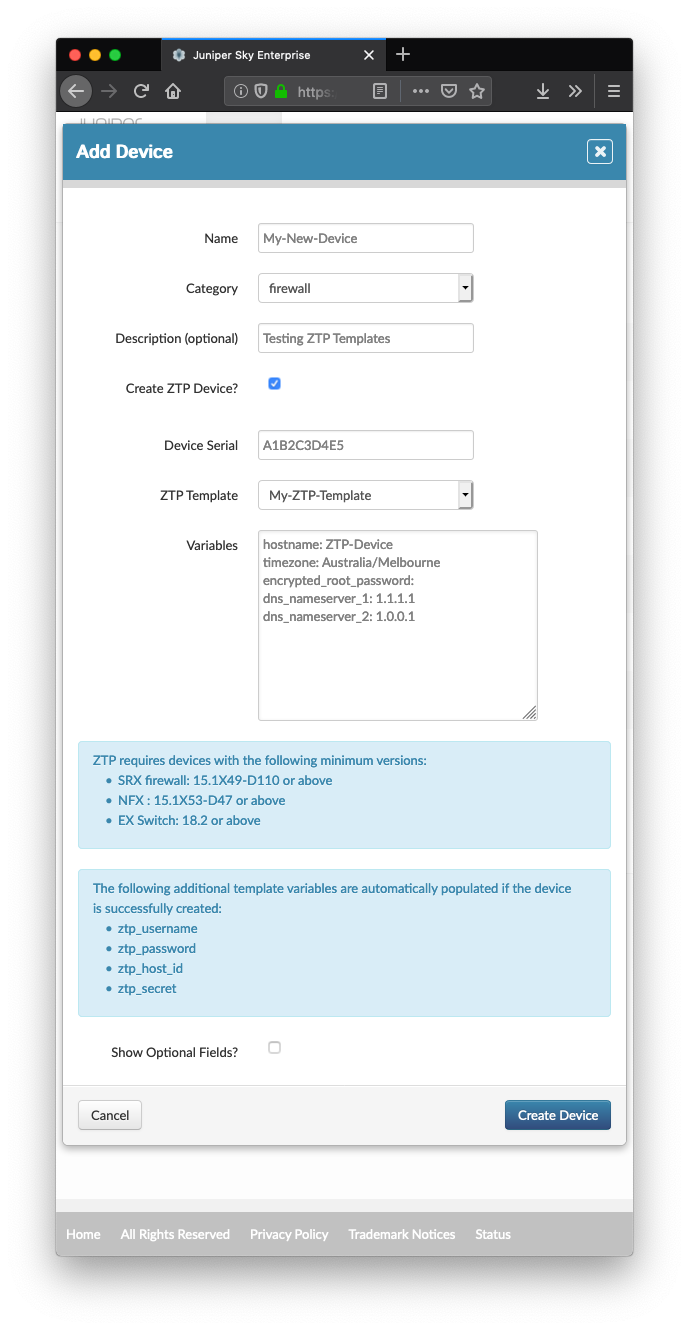
NB: It is VERY important that the Serial Number you enter is correct. The device will not be able to obtain its configuration otherwise as the correct serial will not be present in the redirect server.
Authorizing the Device
And now we play the waiting game...
Sky Enterprise is usually quite quick about adding the Serial Number to the redirect server, but this can take up to 15 minutes.
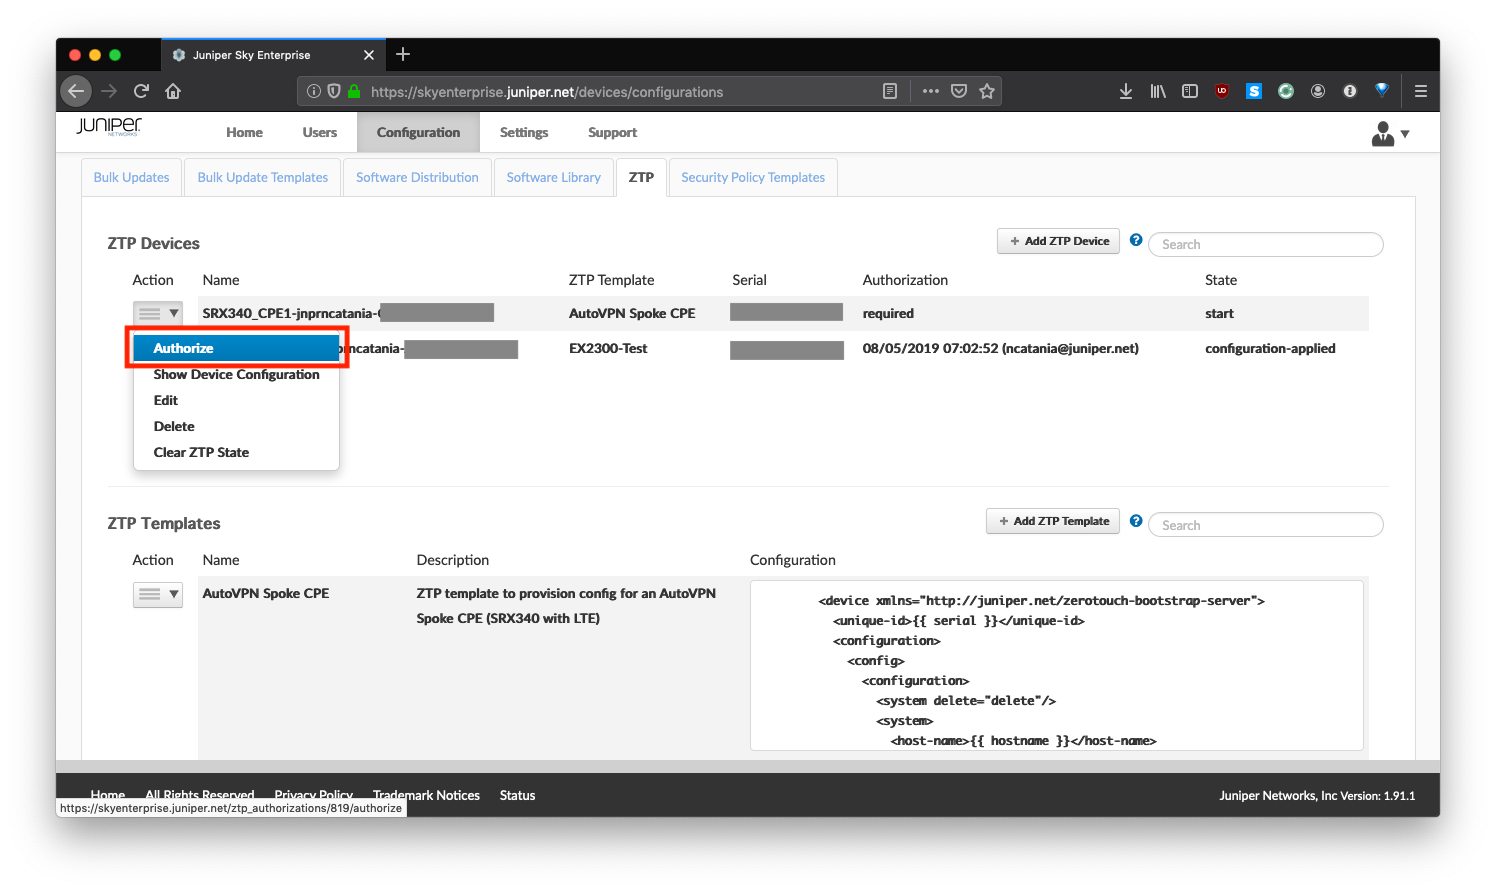
Navigate back to CONFIGURATION > ZTP. Your device's status is reflected here. If the device has successfully contacted Sky Enterprise, the state field should be Authorization Required. For security reasons, Sky Enterprise will not push the configuration to the device until you or another admin authorizes the ZTP process.
To initiate the ZTP process, click the menu icon next to the device name, and select Authorize.
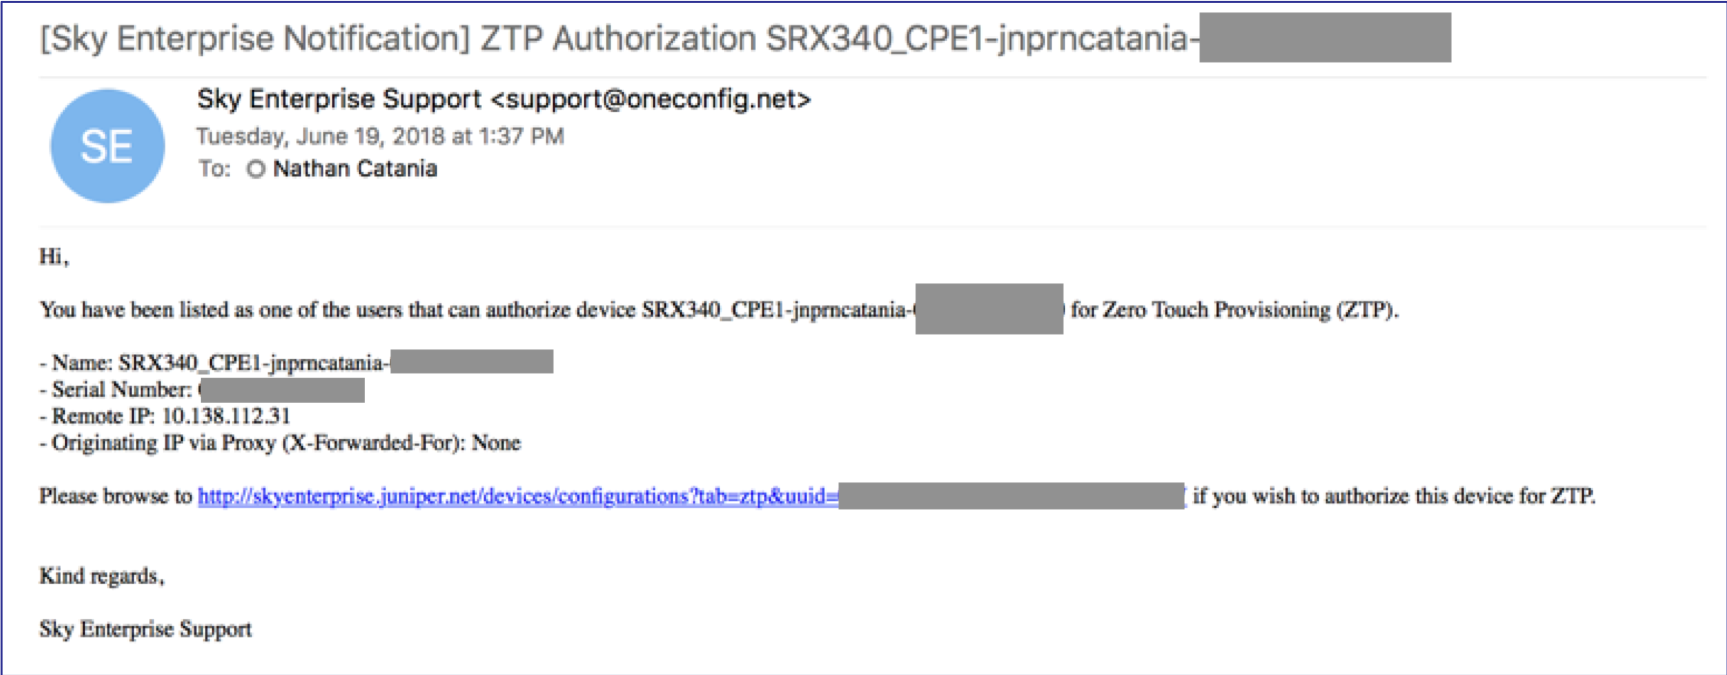
If you have email notifications configured, Sky Enterprise will notify you that a device has requested authorization to ZTP.
If the ZTP process completes successfully, your device should appear under HOME > DEVICES as ONLINE.
Congratulations! You just Zero Touched a device!
Not working? See Section 4.0 for Troubleshooting tips.
3.0 - Operational Mode Commands and Stage 2 Configuration
Sky Enterprise does not allow you to run operational mode commands as part of the ZTP process. Likewise, there is no Stage 2 configuration permitted.
Only a single rendered configuration can be pushed as part of ZTP per device. This raises several questions, like:
- How do you manage PKI for features such as VPNs and SSL Proxy?
- How do you run enrollment commands or OP scripts for features like Sky ATP?
- How do you run HA commands for Stacking or Clustering?
All of these examples require Operational Mode commands such as asrequest chassis cluster ... or request security ....
Sky Enterprise supports some of this functionality through its UI - like Virtual Chassis/Stacking config. You can additionally run commands through the 'Virtual CLI' of Sky Enterprise UI. However, both of these are still manual processes.
What if you wanted to automate this as part of the ZTP process?
Event Policies are the answer!
Event Policies & Triggering Events
An Event Policy can be used to trigger the completion of additional tasks after the ZTP process has completed. For example, running Operational Mode commands, or running a script to apply additional (Stage 2) config.
You would include the Event Policy configuration as part of the initial ZTP template used to provision your device.
A good use case for this is PKI management on SRX. You can use an Event Policy to trigger the request security pki commands to obtain certificates from a CA and enroll them on the device in order to bring up VPNs or utilize SSL Proxy.
Find an Event to Trigger Event Policy
First, locate an appropriate event (usually a Syslog event) to trigger your Event Policy.
To obtain a complete list of all events that a policy can be triggered with, use the following command in Configuration Mode (this might be slow):
set event-options policy test-policy1 events ?
? at the end of the command will load the complete list of all event triggers.
Ideally, you want to pick an event that would not be encountered again once the required commands have been run (or Stage 2 config applied).
For the example mentioned in the section above, if we try and bring up an IPsec VPN without any of the required PKI present, we will see the event pkid_no_keypair in the messages log. We can use this as an Event Policy trigger event.
A good method of finding events that you can trigger on is to apply your config to a test device, and watch the messages log to see what events/warnings/errors occur. You can't trigger on everything here (the event must be in the list obtained above), but it is a good starting point to determine what issues your device is having as a result of not running the appropriate commands.
show log messages | last 50
Configuring an Event Policy
The following is an example of an Event Policy:
event-options {
    policy ca_request {
        events pkid_no_keypair;
        then {
            execute-commands {
                commands {
                    "op url https://raw.githubusercontent.com/nathancatania/Junos-Notes/master/POCs/SDWAN_Lite/enrol.slax";
                }
            }
        }
    }
}
This policy will execute on the pkid_no_keypair event, and will run a remote SLAX script, which in itself will run multiple Operational Mode commands.
You do not need to run a script to execute commands - you can set the Event Policy to run Operational Mode commands directly.
There is a small caveat to this:
Commands in the Event Policy are bound by a character limit. If your command exceeds the limit, the policy will not commit. The workaround to this is to run the command via a script.
If you examine the script above, you will see that it runs 3x Operational Mode commands:
request security pki ca-certificate enroll ca-profile sdwan-profile

request security pki generate-key-pair certificate-id sdwan-local

request security pki local-certificate enroll ca-profile sdwan-profile certificate-id sdwan-local domain-name juniper.example email [email protected] ip-address 10.20.30.2 subject DC=juniper.example,CN=srxce1,OU=engineering,O=juniper,L=melbourne,ST=australia,C=au challenge-password E2B42DC325CA34D0
The last command exceeds the character limit; hence a script is used to run it instead.
You can get creative with your Event Policies, including applying additional configuration to your devices. The trick is to finding the correct event to trigger on.
Event Policy Caveats
Continuous Policy Execution
If you are worried about your Event Policy continuously executing, you can use it to trigger additional config that has it remove itself after doing what it needs to do.
Script Privacy
Any script that you execute will need to be hosted remotely, as you cannot add files to the device as part of the ZTP process.
In the case of SRX and NFX ZTP, you could include a PSK IPsec VPN in your initial ZTP config that allows the device to reach the remote script in your internal network. This ensures you don't have to host your script publicly if it contains sensitive information.
For EX switches, the device should be able to reach your internal network through whichever firewall or gateway it is connected to.
4.0 - Troubleshooting
Checking Logs
If you find you are having issues with the ZTP process, examining the messages log can assist with troubleshooting:
show log messages | match phone-home | last 50
For more in-depth detail, you can modify the phone-home client to enable traceoptions (AKA debug logging):
set system phone-home traceoptions flag all
set system phone-home traceoptions file phc.log
This will log detailed output from the phone-home client to a log file called phc.log. To examine this file:
show log phc.log | last
Failed Configuration
If your configuration failed to apply, you will see something like this in the messages log:
root@srx340> show log messages | last
[...]
May 14 02:17:29  srx340 phone-home: phcd_platform_junos_commit: Read:error: configuration check-out failed
May 14 02:17:29  srx340 phone-home: phcd_platform_junos_apply_config: vnf_name:Local config failed!
May 14 02:17:29  srx340 phone-home: phcd_act_download_cfg: Failed to apply received configuration
May 14 02:17:29  srx340 phone-home: The stage1 configuration failed to committed on the device
Looking further up the log, or examining the traceoptions log from the phone-home client, will usually reveal the reason as to why the configuration failed.
This is usually due to a malformed or invalid XML config.
SRX Troubleshooting
The SRX has a few quirks that may cause issues for you when attempting ZTP.
******
May 14 02:17:29  srx340 phone-home: phcd_platform_junos_commit: Read:error: AUTHENTICATION service may not be de-configured while clients are present. Please clear bindings
******
May 14 02:17:29  srx340 phone-home: phcd_platform_junos_commit: Read:error: configuration check-out failed
May 14 02:17:29  srx340 phone-home: phcd_platform_junos_apply_config: vnf_name:Local config failed!
May 14 02:17:29  srx340 phone-home: phcd_act_download_cfg: Failed to apply received configuration
May 14 02:17:29  srx340 phone-home: The stage1 configuration failed to committed on the device
Note the first line in the log. With the factory default config, branch SRX devices have a DHCP server configured on ge-0/0/0.0. If you attempt to ZTP the device via this port, and remove the DHCP server config as part of your Stage 1 config, the deployment may fail. The device will not let you remove the the DHCP server settings as long as the port is in use.
If you hit this issue, as a workaround try to ZTP with LTE or a different port - such as fxp0. Failing that, leave the DHCP server configuration intact and remove it after the ZTP process completes.