Glean Getting Started Guide
Warning
This is a getting started guide I wrote for Glean in late 2023/early 2024 when their documentation didn't really exist!
It is likely very out of date by now. You should checkout the latest version here (docs.glean.com)
Any thoughts or opinions in this article are my own and do not reflect those of Glean. I am a Glean SE who worte this guide as part of a project to enhance Glean's documentation and documentation system. This is currently being approved, so in the meantime, the Getting Started guide I wrote is below.
1.0 - What is Glean?
Glean is a powerful tool designed to streamline your workspace by making information easily accessible. It allows you to search across various data sources, share knowledge with your team, and leverage advanced features for complex workflows.
In addition, Glean provides secure generative AI capabilities, similar to your organization's own dedicated ChatGPT or Co-Pilot, but securely trained on your organization's data. This means you don't need to worry about sensitive company data making its way outside the organization.
Access the Admin UI
Learn how to access the Glean Administrator User Interface (UI), known as Workspace Settings, and begin set up for your organization
The Glean Admin UI (app.glean.com/admin), known as the Admin Console, is where you will manage the Glean workspace for your organization, including setting up Single Sign-On (SSO), configuring data sources, and syncing people data.
Sign In to Workspace Settings
To access the Workspace Settings for your tenant, navigate to https://app.glean.com/admin in your web browser. If you are not already logged in, you will be prompted to do so.
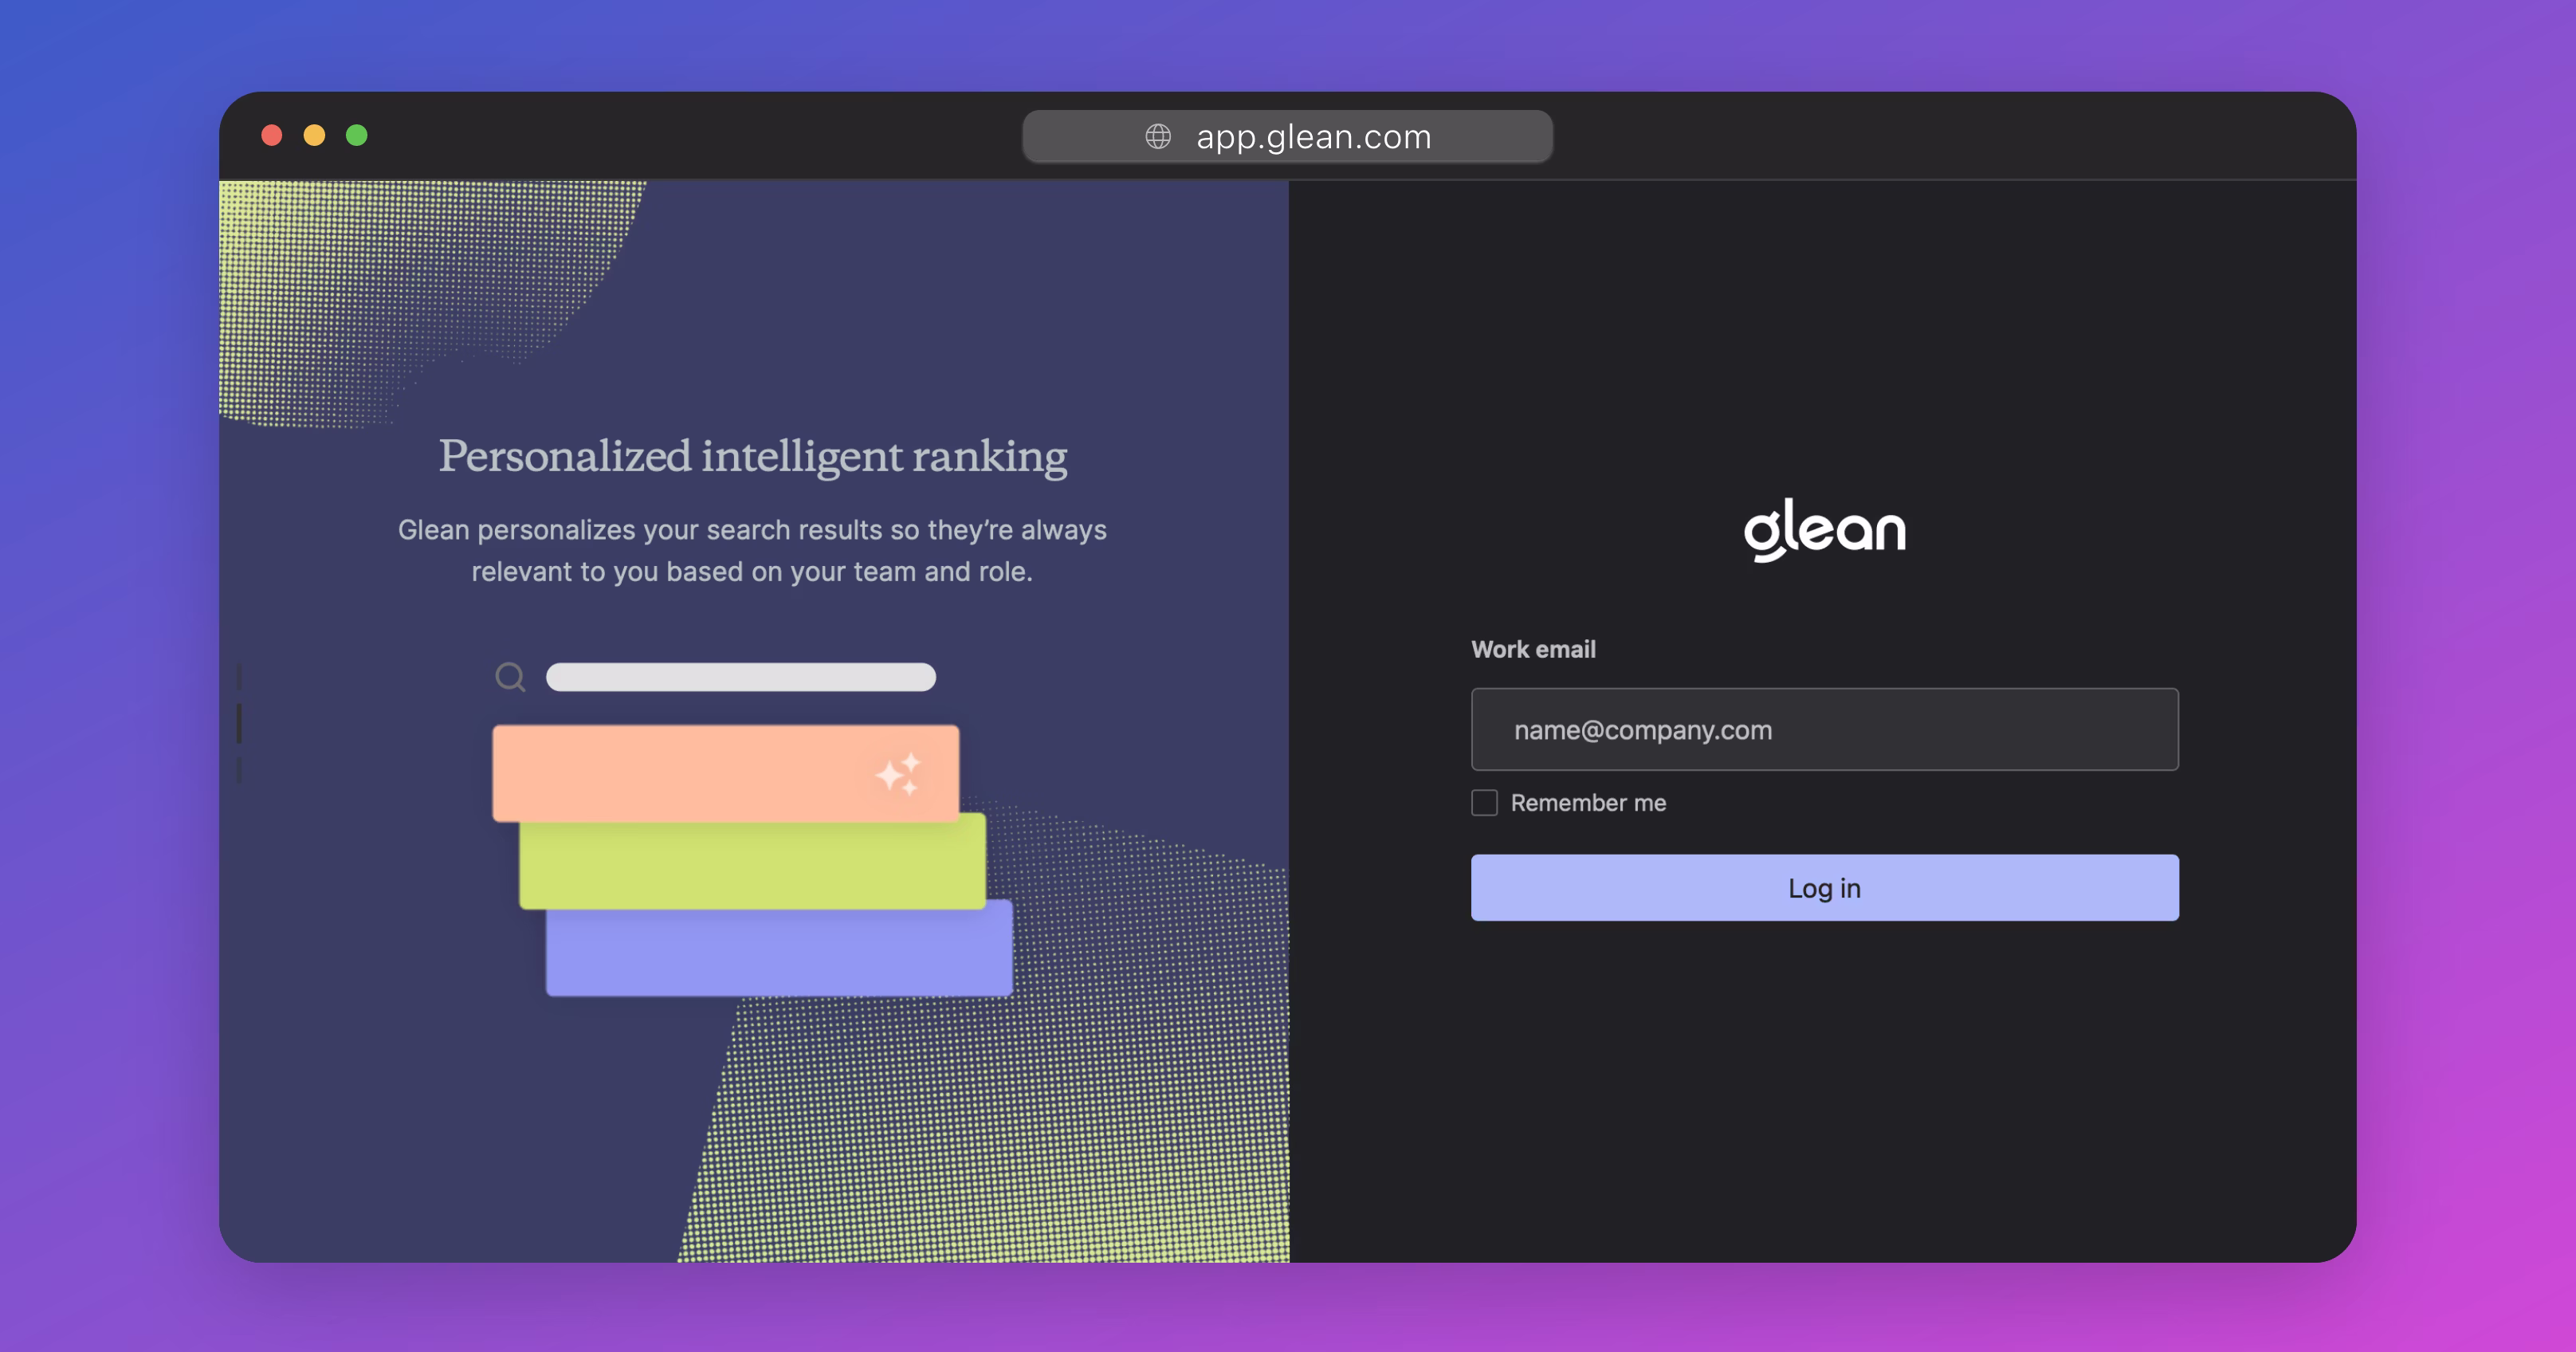
Because Single Sign-On (SSO) has not been configured yet, you will be prompted to check your email for a link to log in. This is called a Magic Link.
Click the Magic Link in your inbox to log in.

Add Additional Administrators
When you sign in for the first time, you will be prompted to add additional administrators before proceeding.
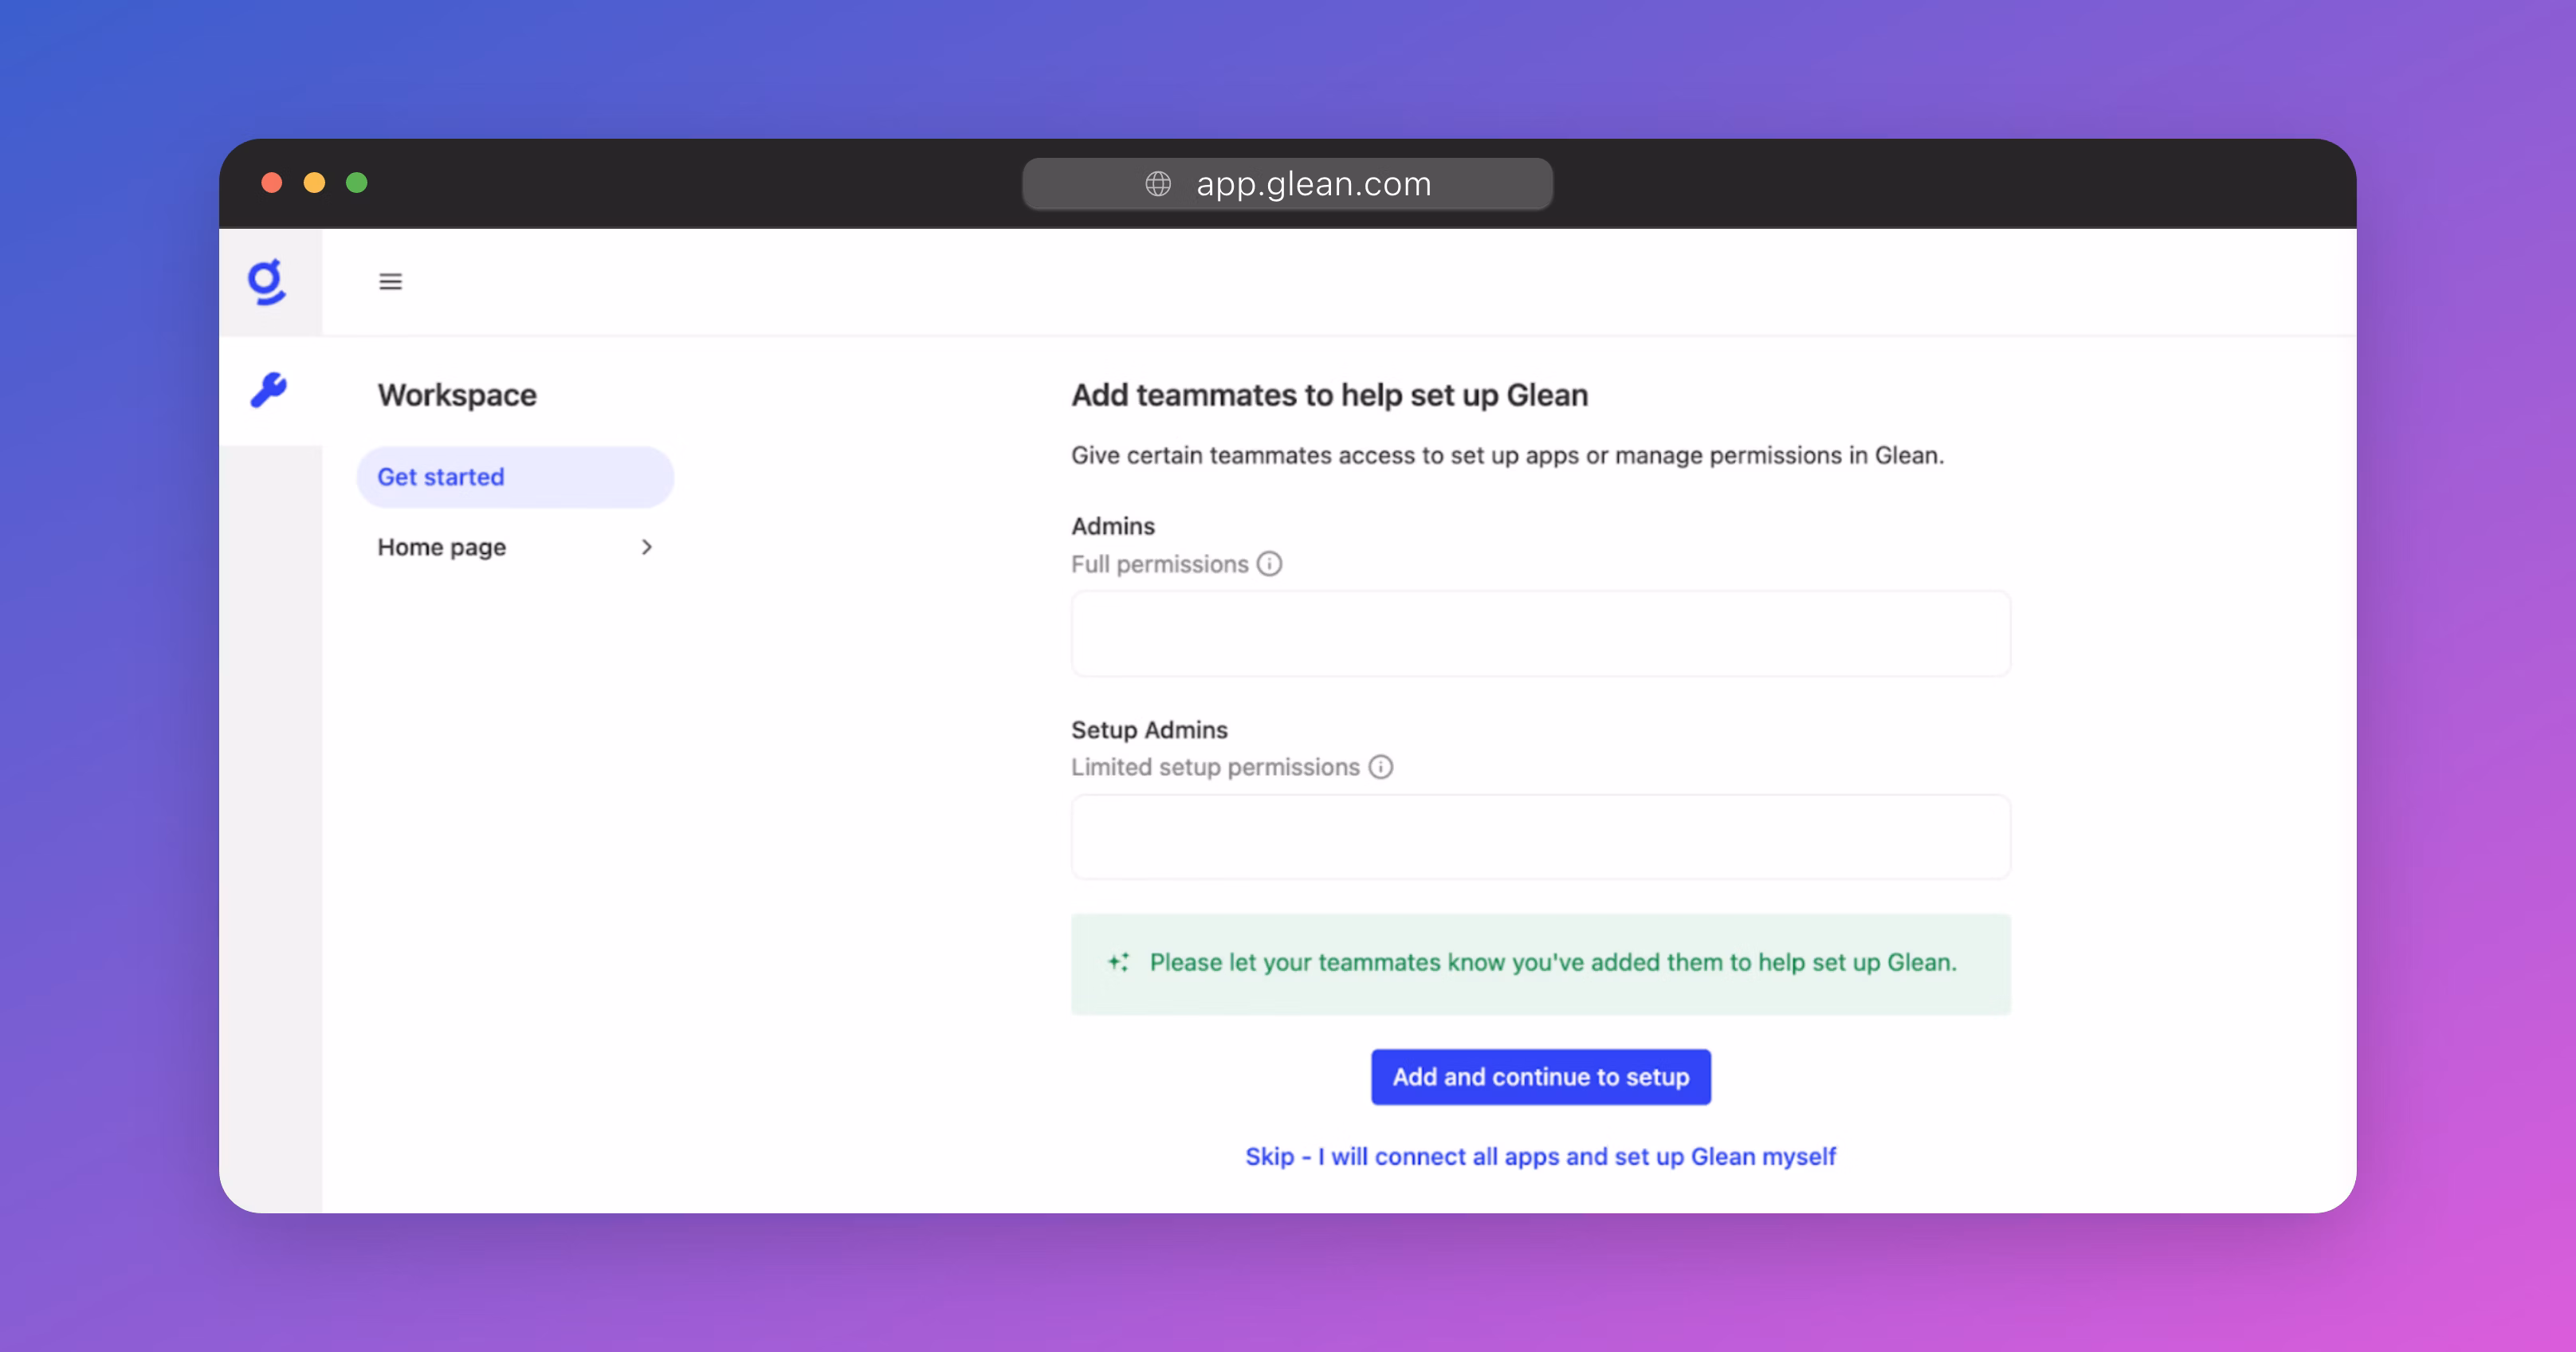
There are two types of administrator roles, Admin and Setup Admin:
- The Admin role (also known as the Full Admin role) has full read/write privileges across all Workspace Settings. This role can add/remove other administrators, manage user permissions, configure data sources, start crawls, and customize the Glean workspace for the organization.
- The Setup Admin role has restricted permissions and can only configure data sources and start crawls. This is the perfect role to give to the administrators of any cloud applications that you wish to connect to Glean.
Warning
Only select individuals within your organization should be provided with the Admin role.
To proceed, enter the emails of any additional administrators that you wish to add, or simply skip to the next step.
Hosting Glean in your own GCP or AWS?
You will need to follow the appropriate cloud‑prem guide for deploying Glean in GCP or AWS before you can proceed with the rest of this guide.
Configure SSO
In this section, you will learn how to configure Single Sign-On (SSO) to provide seamless and secure employee access to Glean
SSO is mandatory for all Glean deployments. By integrating your directory service with Glean, user information will be automatically synchronized, ensuring that your organization's document access controls are accurately reflected in search results within Glean.
Understanding Glean SSO
Glean leverages OpenID Connect (OIDC) for implementing SSO and synchronizing directory information.
OIDC is a robust protocol that provides detailed control over user permissions. It is widely supported by leading Identity Providers (IdPs) such as Okta, Microsoft Entra ID (Azure AD), and Google, ensuring compatibility and ease of integration with your existing identity management infrastructure.
Select your Identity Provider (IdP)
In the admin Workspace Settings, navigate to Admin Console > Settings > Authentication and select your IdP from the list.
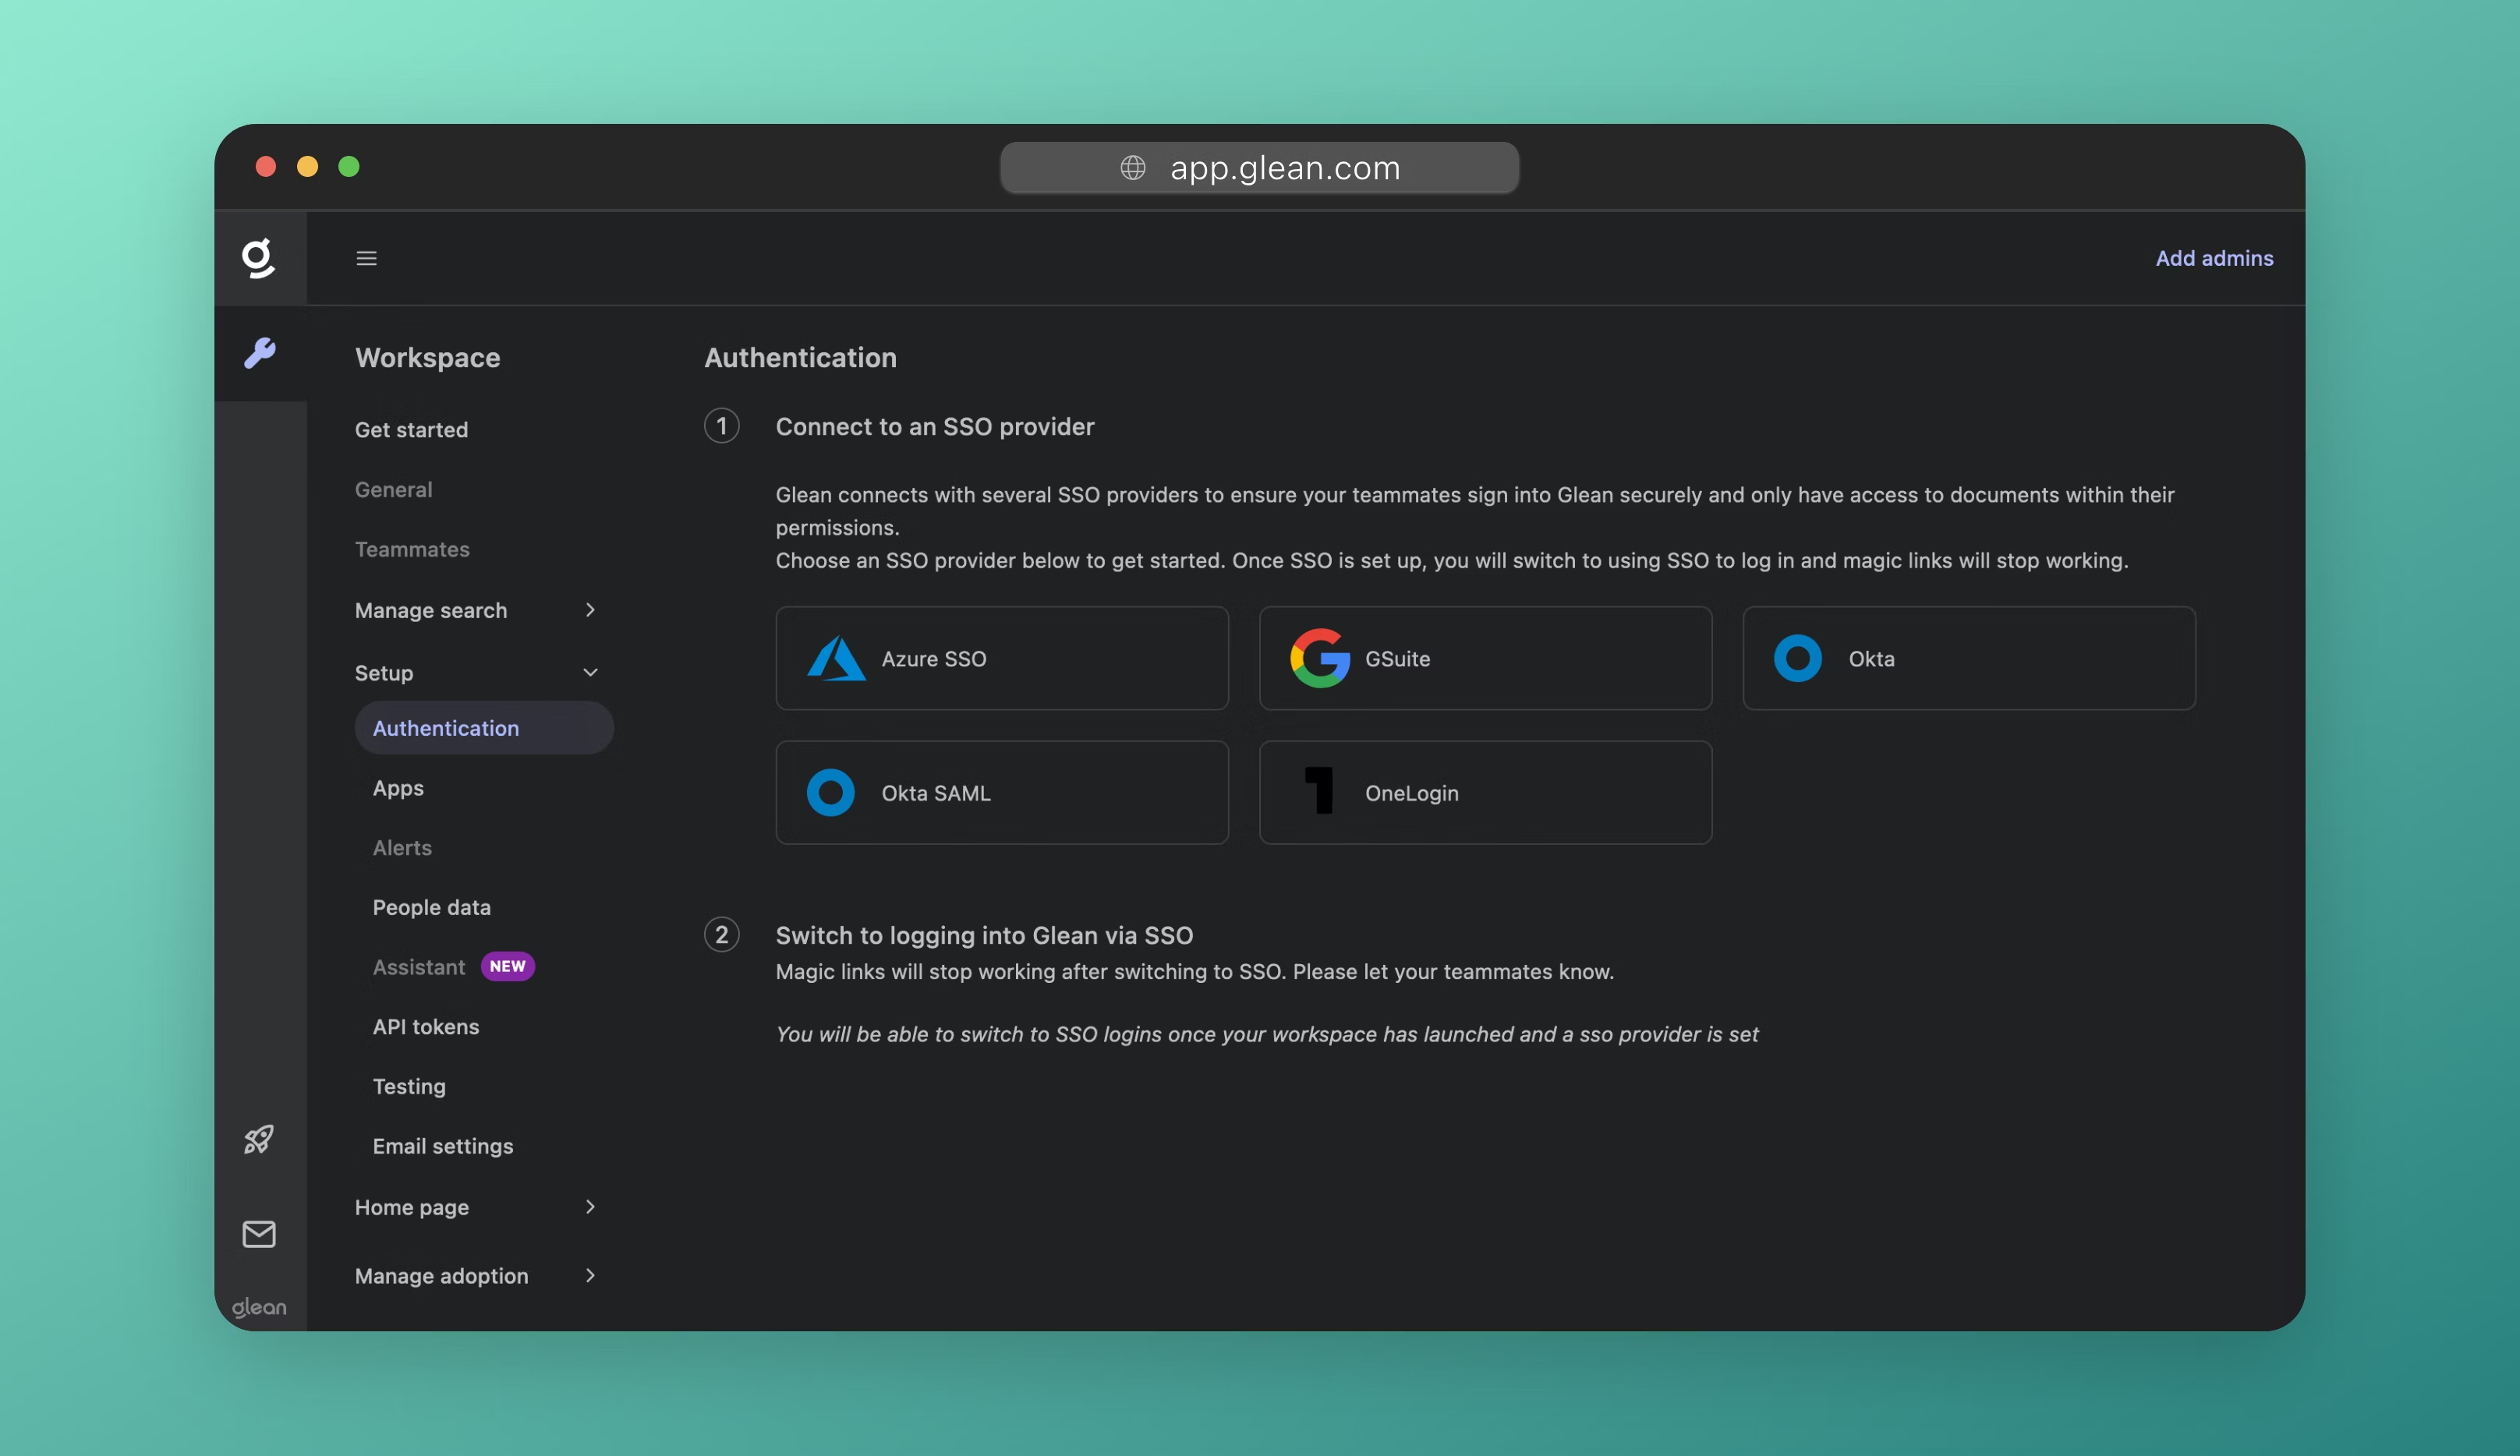
Glean also supports the use of SAML in cases where your SSO provider or company Standard Operating Procedure does not support using OIDC. To configure SAML, please choose Okta SAML from the SSO provider list, and paste a link to your IdP metadata XML file when prompted.
OIDC vs SAML
Warning
Glean strongly recommends the use of OIDC over SAML for integrating SSO. It is crucial that your employee directory is asynchronously pushed to Glean to ensure correct functionality. SAML tokens do not provide the comprehensive identity data required for Glean's operation, and in addition, can only be updated upon employee re‑authentication.
Should you choose to implement SAML, you will be responsible for maintaining your directory information.
Configure SSO
Detailed instructions for configuring SSO with common IdPs are linked below:
Enable SSO
Once you have configured SSO, you will need to tell Glean to switch from using Magic Links to SSO for user and administrator sign-in.
Under the section Switch to logging into Glean with SSO, click the Switch to ... button.
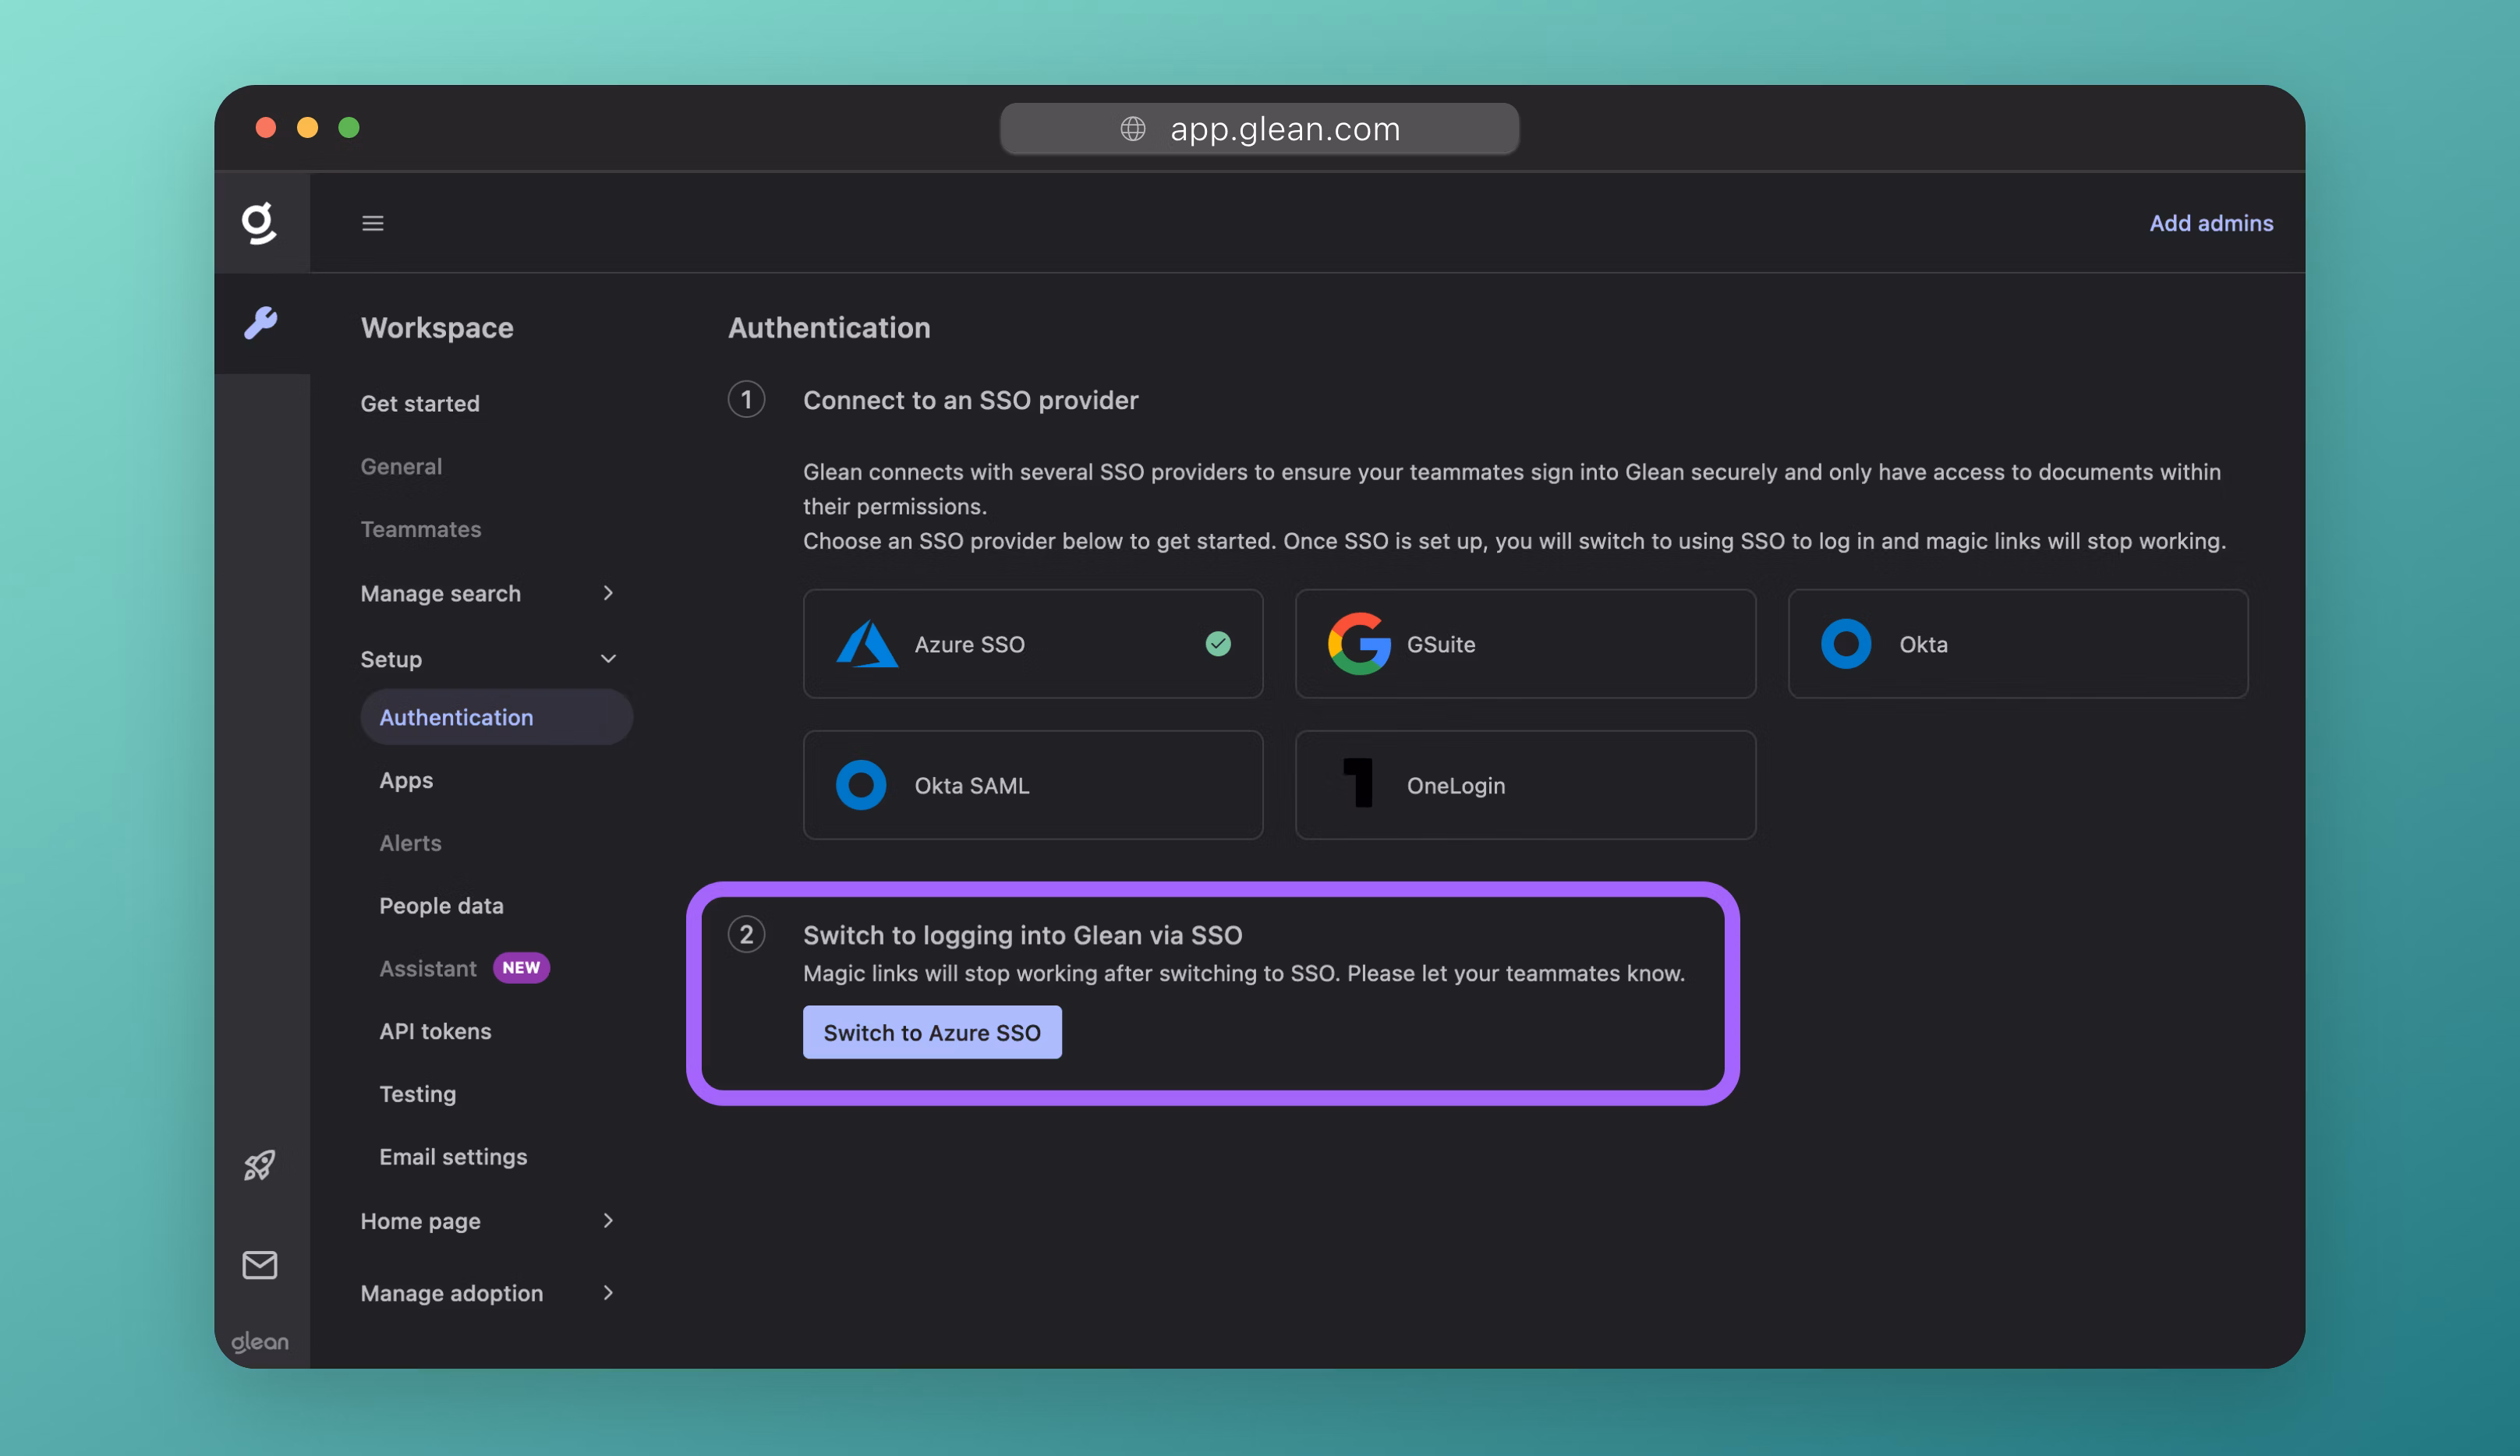
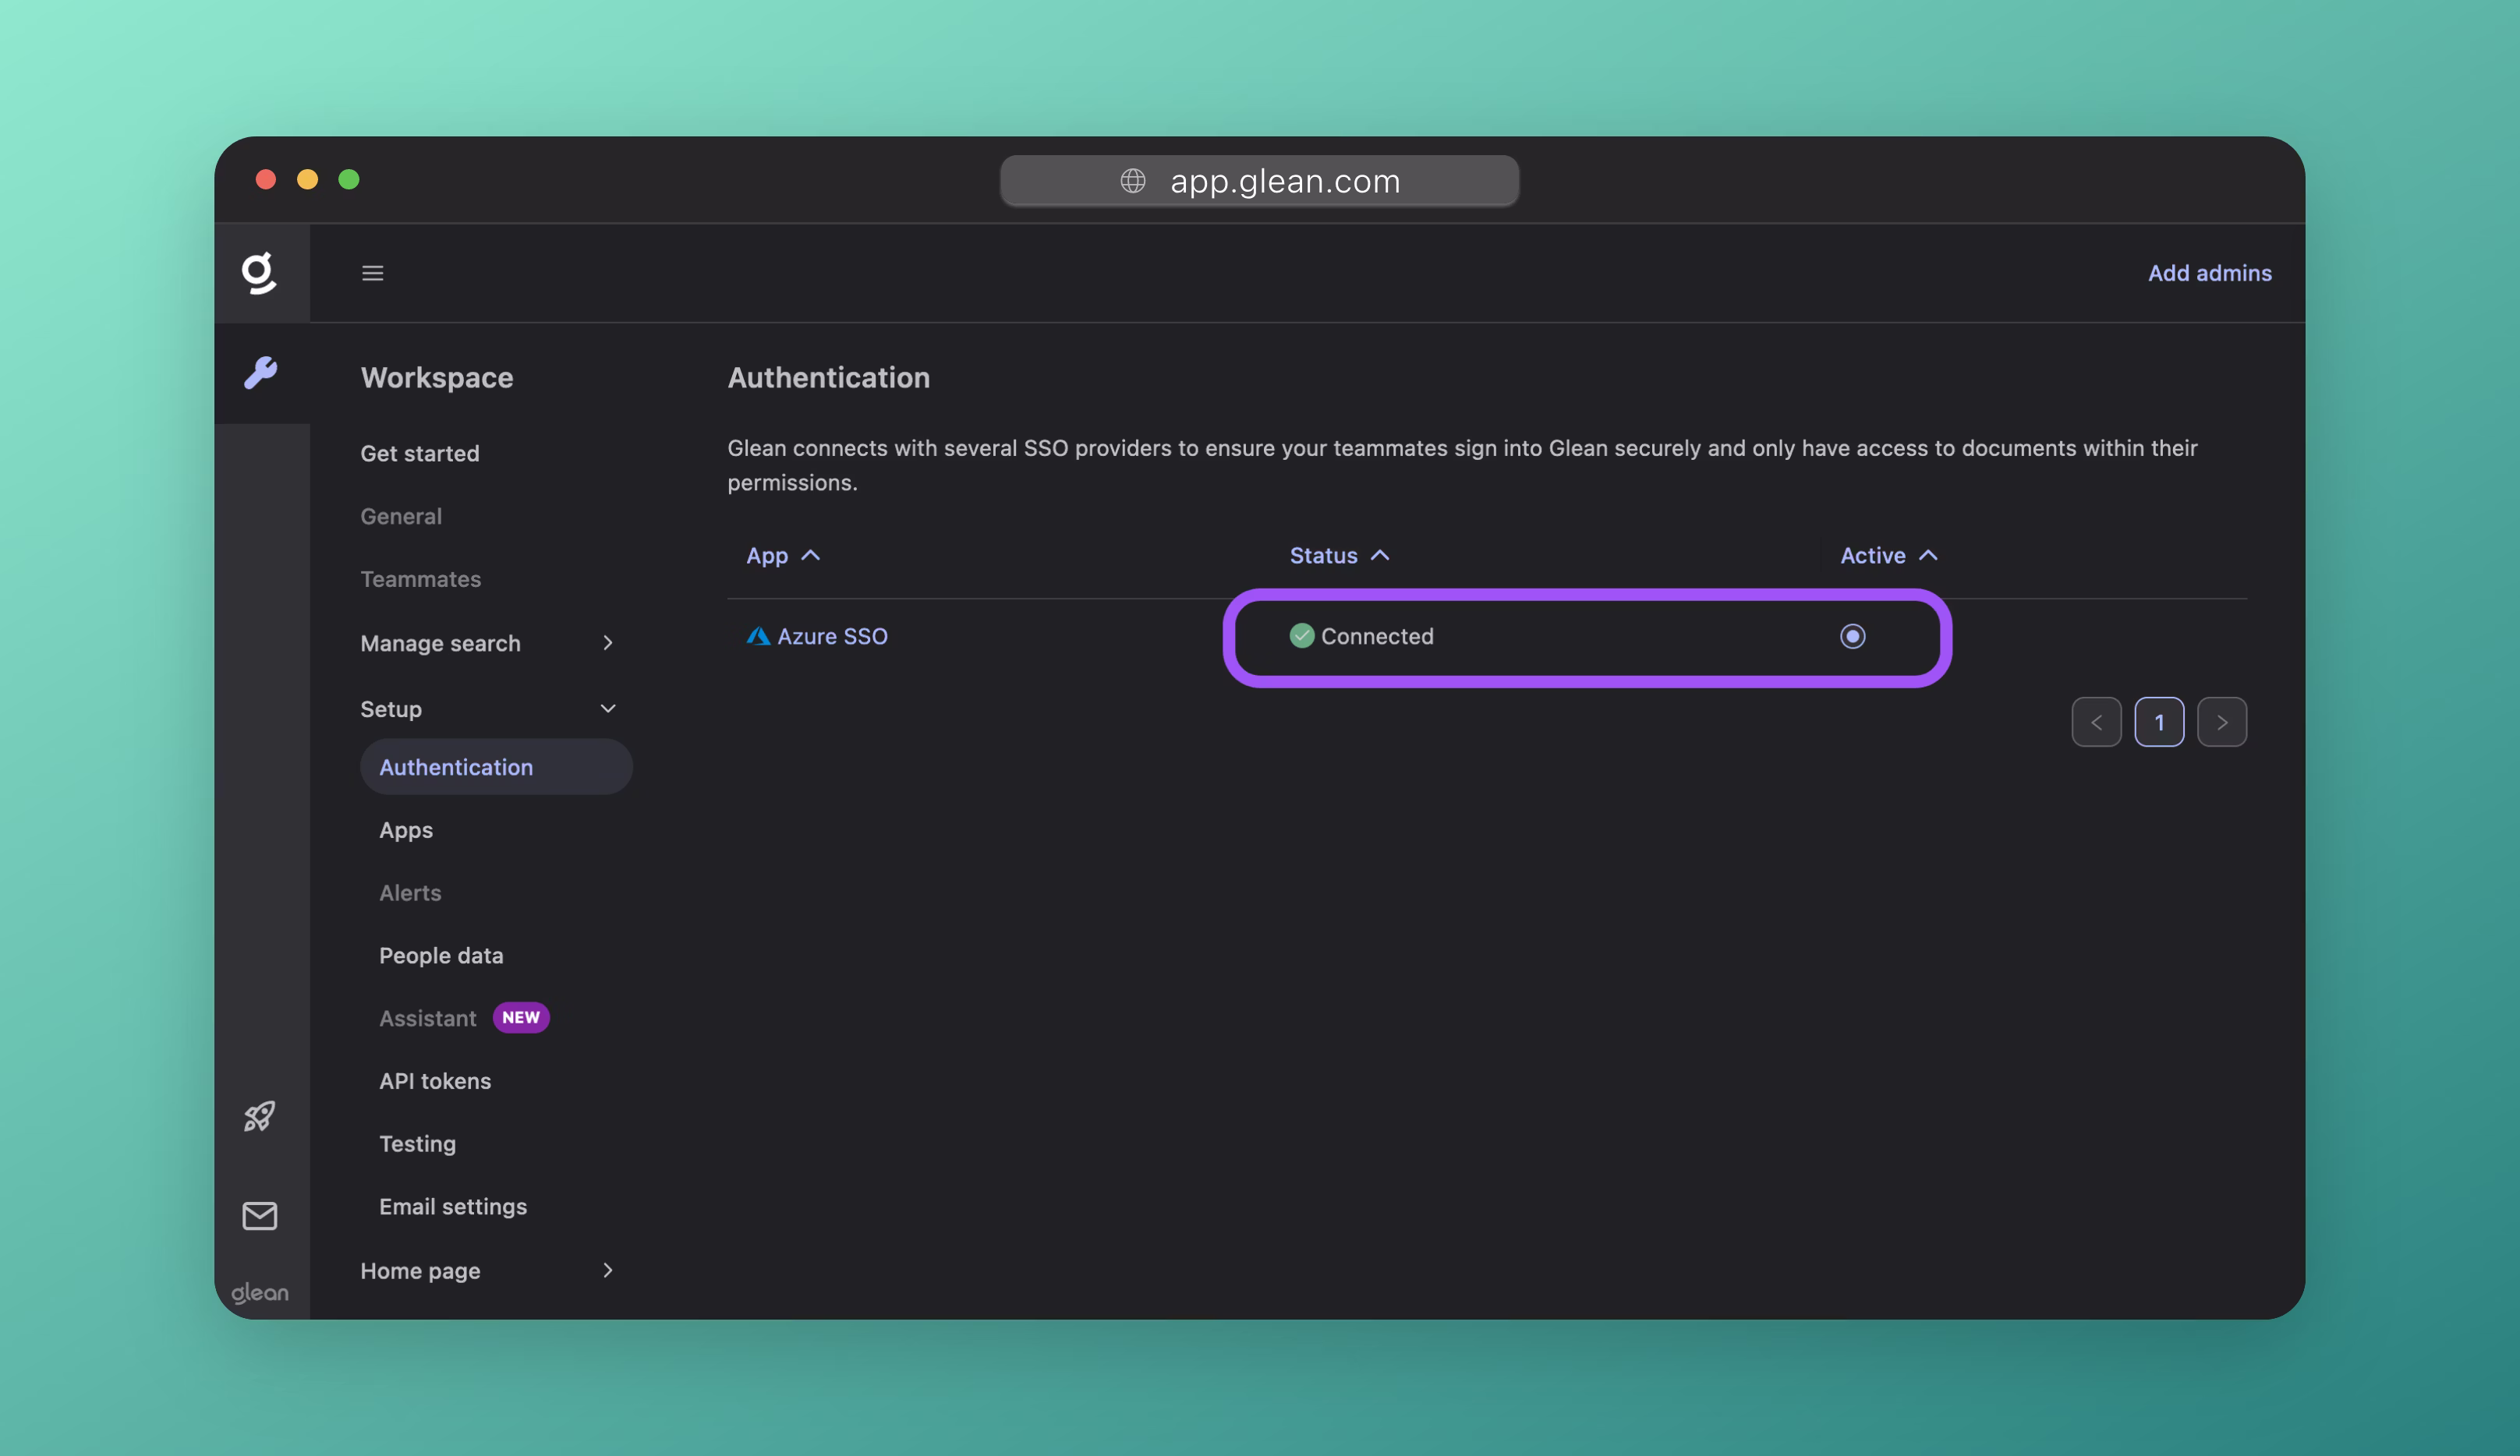
Success
Your page will refresh, and you will see your IdP listed as Connected and Active.
Note
If you don't see the Switch to ... button, it means that your Glean tenant is still provisioning and you will not be able to make the switch just yet.
You can skip ahead to the Connect Data Sources step and return to this point later.
Test the SSO Configuration
There are two key phases of SSO to test: The Glean (SP) to IdP redirect, and the IdP back to Glean (SP) redirect.
Glean to IdP
To test your SSO configuration, open a new Incognito or Private Browsing window and navigate to https://app.glean.com. Enter your work email and click Log In.
You should be redirected to your SSO platform successfully.
Warning
If redirection to your SSO platform fails, ensure you have notified Glean of all authentication domains that will be used to log in. Glean uses the domain(s) to:
- Redirect the user from the central login page to your backend Glean tenancy.
- Only permit users from the domains you have notified Glean of to log in.
If you are using SAML, this indicates that the metadata provided to Glean (such as the Login URL) is incorrect. Please check your metadata and if the issue persists, contact Glean support.
IdP to Glean
When you have been redirected to your SSO platform, attempt to sign in. You should be redirected back to Glean and successfully signed in.
Warning
If you can sign in, but redirection back to Glean fails, check whether BOTH of the Authentication URLs provided by Glean for you to enter into your IdP have been set correctly. For OIDC these are:
https://[tenant_name]-be.glean.com/authorization-code/callback?isExtension=1https://[tenant_name]-be.glean.com/authorization-code/callback
If this does not fix the issue, change the order of the URLs and try again: some IdPs can be specific about the order of the URLs specified. If your issue persists, contact Glean Support.
Sync People Data
In this section, you will synchronize your employee directory to Glean to ensure secure and accurate search results. Glean calls this identity information 'People Data'
Note
You will not be able to complete this step until your Glean tenant has been provisioned. If you were not able to switch from Magic Links to SSO in the last section, you will need to return to this step later.
About People Data
Synchronizing your employee directory to Glean is a critical part of the setup process, as it allows Glean to:
- Enforce document permissions.
- Apply role-based access controls (RBAC).
- Deliver more relevant search results.
Tip
If you configured SSO using OIDC in the last step, and your directory is the same as your SSO platform (e.g. Azure AD/Entra ID, Okta), then you have already configured people data sync as part of the SSO configuration; in which case, you now simply need to enable it as a source.
Configure a People Data Source
Required Fields
You must ensure that the following fields are populated for every user in your People Data source:
- Name (First Name, Last Name)
- Department
Warning
If you do not provide these fields, directory sync of user data to Glean will fail.
Additionally, the following fields are strongly recommended to enhance the Glean experience for your organization:
| Recommended Field | Description |
|---|---|
| Manager / Manager Email | The email of the user's manager. Used heavily in search ranking signals. Required for the org chart to be populated correctly. |
| Location | The working location of the user. Required for location-based personalization. |
| Start Date | The start date of the user. To show tenure in the user's profile page. |
Initial Setup
Navigate to Admin Console > Settings > People data.
If your SSO platform supports directory synchronization, it will be listed here with a green checkmark and status Ready to sync. Click the SSO provider's icon to proceed.
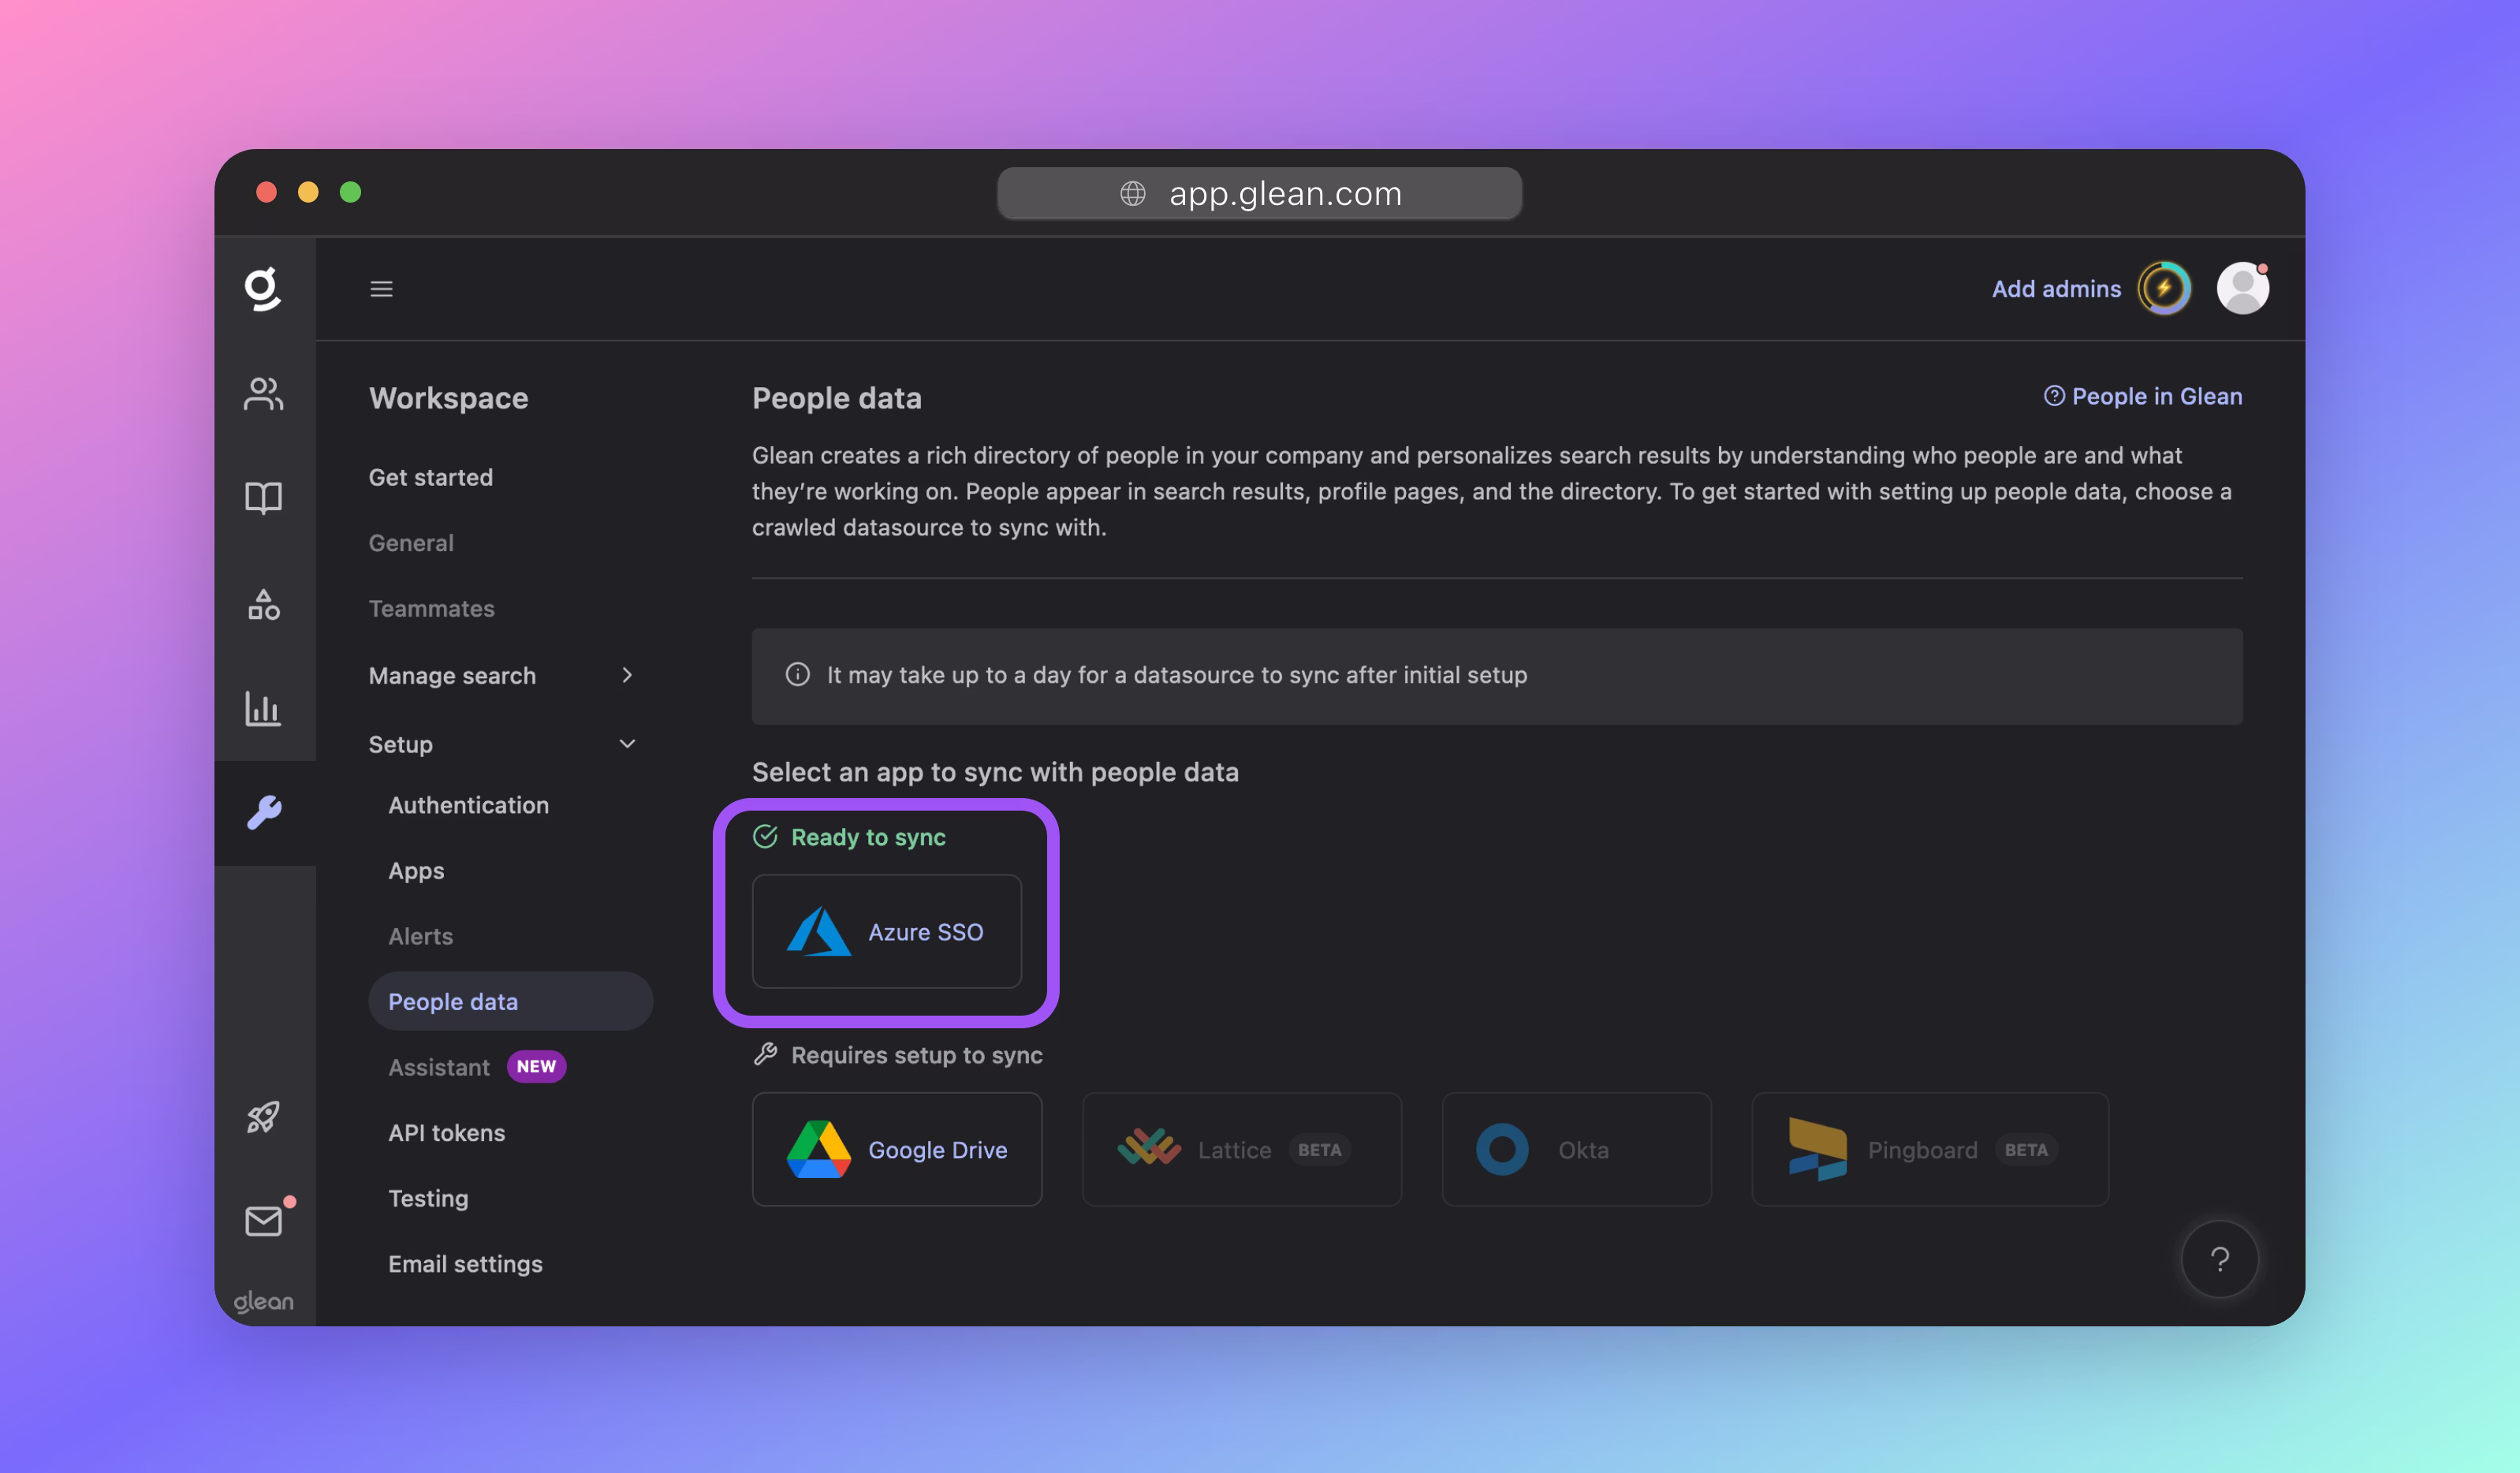
If you wish to set up an alternative source, click the appropriate service and follow the setup instructions.
Using a People Data source not listed?
You will need to manually upload your directory data to Glean using CSV, or leverage Glean's Indexing API to push your directory data to Glean.
In some cases, Glean may also be able to pull your people data from another connected data source such as BambooHR, or Facebook Workplace. Please contact your Glean engineer or Glean support for more information.
Attribute Mapping
On the next screen, and if your People Data source supports it, you will be able to map attributes from your directory to the required field in Glean. This is useful if you store user information differently than what is standard.

For example, you might want to infer a user's manager from their manager's email. If they have an Okta field called managerEmail, you could map managerEmail to the Glean attribute "Manager".
If you are unsure about what information is stored in a given directory attribute, you can preview information pulled directly from your directory specifically for your directory profile within the "Glean profile preview" column.
If your People Data source does not support custom mapping in the Glean interface, the directory attributes will be fixed on the page. Please contact Glean support if you require this feature but do not see it for your configured People Data source.
Initiate the Sync
Before you start the sync, you can view statistics about what information will be included. For example, how many users will be created, and how many departments you have. If this is different from what you expected, check that you have provided the correct permissions within the People Data source.

Click Save at the bottom of the page to save your changes and begin synchronization. From this point onwards, the sync is automatic: Glean will check your People Data source periodically for any changes.

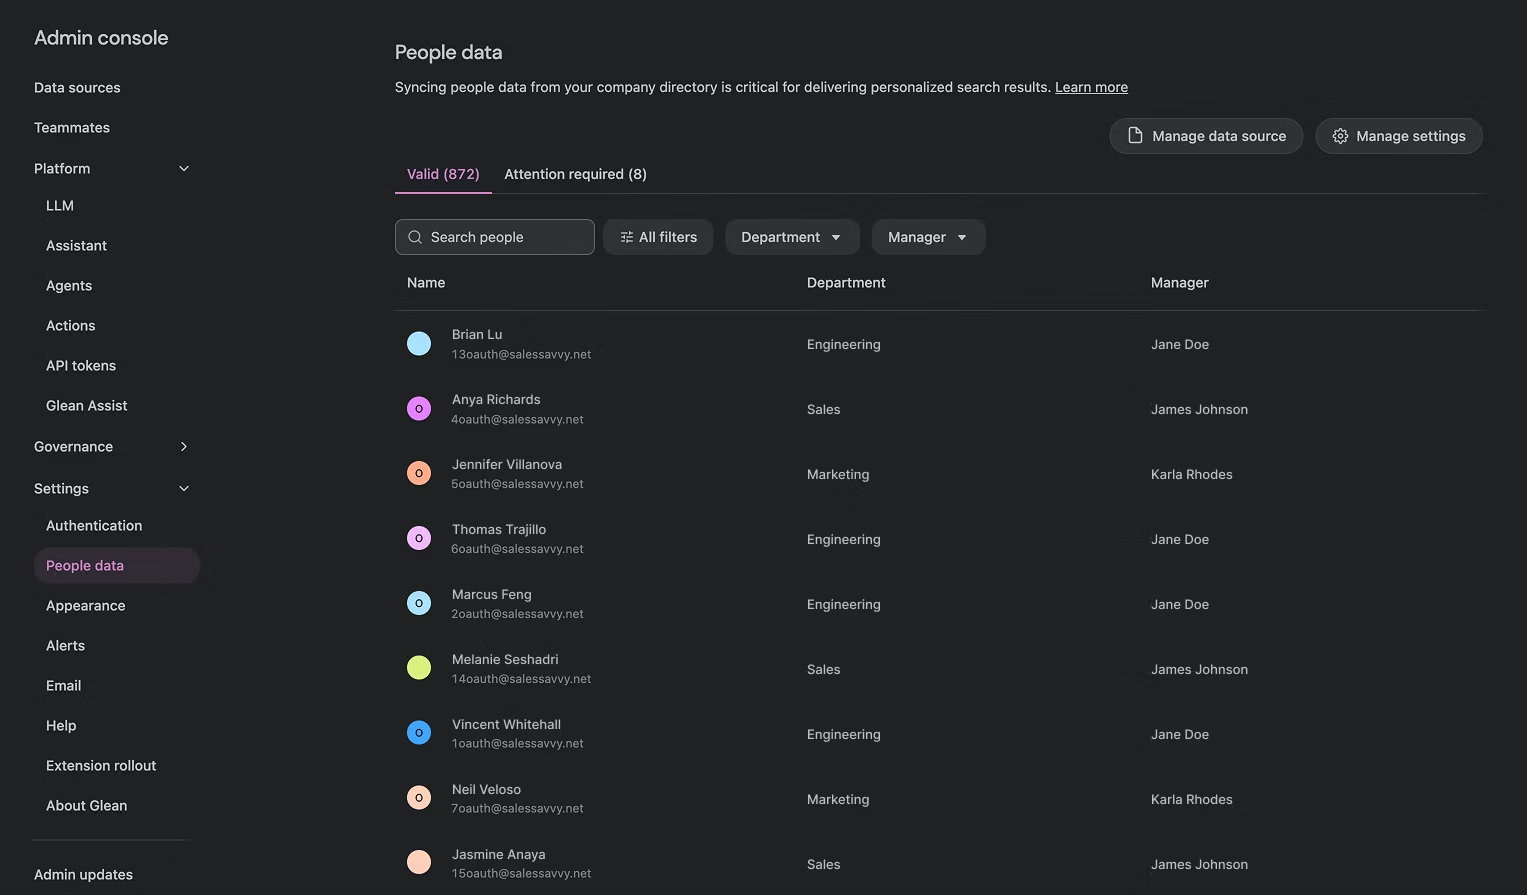
Verification
The People Data sync will start, and over the next hour, you will start to see your employee directory being populated in Glean.
The synchronization is not immediate: Glean needs to crawl your people data first, and then index it so that it is usable in search.
Tip
It can take 2‑4 hours for the initial sync to complete.
You can return to this page later to validate that your sync is working.
Warning
If you do not see people data start to show up within a few hours, this typically points to a permissions issue.
Ensure that you have provided Glean with the correct permissions within your IdP when you configured SSO.
For example, for Azure AD, it is critical to have Directory.Read.All and User.Read.All as Application permissions NOT Delegated Permissions. If your issues persist, please contact Glean support.
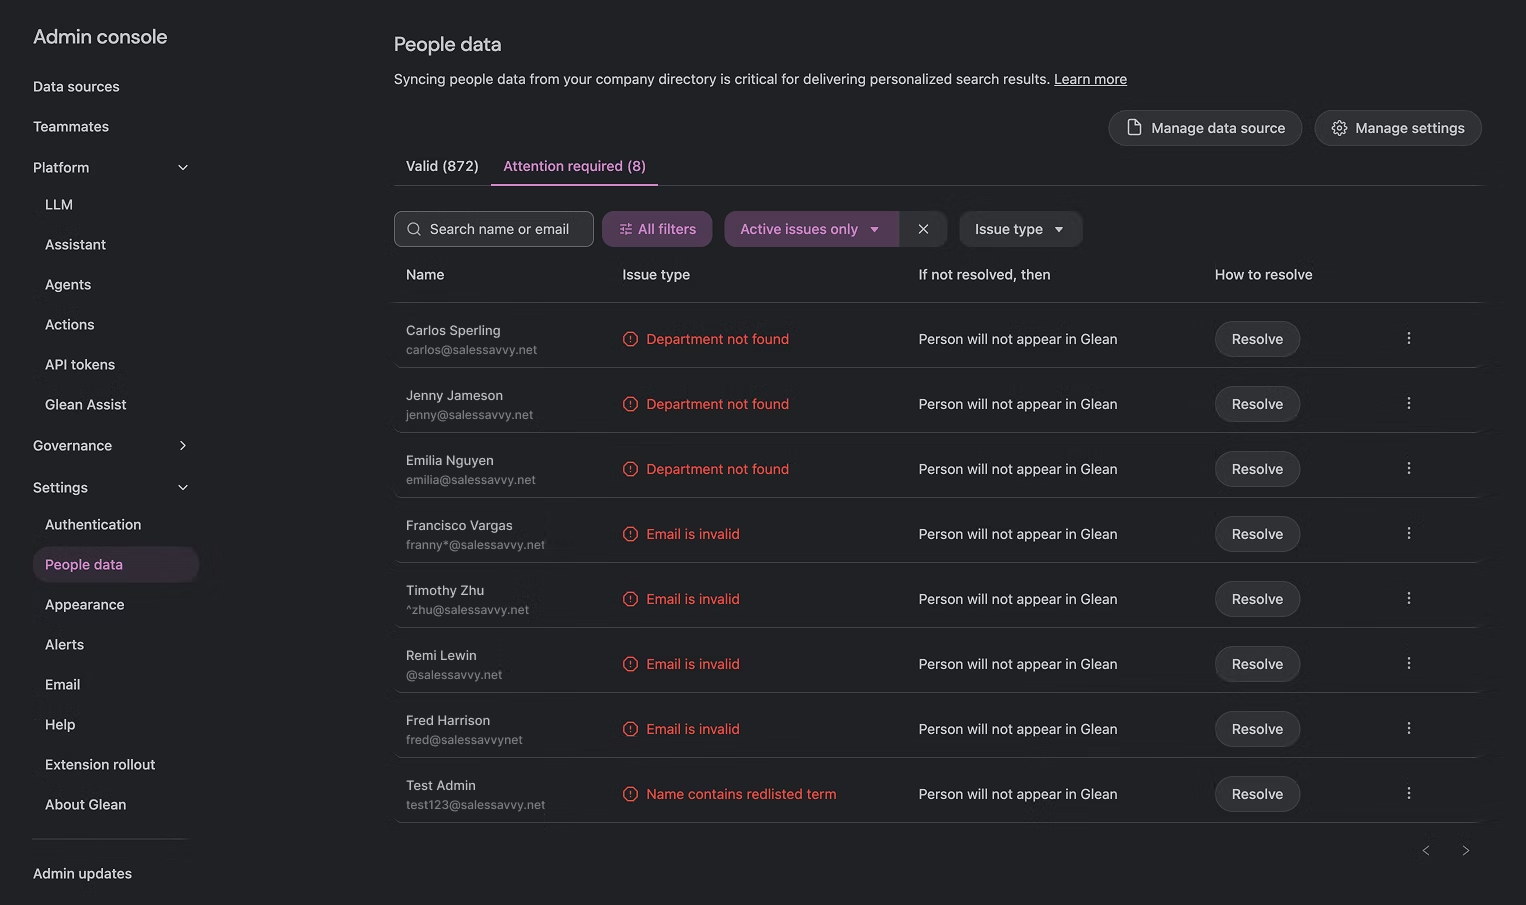
Missing / Invalid People
Glean can encounter issues when synchronizing certain people from your directory. Common issues include:
- A person's email is invalid or malformed (e.g. email is missing the "@ " symbol)
- One or more required attributes are missing
- A person's name or email contains a redlisted term
You can see all of the people marked as missing in the "Attention required" tab on the People Data page. Click the Resolve button next to a missing person on the table to see the set of instructions you can follow to resolve this issue.
Manual Upload (CSV)
For instances where your directory information cannot be automatically synchronized, Glean also supports the manual upload of people data as a set of comma‑separated values (.csv).
Because this method is not asynchronous, Glean does not recommend it. Any updates to your directory (new employees, departures, or changes) will require you to re‑upload a new CSV.
Why can't Glean get identity information from the SAML token?
-
The SAML Assertion Token does not contain all of the identity data required by Glean, and
-
Changes to a user account are only reflected in the SAML token when it is refreshed on user re‑authentication.
This means that Glean would not be aware of any changes to a user's identity attributes or group memberships until after re‑authentication occurs; which is not desirable from a permissions enforcement perspective.
CSV Format
The following are mandatory fields:
| Required Field | Description |
|---|---|
first_name |
The user's first name, eg: Ben |
last_name |
The user's last name, eg: Benson |
email |
The user's email, eg: [email protected] |
title |
The user's job title, eg: Software Engineer |
department |
The user's department, eg: Engineering |
The following are not mandatory, but highly recommended fields to enhance the Glean experience for your organization:
| Recommended Field | Description |
|---|---|
manager_email |
The email of the user's manager. Used heavily in search ranking signals. Required for the org chart to be populated correctly. |
location |
The working location of the user. Required for location-based personalization. |
start_date |
The start date of the user. To show tenure in the user's profile page. |
A sample CSV is included below:
name,email,first_name,last_name,nickname,title,department,business_unit,manager_email,location,city,country,desk_location,start_date,status,photo_url
Samuel Sample,[email protected],Sam,Sample,Sam,CEO,Leadership,Leadership Team,,"Sydney, Australia",Sydney,Australia,"Desk 1/25",27/09/22,active,https://i.postimg.cc/rp2Qfkz6/WFH-2.jpg
Ellie Example,[email protected],Ellie,Example,,CFO,Leadership,Leadership Team,[email protected],"Palo Alto, California",California,USA,,26/10/22,active,https://i.postimg.cc/rp2Qfkz6/WFH-2.jpg
Steve Smith,[email protected],Steve,Smith,Steve,CTO,Leadership,Leadership Team,[email protected],"Auckland, New Zealand",Auckland,"New Zealand","Table 1",27/10/22,active,https://i.postimg.cc/rp2Qfkz6/WFH-2.jpg
Benjamin Benson,[email protected],Benjamin,Benson,Ben,"Software Engineer",Engineering,Engineering,[email protected],"Tokyo, Japan",Tokyo,Japan,"Level 6, 1/6",03/12/22,deactivated,
Upload the Data
Select CSV as a People Data source and select your CSV file when prompted.
If you do not see this as an option or are having difficulties with the upload, please contact Glean support.
Connect Data Sources
In this section, you will learn how to connect the sources of data that Glean will crawl and index for search
About Data Sources and Connectors
Data Sources
Data Sources are the platforms, services, or cloud apps where your data resides. These could be:
| Category | Example Apps |
|---|---|
| Cloud Storage | Box, OneDrive |
| Outlook, Gmail | |
| Communication | Slack, Teams |
| Documentation | Confluence, Docusign |
| Ticketing & Support | Jira, Zendesk |
| Code & Engineering | GitHub, BitBucket |
| HR | Workday, Lattice |
| Sales & Marketing | Salesforce, Marketo |
| Project Management | Asana, Monday |
| ...and more! |
Connectors
Connectors are the tools/integrations that Glean uses to connect to your data sources and crawl data from them. Today, Glean has 100+ connectors already built to allow you to connect to different data sources in use at your company.
Connectors typically pull data from your data sources securely over API, but may also receive data from your data sources via a webhook.
Select a Data Source to Connect
Navigate to Admin Console > Data sources and click the Add app button at the top-right.
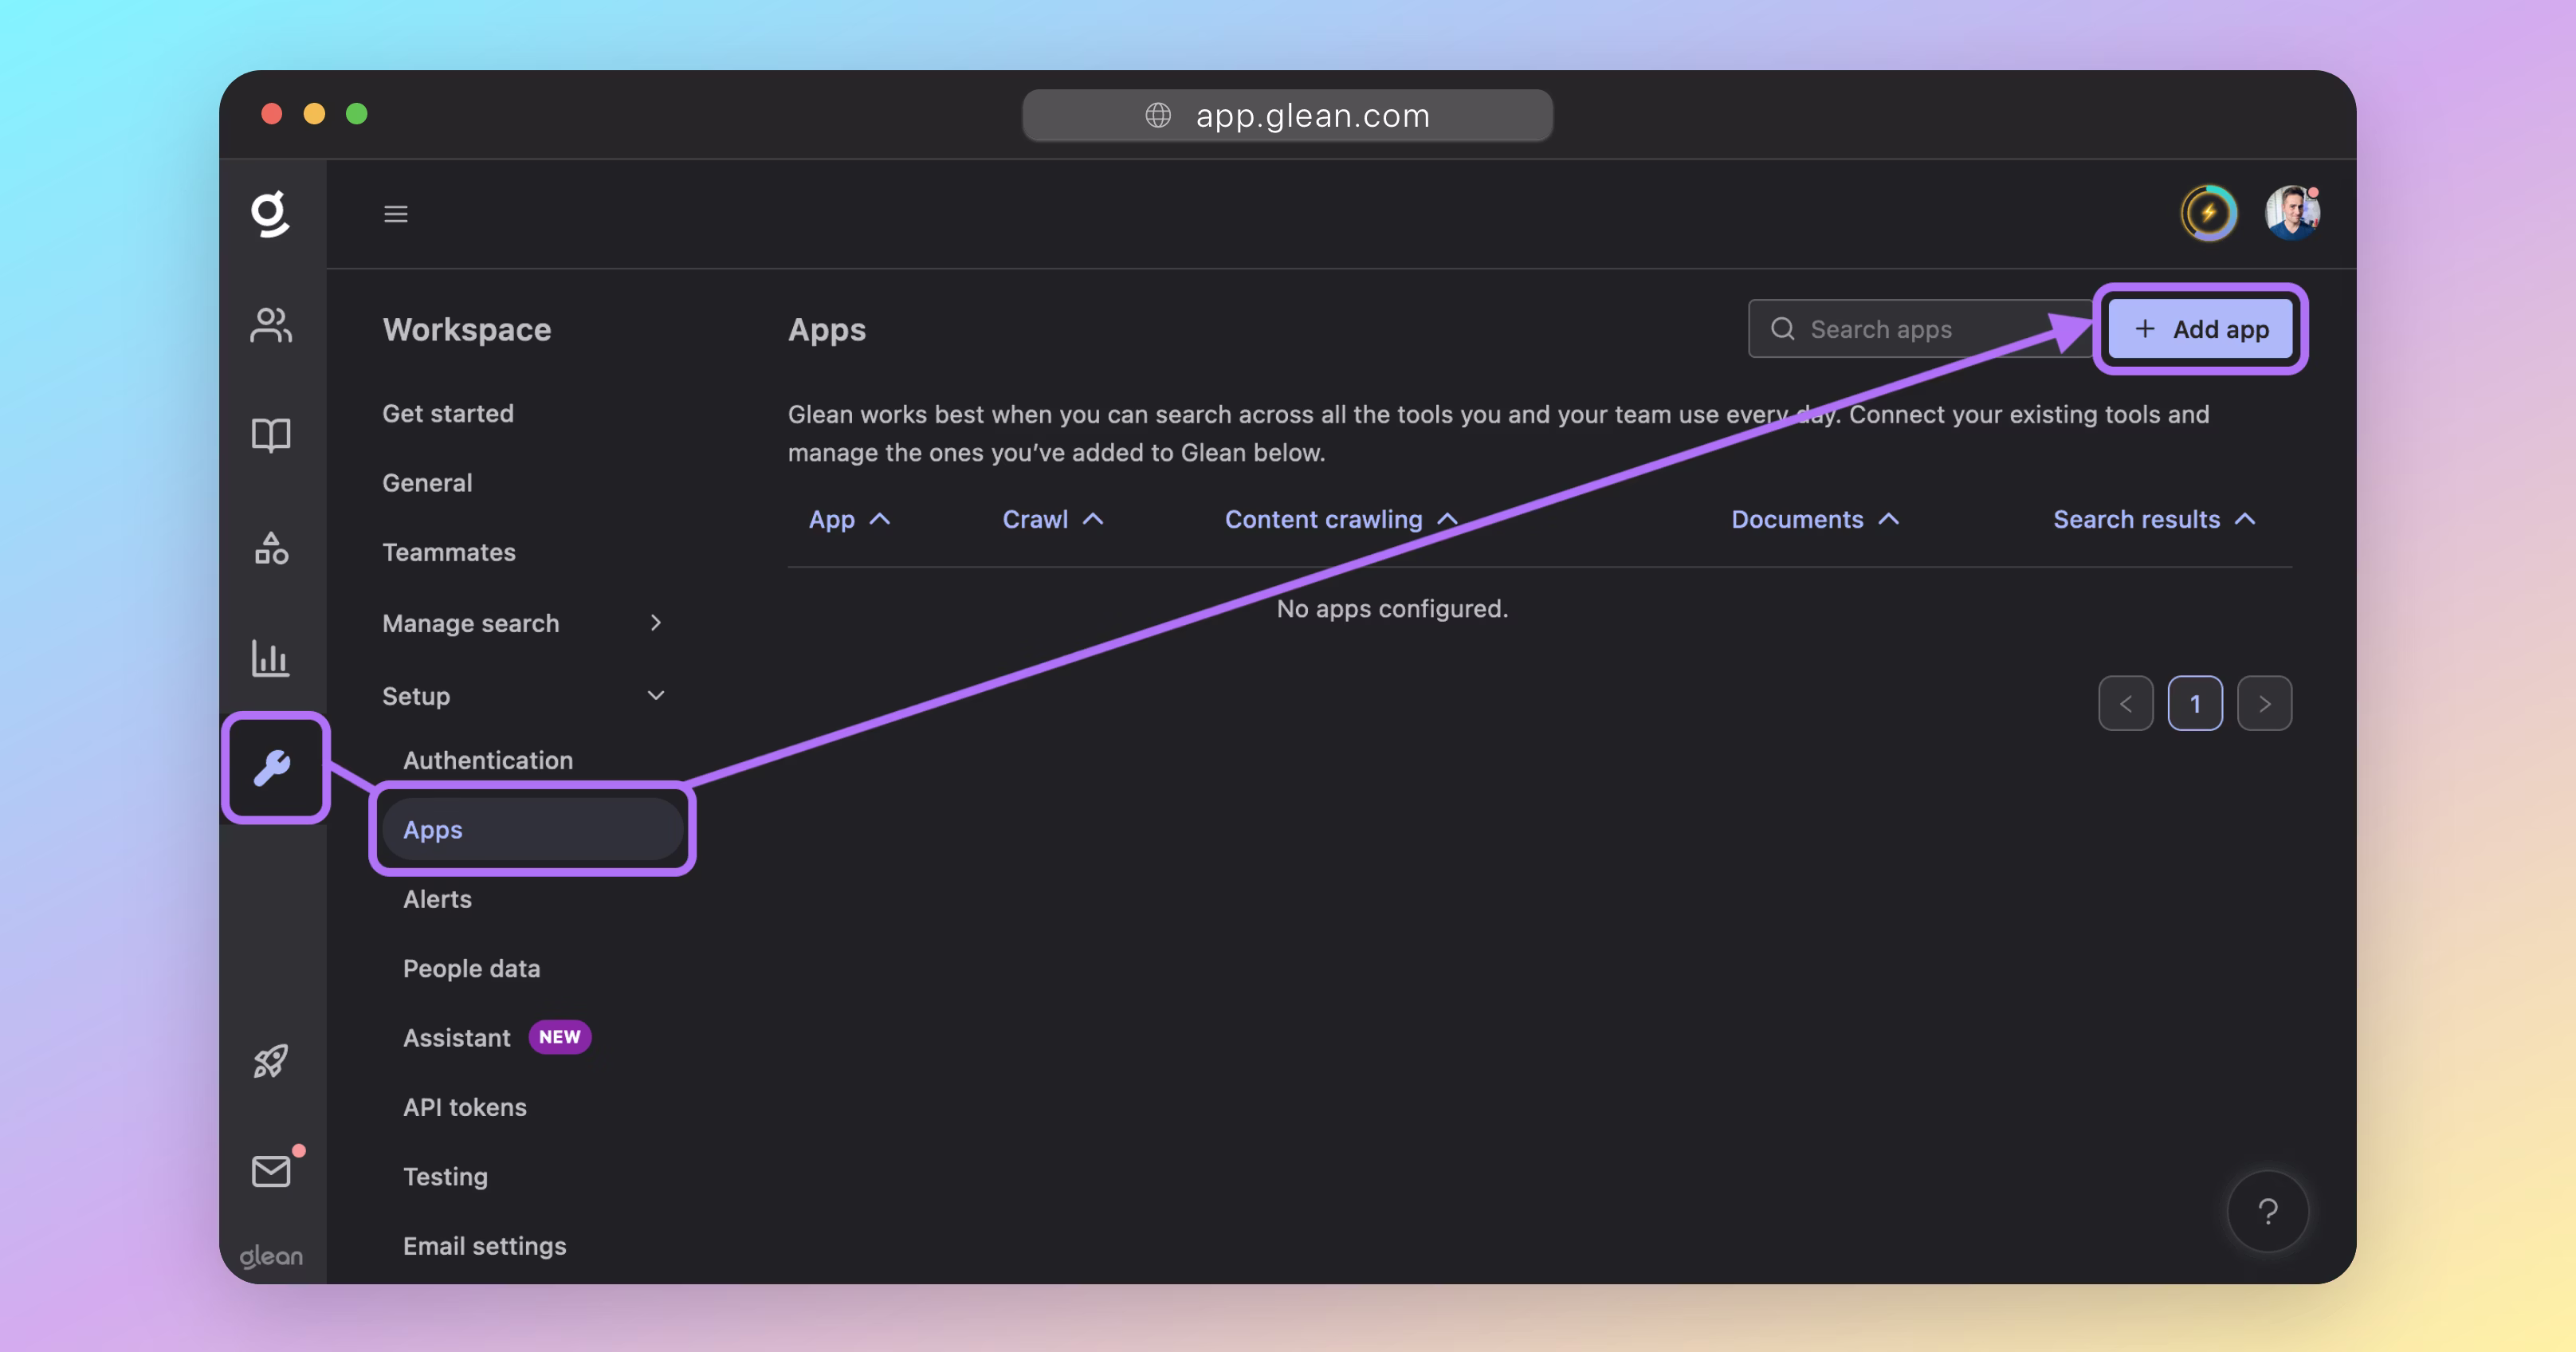
Select the data source that you want to connect Glean to and follow the instructions that are presented on-screen.
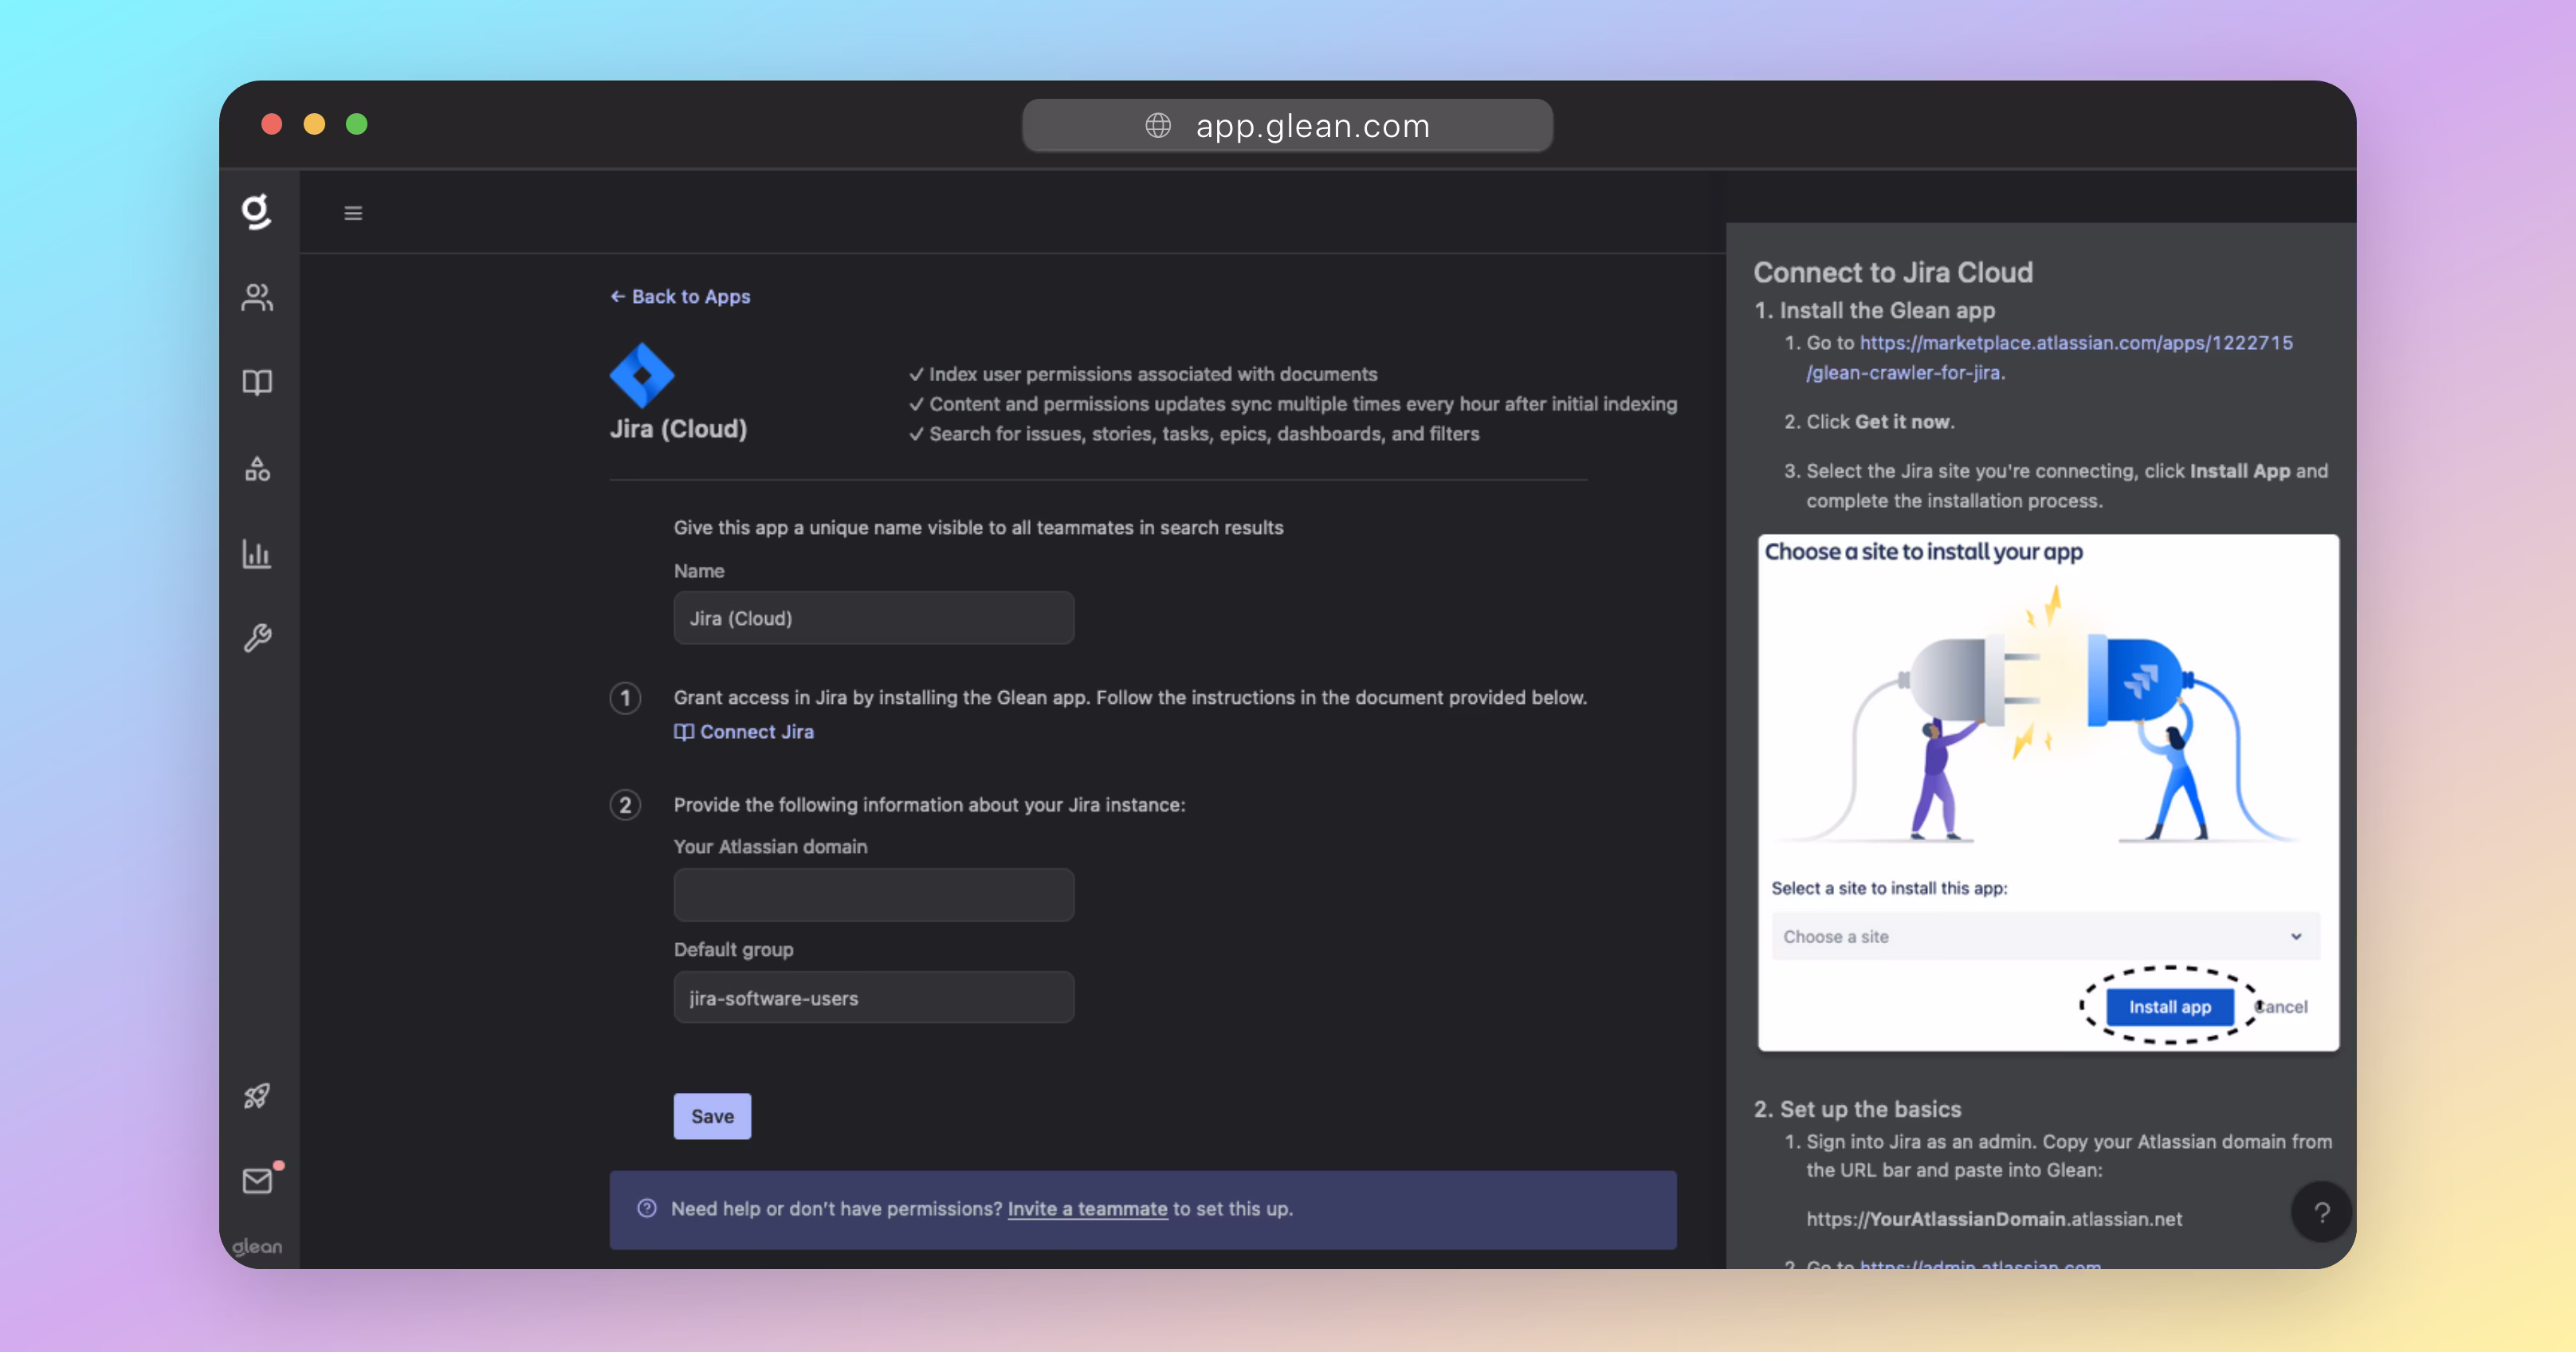
Connector configuration is typically achieved via OAuth and/or via installing Glean via your app's marketplace/store (e.g. Atlassian Marketplace, Box App Center, etc).
As part of the setup flow for each connector, your API credentials and permissions will be validated.
For each piece of data within a datasource, Glean will crawl 3 things:
- The contents of the asset itself (ie: spreadsheet, document, message, email, event, etc)
- Access permissions for the item (ie: which users have access to the item)
- Activities performed on the item (ie: when was the item created/posted/modified/viewed/etc and by which users?)
Glean only asks for the most minimal permissions to perform the above, however, this varies between datasources based on the capabilities of the API provided by the cloud service.
Warning
You must apply any API access permissions in the setup documents exactly as referenced.
Failure to set the correct API access permissions will cause your Glean crawl to fail, or for data to be missing from Glean.
(Optional) Apply Crawling Restrictions
If you would like to restrict the content that Glean crawls, DO NOT start crawling after saving the connector configuration.
Crawling restrictions can be applied from Admin Console > Data sources once the initial configuration for the datasource has been saved.
The restrictions that are supported vary between apps, but most data sources support at least two of the following restrictions:
- Time-based restrictions (eg: Only crawl created or accessed in the last 6 months)
- User-based restrictions (eg: Only crawl content from the specified users)
- Group-based restrictions (eg: Only crawl content from the specified AD group)
- Site/channel-based restrictions (eg: Only crawl content from the specified site or channel)
- Folder-based restrictions (eg: Only crawl content from within the specified folders)
For most apps, greenlisting (explicit inclusion), and redlisting (explicit exclusion) are typically both supported.
Tip
Not all crawling restrictions are available in the UI: some can only be applied by Glean. Contact your Glean account team or Glean support for additional information.
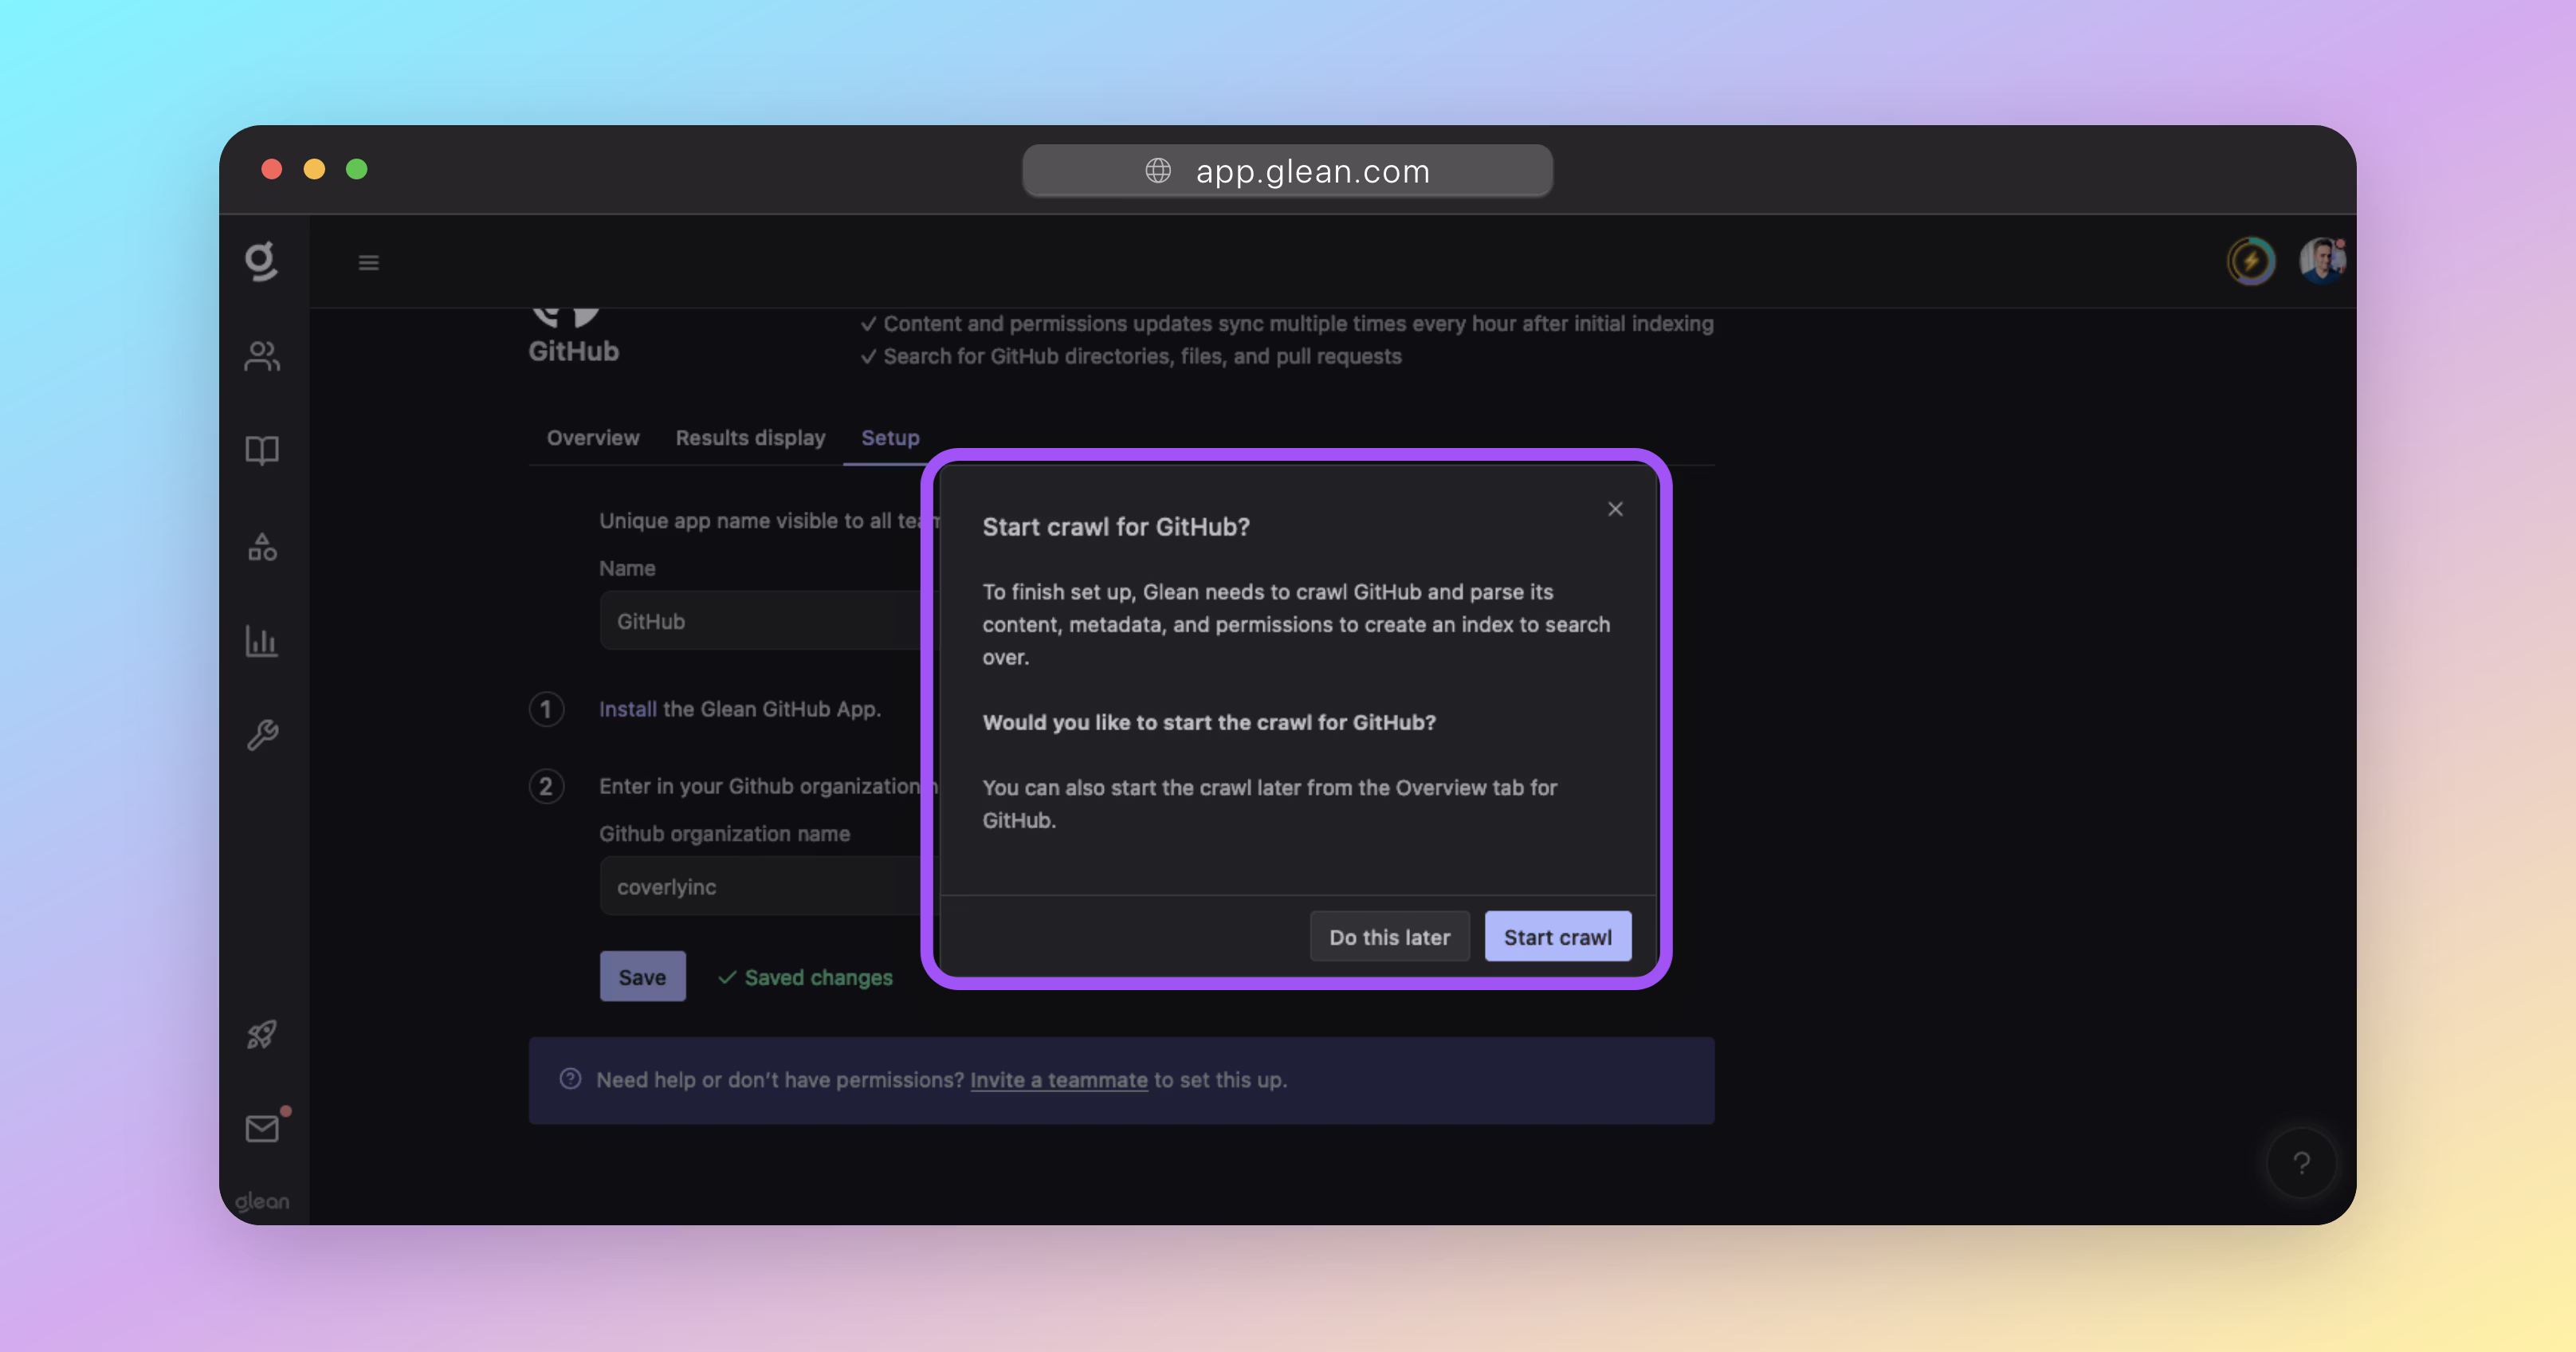
Start Crawling
Once you have connected your data source, you can initiate the crawl for it.
Crawling is the process in which Glean sifts through the data in each of your connected apps and indexes it for search.
To start the crawl, click on the Start crawl button after setting up the connector configuration.
You can also start the crawl later by selecting the app under Admin Console > Data sources, and selecting Start crawl.
Checking the Crawl Status
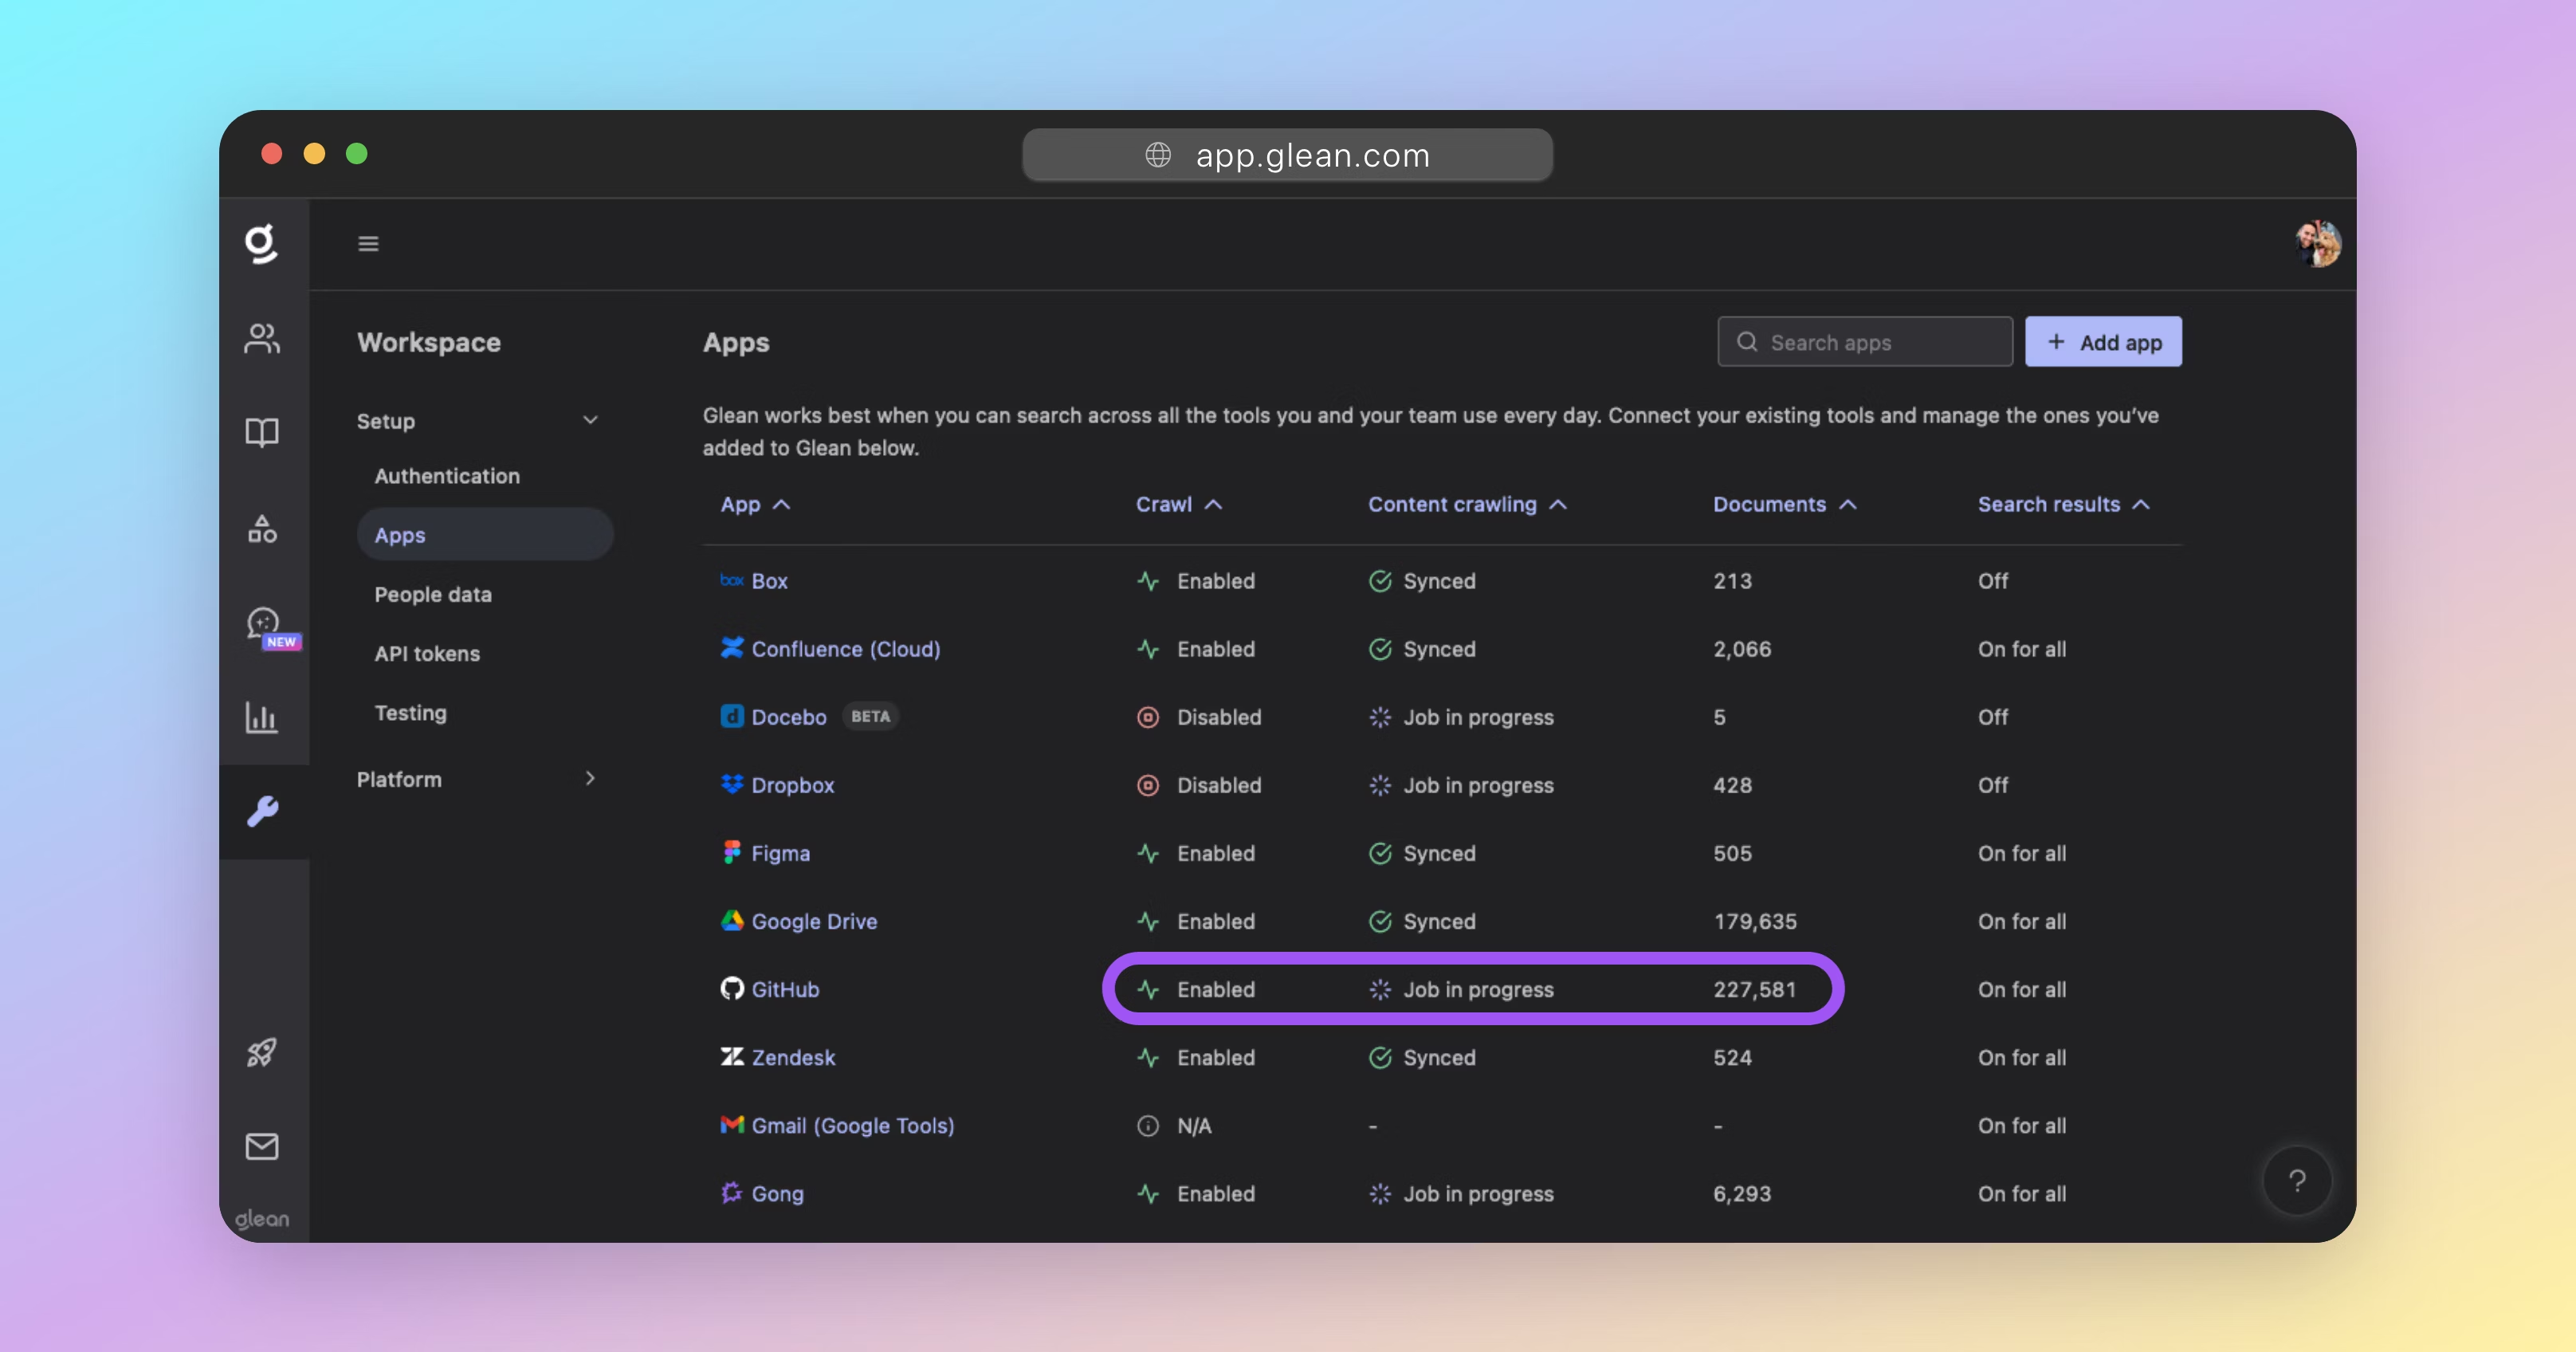
You can check the status of your crawl at any time by going to Admin Console > Data sources and reviewing the table of configured apps.
Here, you will see information about the progress of the crawl, including how many documents have been indexed and any errors that may have occurred.
Note
For crawls of large data sources, or data sources with low rate limits, it is normal for the document count to be low initially and then exponentially increase over a few days.
If the document count remains low after a few days, please check the permissions granted to the Glean connector and contact Glean support.
How long does a crawl take?
The initial crawl for any data source will always take a while; the total time of which is dependent on two key factors:
- The size of the data source (eg: number of documents/messages, and the size of each).
- The rate limit of the data source's API.
If an API has a low rate limit, this will affect how quickly Glean can crawl it for items. Likewise, data sources containing a large number of documents, files, or messages, will also take longer to crawl.
For a typical enterprise data source, expect the initial crawl to take anywhere from 3 days, up to 10 days for large data sources with low API rate limits.
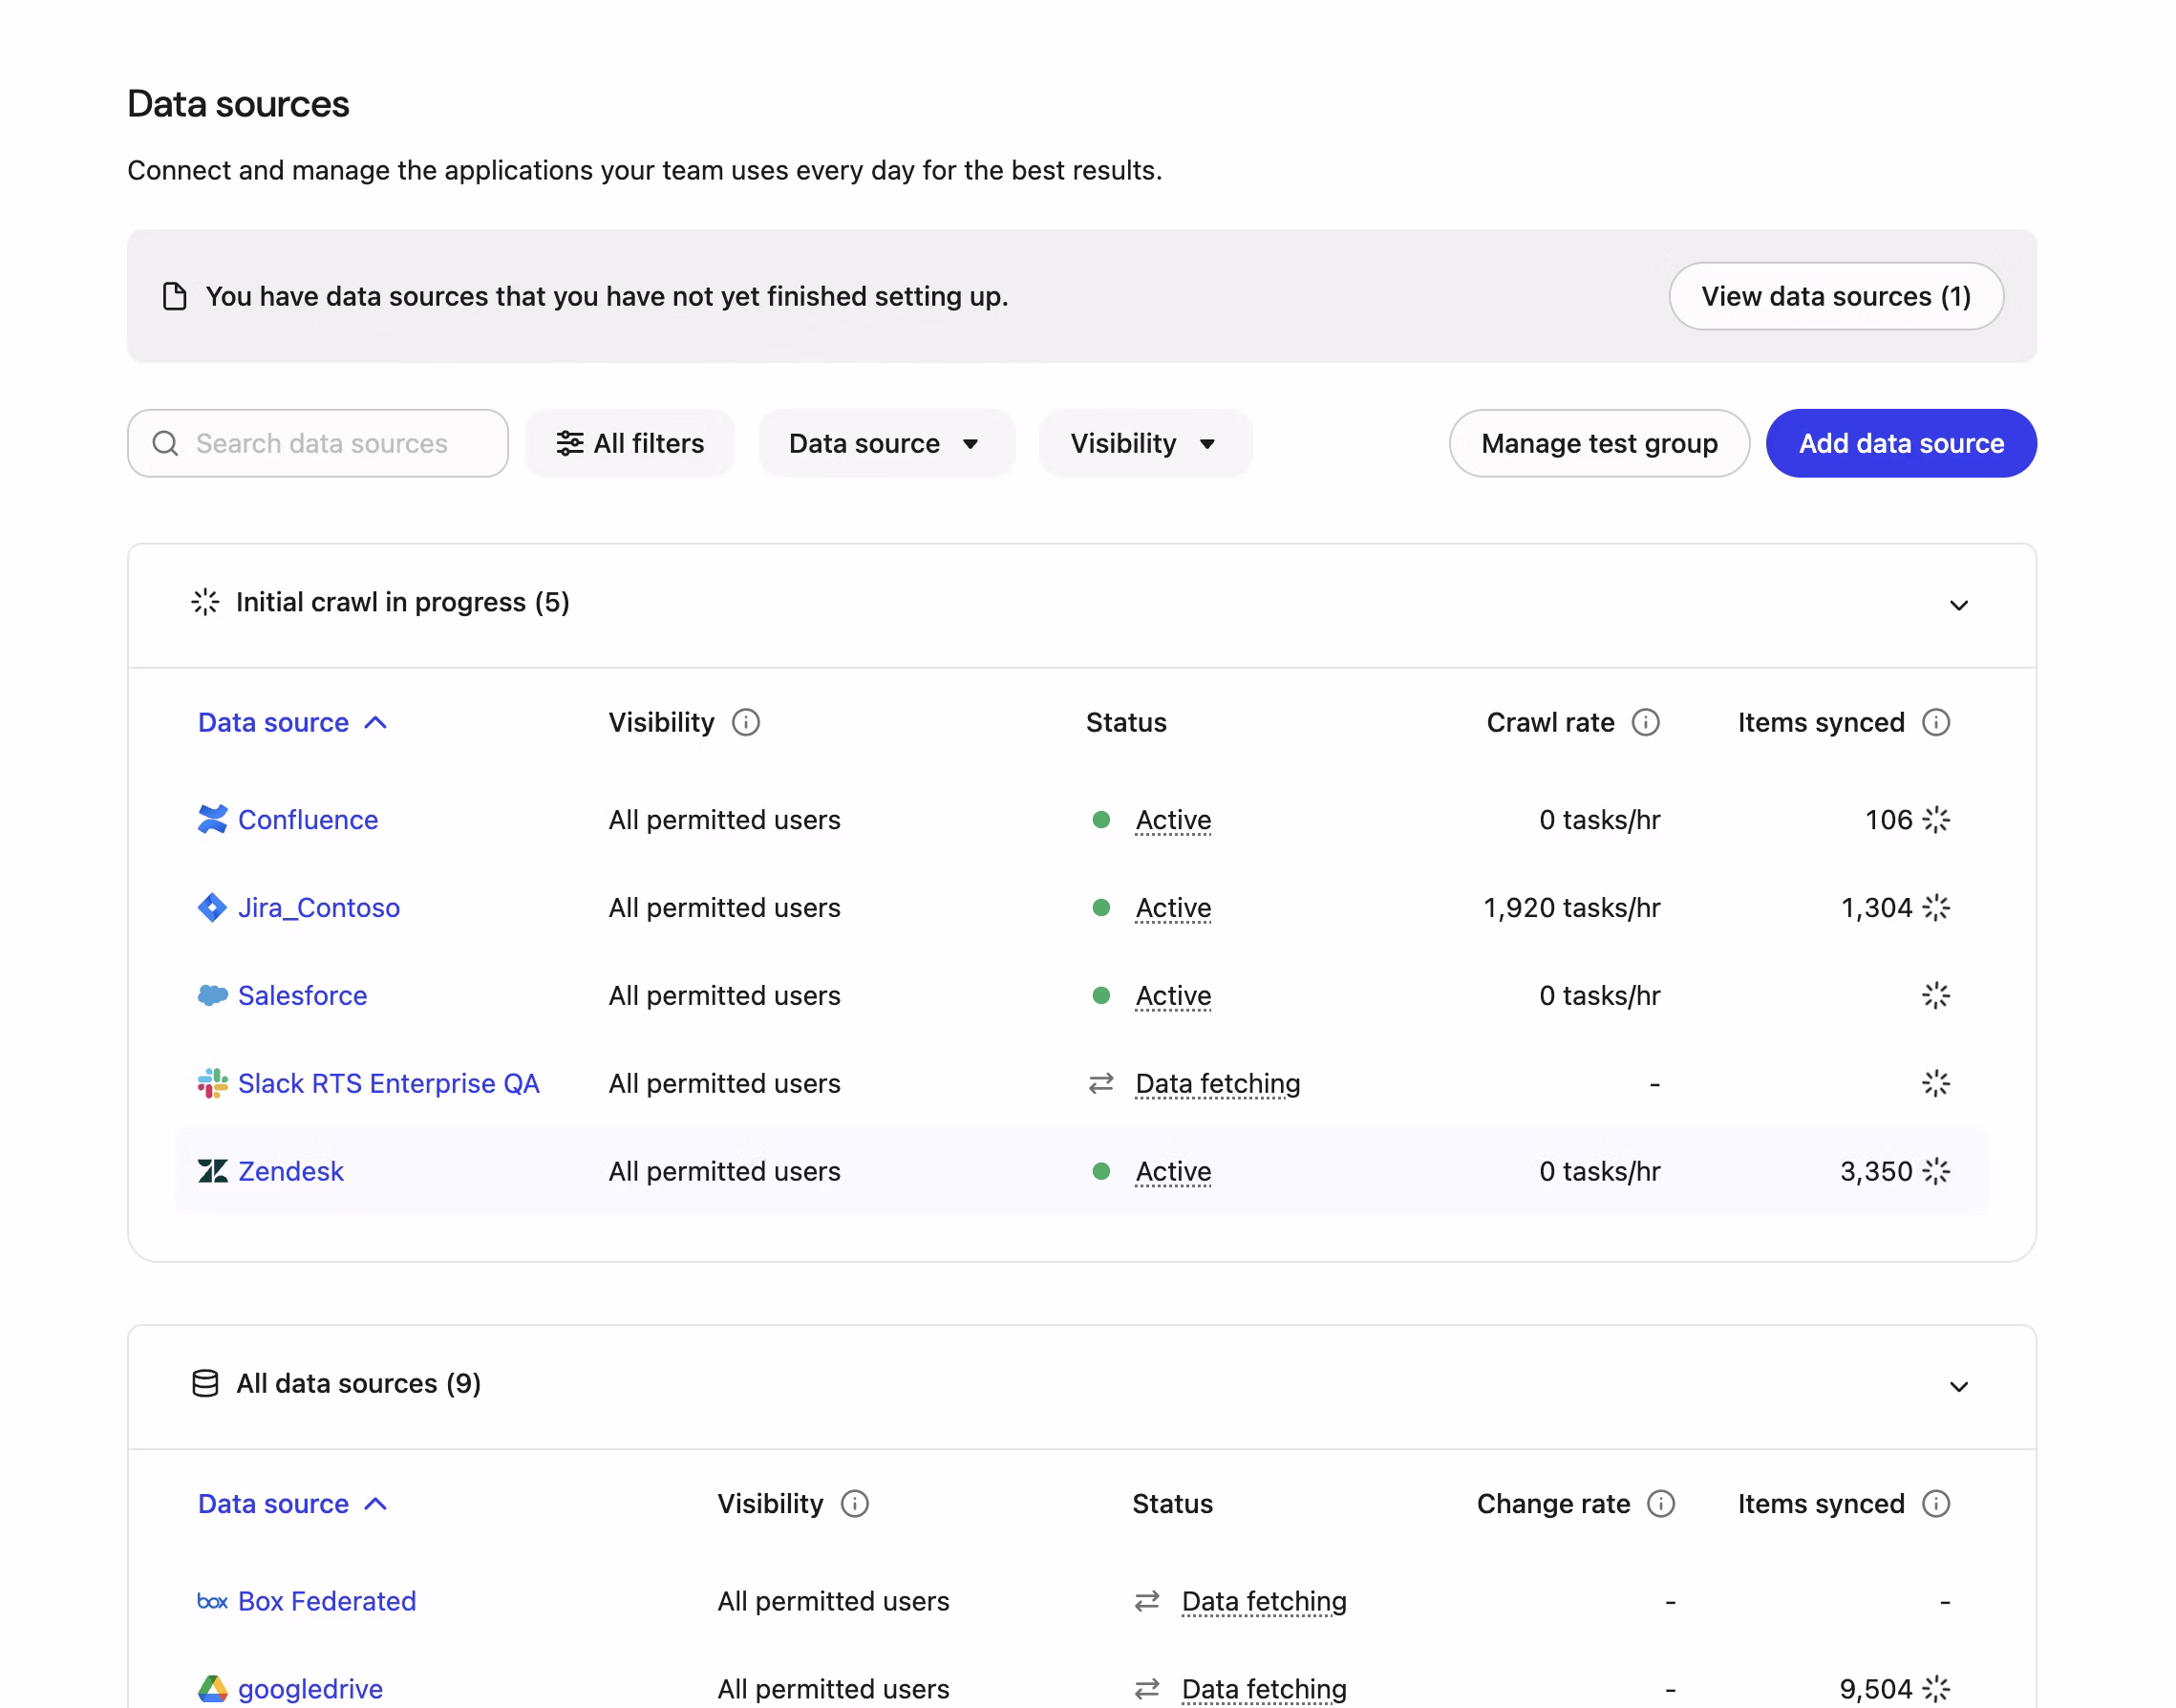
On the Data sources page, two columns Crawl Rate and Change Rate help you quickly assess crawl activity and freshness. These provide a simple heartbeat so you can confirm that work is progressing and that recent updates are being synced.
During initial sync, the table shows Crawl Rate which is the hourly rate of crawling tasks across document parts, for example, content, metadata, permissions. You can use this information to confirm active progress.
After the initial crawl completes, the table shows Change Rate which is the number of user-driven changes synced in the past 24 hours, for example, edits, additions, deletions. You can use this information to validate ongoing freshness.
Metrics typically refresh every 5–10 minutes.
You can sort these columns to focus on the most or least active data sources.
Some connector types may not display these metrics, for example, federated‑fetch only, customer‑managed, and web connectors.
Crawling & Learning Process
Now that your company apps are connected to Glean, three essential background processes will take place; each crucial for Glean's functionality
In the previous section, you successfully linked all your company apps to Glean. Now, three essential background processes will take place, each crucial for optimizing Glean's functionality:
- Crawling - Glean fetches data from your connected apps.
- Indexing - Glean creates a model of the data that was fetched and incorporates it into your organization's search index.
- Learning - Glean processes the data that was fetched using Machine Learning (ML) to create a search and ranking algorithm tailored to your organization's data and users.
Timelines for Completion
The time required to complete all 3 processes will vary depending on the size of your organization and the volume of content that Glean needs to process. The combined crawling and indexing processes can take approximately:
- 2‑3 days to complete for a typical small organization, or small volume of content.
- 10‑14 days for a typical large organization, or large volume of content.
The M/L process can take an additional 2‑14 days, depending on:
- The GCP or AWS region that your Glean tenant was deployed to (and the tier of TPU/GPU hardware available in that region).
- The amount of content that needs to be processed as part of each M/L workflow.
These times should be used as an estimate only.
Your Glean engineer will advise you once all crawling, indexing, and learning processes have been completed. The remainder of this document will cover these processes in more detail.
For now, you can proceed to the next step: Populate Content.
About Crawling & Indexing
When you initiate a crawl for a data source for the first time, the crawling and indexing processes are initiated. During this time, Glean will:
- Crawl the content (and associated permissions & activity metadata) for the selected data source.
- Create the Glean Knowledge Graph by indexing the crawled content, mapping it together, and creating a real‑time model that can be referred to in response to a user's query.
Note
Crawling is the process in which Glean fetches data from within your organization's sources of data for the purposes of creating the search index.
The Knowledge Graph is a real‑time model of your organization's indexed information. It is a map that links all content, people, permissions, language, and activity within your organization. It is designed to provide users with the most personalized and relevant results for their queries in a matter of milliseconds.
Indexing is the process in which Glean makes content ready for display in search results by creating (or updating) your organization's Knowledge Graph: the mapping between all content, people, permissions, language, and activity in the company.
Checking the Crawling & Indexing Status
You can check the status of your in‑progress crawls at any time by going to Admin Console > Data sources and reviewing the table of configured apps.
Here, you will see information about the progress of the crawl, including how many documents have been indexed, and any errors that may have occurred.
Crawling & Indexing FAQ
How long does the initial crawl and index process take to complete?
Crawling
The initial crawl for any datasource will always take a while; the total time of which is dependent on two key factors:
The size of the datasource (eg: number of documents/messages, and the size of each).
The rate limit(s) of the datasource vendor's API.
If an datasource vendor's API has a low rate limit, this will affect how quickly Glean can crawl it for items. Likewise, datasources containing a large number of documents, files, or messages, will also take longer to crawl.
Some datasources share a rate limit across all integrated applications (like Glean). For these datasources, crawling time is typically slower, as Glean must be careful not to exhaust the entire rate limit threshold itself.
Indexing
The indexing process works in parallel with the crawling process. That is, content that has been crawled is processed by Glean's indexer while other content is still being crawled.
While the crawling speed is heavily dependent on the volume of data AND the API rate limit, the indexing speed is conversely heavily dependant on compute resources. The health of each deployment's index and compute resources dedicated to the indexing process is carefully monitored by Glean's SRE team.
Total Time Required
For a typical enterprise datasource, expect the complete initial crawling and indexing processes to take anywhere from 3 days, up to 14 days for large datasources with moderate API rate limits.
Can multiple data sources be crawled at the same time without impact?
Yes. Each data source configured has its own unique crawler that dynamically scales based on demand. This ensures that multiple data sources can be crawled in parallel without impact to the time required to complete each crawl.
What happens if a document is modified while a crawl is in progress?
When a full (initial) crawl of a data source is initiated, it captures the state of all documents and content up to the exact timestamp when the crawl started. If any documents are modified or created after this timestamp, they will be processed and incorporated into the search index in one of two ways:
- Webhooks: Most datasources support webhooks, which Glean leverages to be notified of any content changes. When a webhook is received, it is processed within 1‑5 minutes, depending on the datasource.
- Incremental Crawls: Glean performs an incremental crawl of each datasource every 24 hours. These crawls focus on identifying and incorporating changes that have occurred since the last crawl that were not captured via webhooks. This ensures that all recent modifications are captured.
Both webhooks and incremental crawls operate independently and run concurrently with any active full crawls. This design ensures that document updates are processed efficiently and that the system remains up‑to‑date with the latest changes.
How to verify if a document is crawled and indexed?
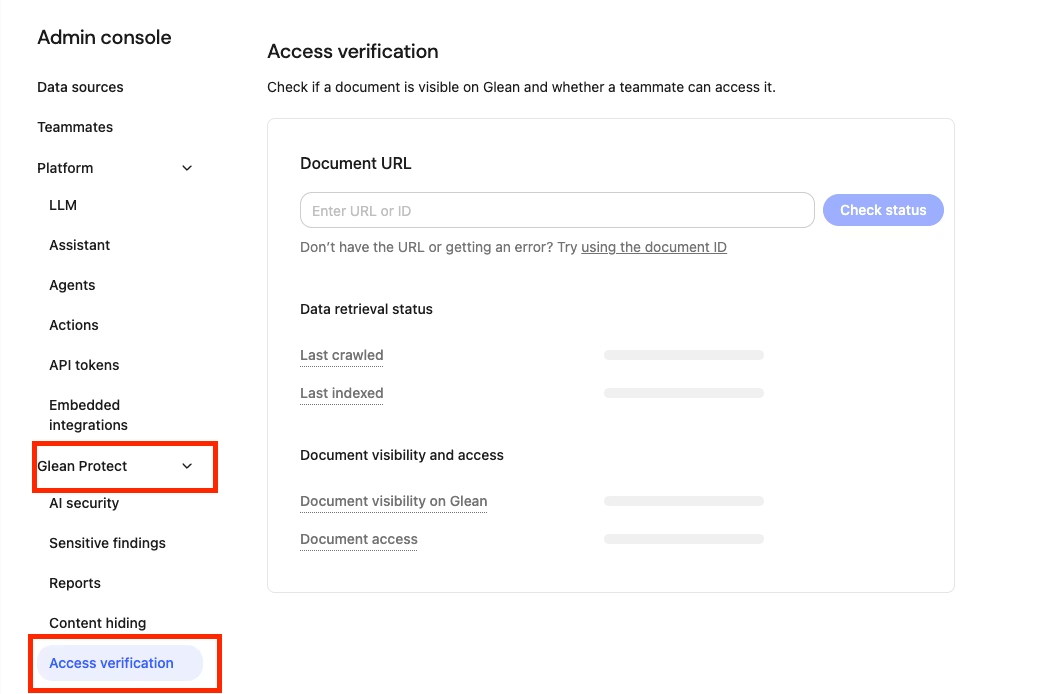
The Access Verification page allows admins to resolve questions related to the visibility of specific documents within Glean. With this tool, admins can determine a document's latest status or detect if a document is visible in Glean across users or test individual user access.
Navigate to Admin Console >> Glean Protect >> Access verification.
If you know the document URL or ID
Input the document URL or ID and press “Check status”. Glean will search for the document to check that it exists, then will show the following fields on found documents:
- Last crawled – when Glean last scanned the file for changes.
- Last indexed – when Glean last added those changes to search.
- Document visibility on Glean – whether the document is currently visible or hidden to users on Glean.
- Document access – you can use the teammate selector to check an individual user’s access to the document: “Full access” (the user can open it) or “No access” (the user cannot)

Note
A “document ID” in Glean is a unique identifier automatically assigned to a document upon its successful crawling into the system.
If you don’t know the document URL or ID or are getting an error
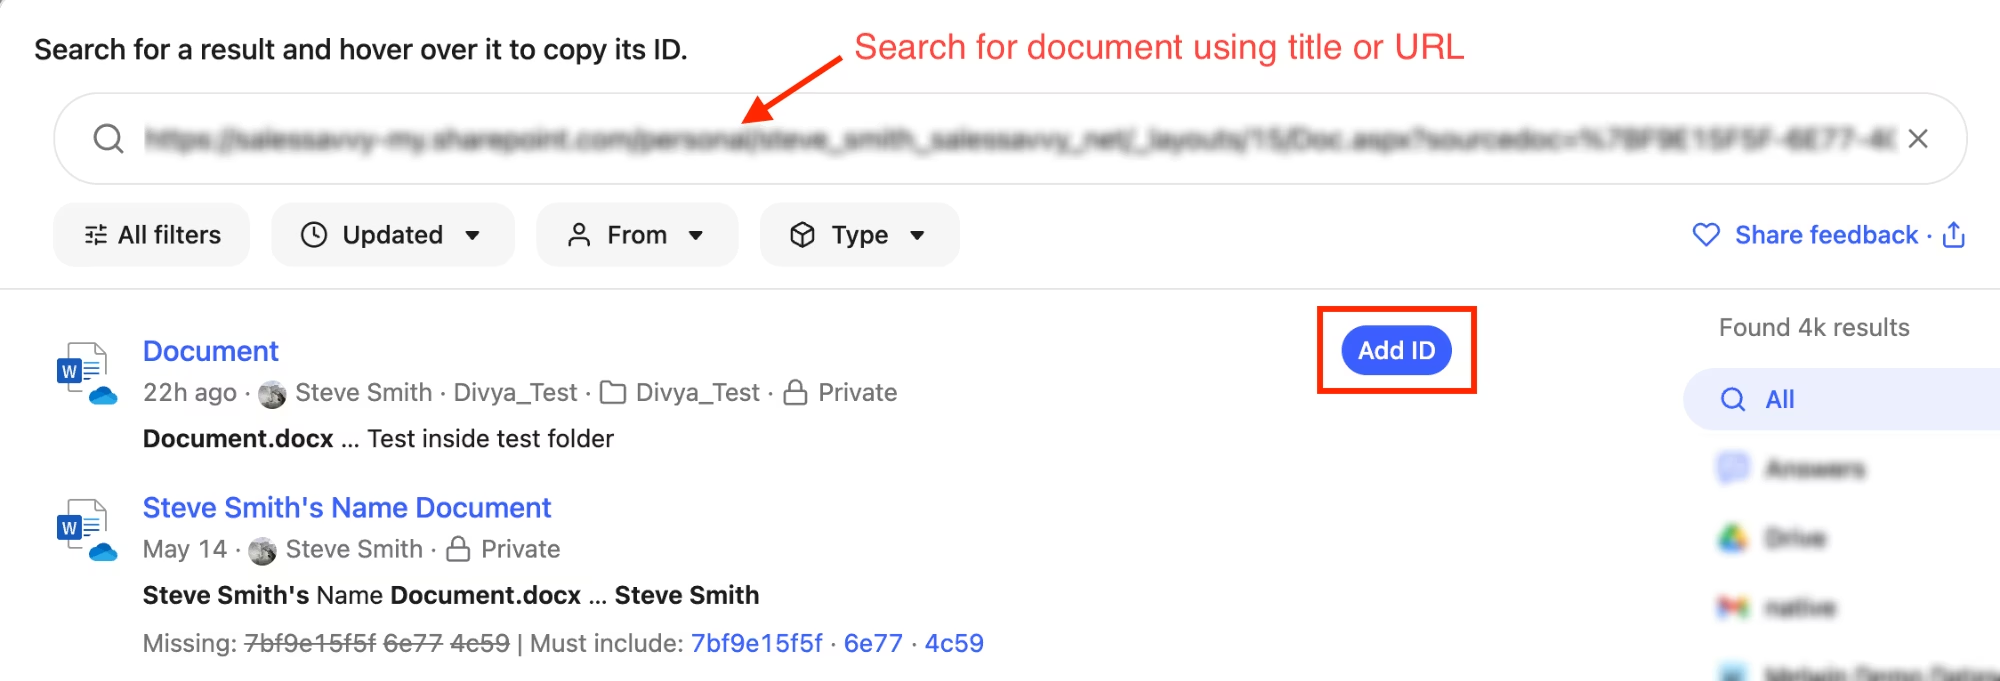
Below the input, click “using the document ID”. This opens Glean Search, where you can find the document using its URL or title.
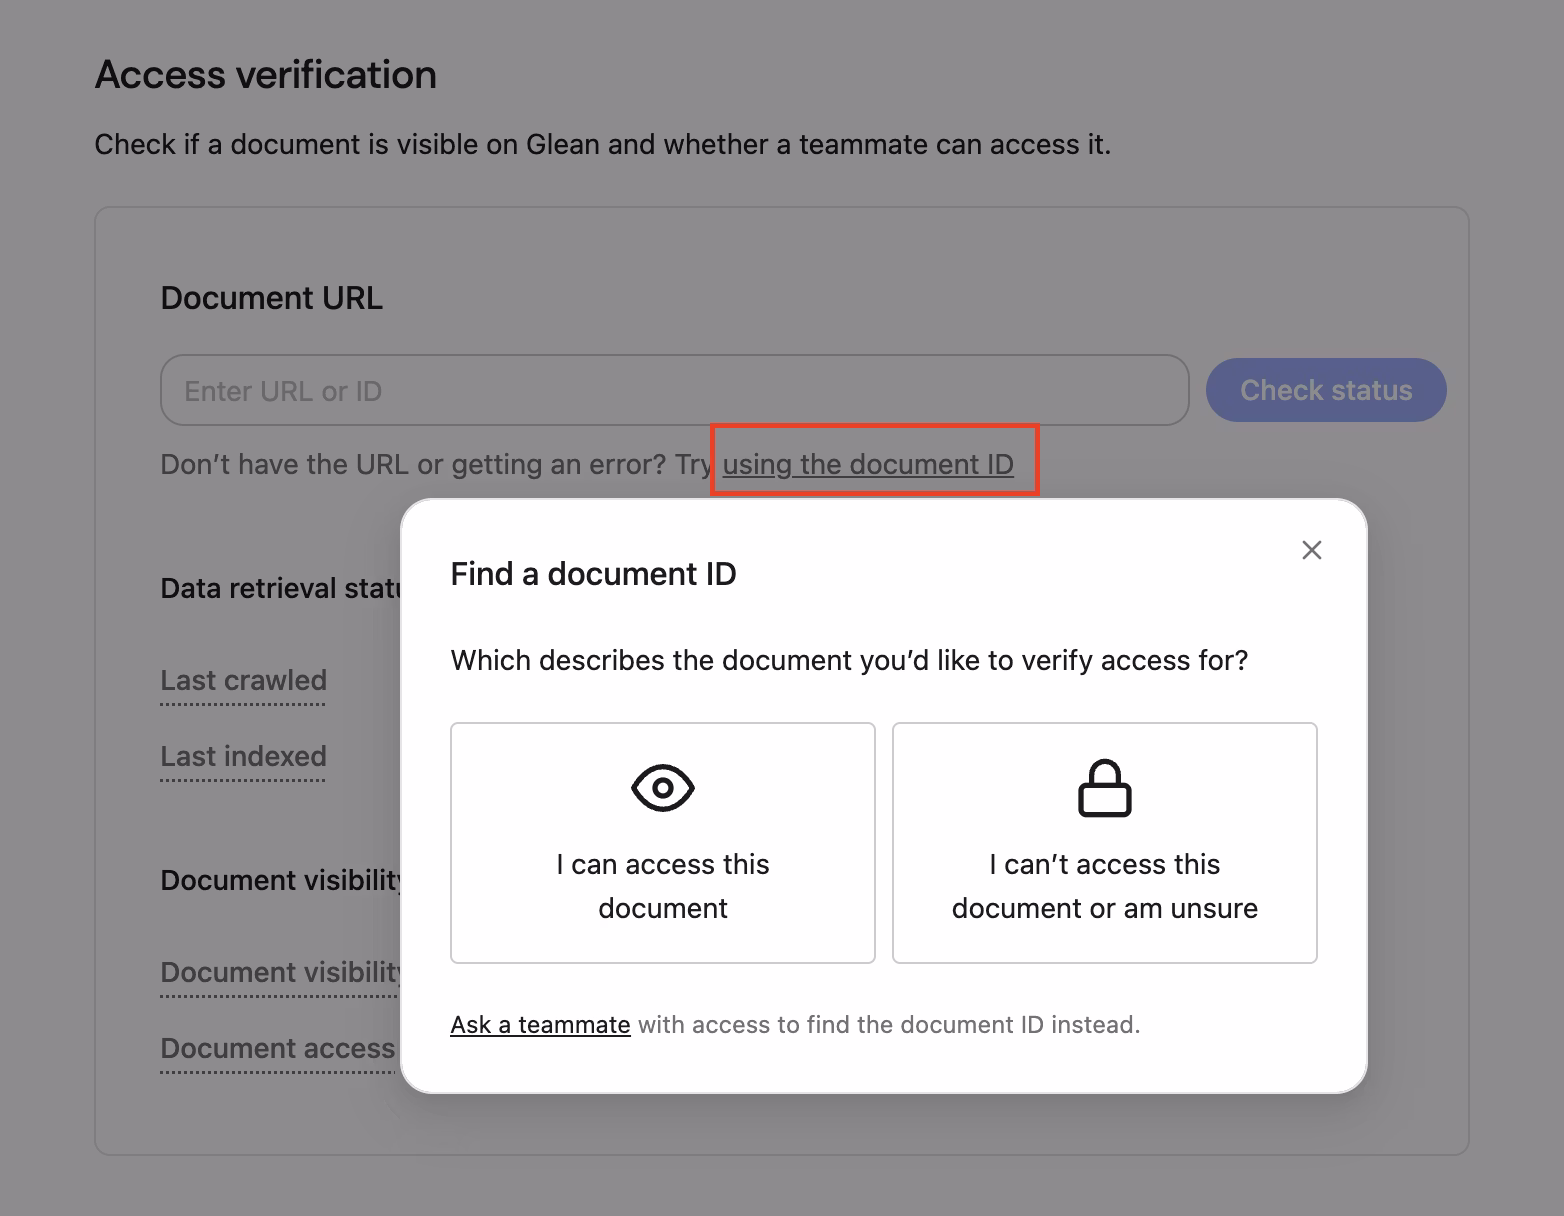
Once you find the document you’re looking for, click “Add ID” to check its status.
About Machine Learning (M/L)
Once the crawling and indexing processes have been completed, Glean will initiate several Machine Learning (M/L) workflows that will run on all indexed content.
The M/L process is critically important and is responsible for:
- Optimizing search query understanding and spellcheck.
- Understanding synonyms, acronyms, and semantics used in documents and between employees within your organization.
- Enhancing relevance rankings for search results and people suggestions.
- Enabling query suggestions, predictive text, and autocomplete.
- Training the unique language model for your organization; which is essential for operation of Glean Chat and Glean Assistant.
Warning
Usage of Glean is not supported until the M/L process has completed successfully. You should not allow users access to Glean until all M/L has completed.
Checking the Machine Learning (M/L) Status
The M/L workflows are background processes - it is not currently possible to check the status of these inside the Glean UI.
Success
Your Glean engineer will notify you on the progress of these workflows and when they complete successfully.
Machine Learning (M/L) FAQ
How long does the M/L process take to complete?
Completing all required M/L workflows can take 2‑14 days in total, depending on:
- The amount of content that needs to be processed as part of each M/L workflow.
- The GCP or AWS region that your Glean tenant was deployed to (and the tier of TPU/GPU hardware available in that region).
- For example, using an Nvidia T4 GPU (if that is all that is supported in your elected deployment region) instead of a dedicated TPU typically increases the time required to run all M/L workflows by a factor of 4‑6x.
Does the M/L process run in parallel with the crawl/index processes?
No. The M/L workflows must be run on a complete dataset. Hence, Glean cannot initiate the M/L process until all of your data sources have been crawled and indexed.
What is the impact if the M/L process is not completed?
- Search results will be significantly degraded.
- Glean Assistant and Glean Chat will not respond correctly.
- Spellcheck will be erroneous.
- Autocomplete will not function.
- Any synonyms or acronyms used within the organization will not be understood if included in a search query.
Populate Content
In this step you will learn how to add Announcements, Answers, Go Links, Collections, and Document Verifications to ensure that your users get the most out of Glean
To create an engaging first experience with Glean, it's essential to populate the platform with various types of content; other than what is being crawled from your datasources.
Glean has several features to assist in the discovery and management of knowledge within your organization, including:
- Announcements
- Answers
- Go Links
- Collections
- Document Verifications/Deprecations
- Pins
Announcements
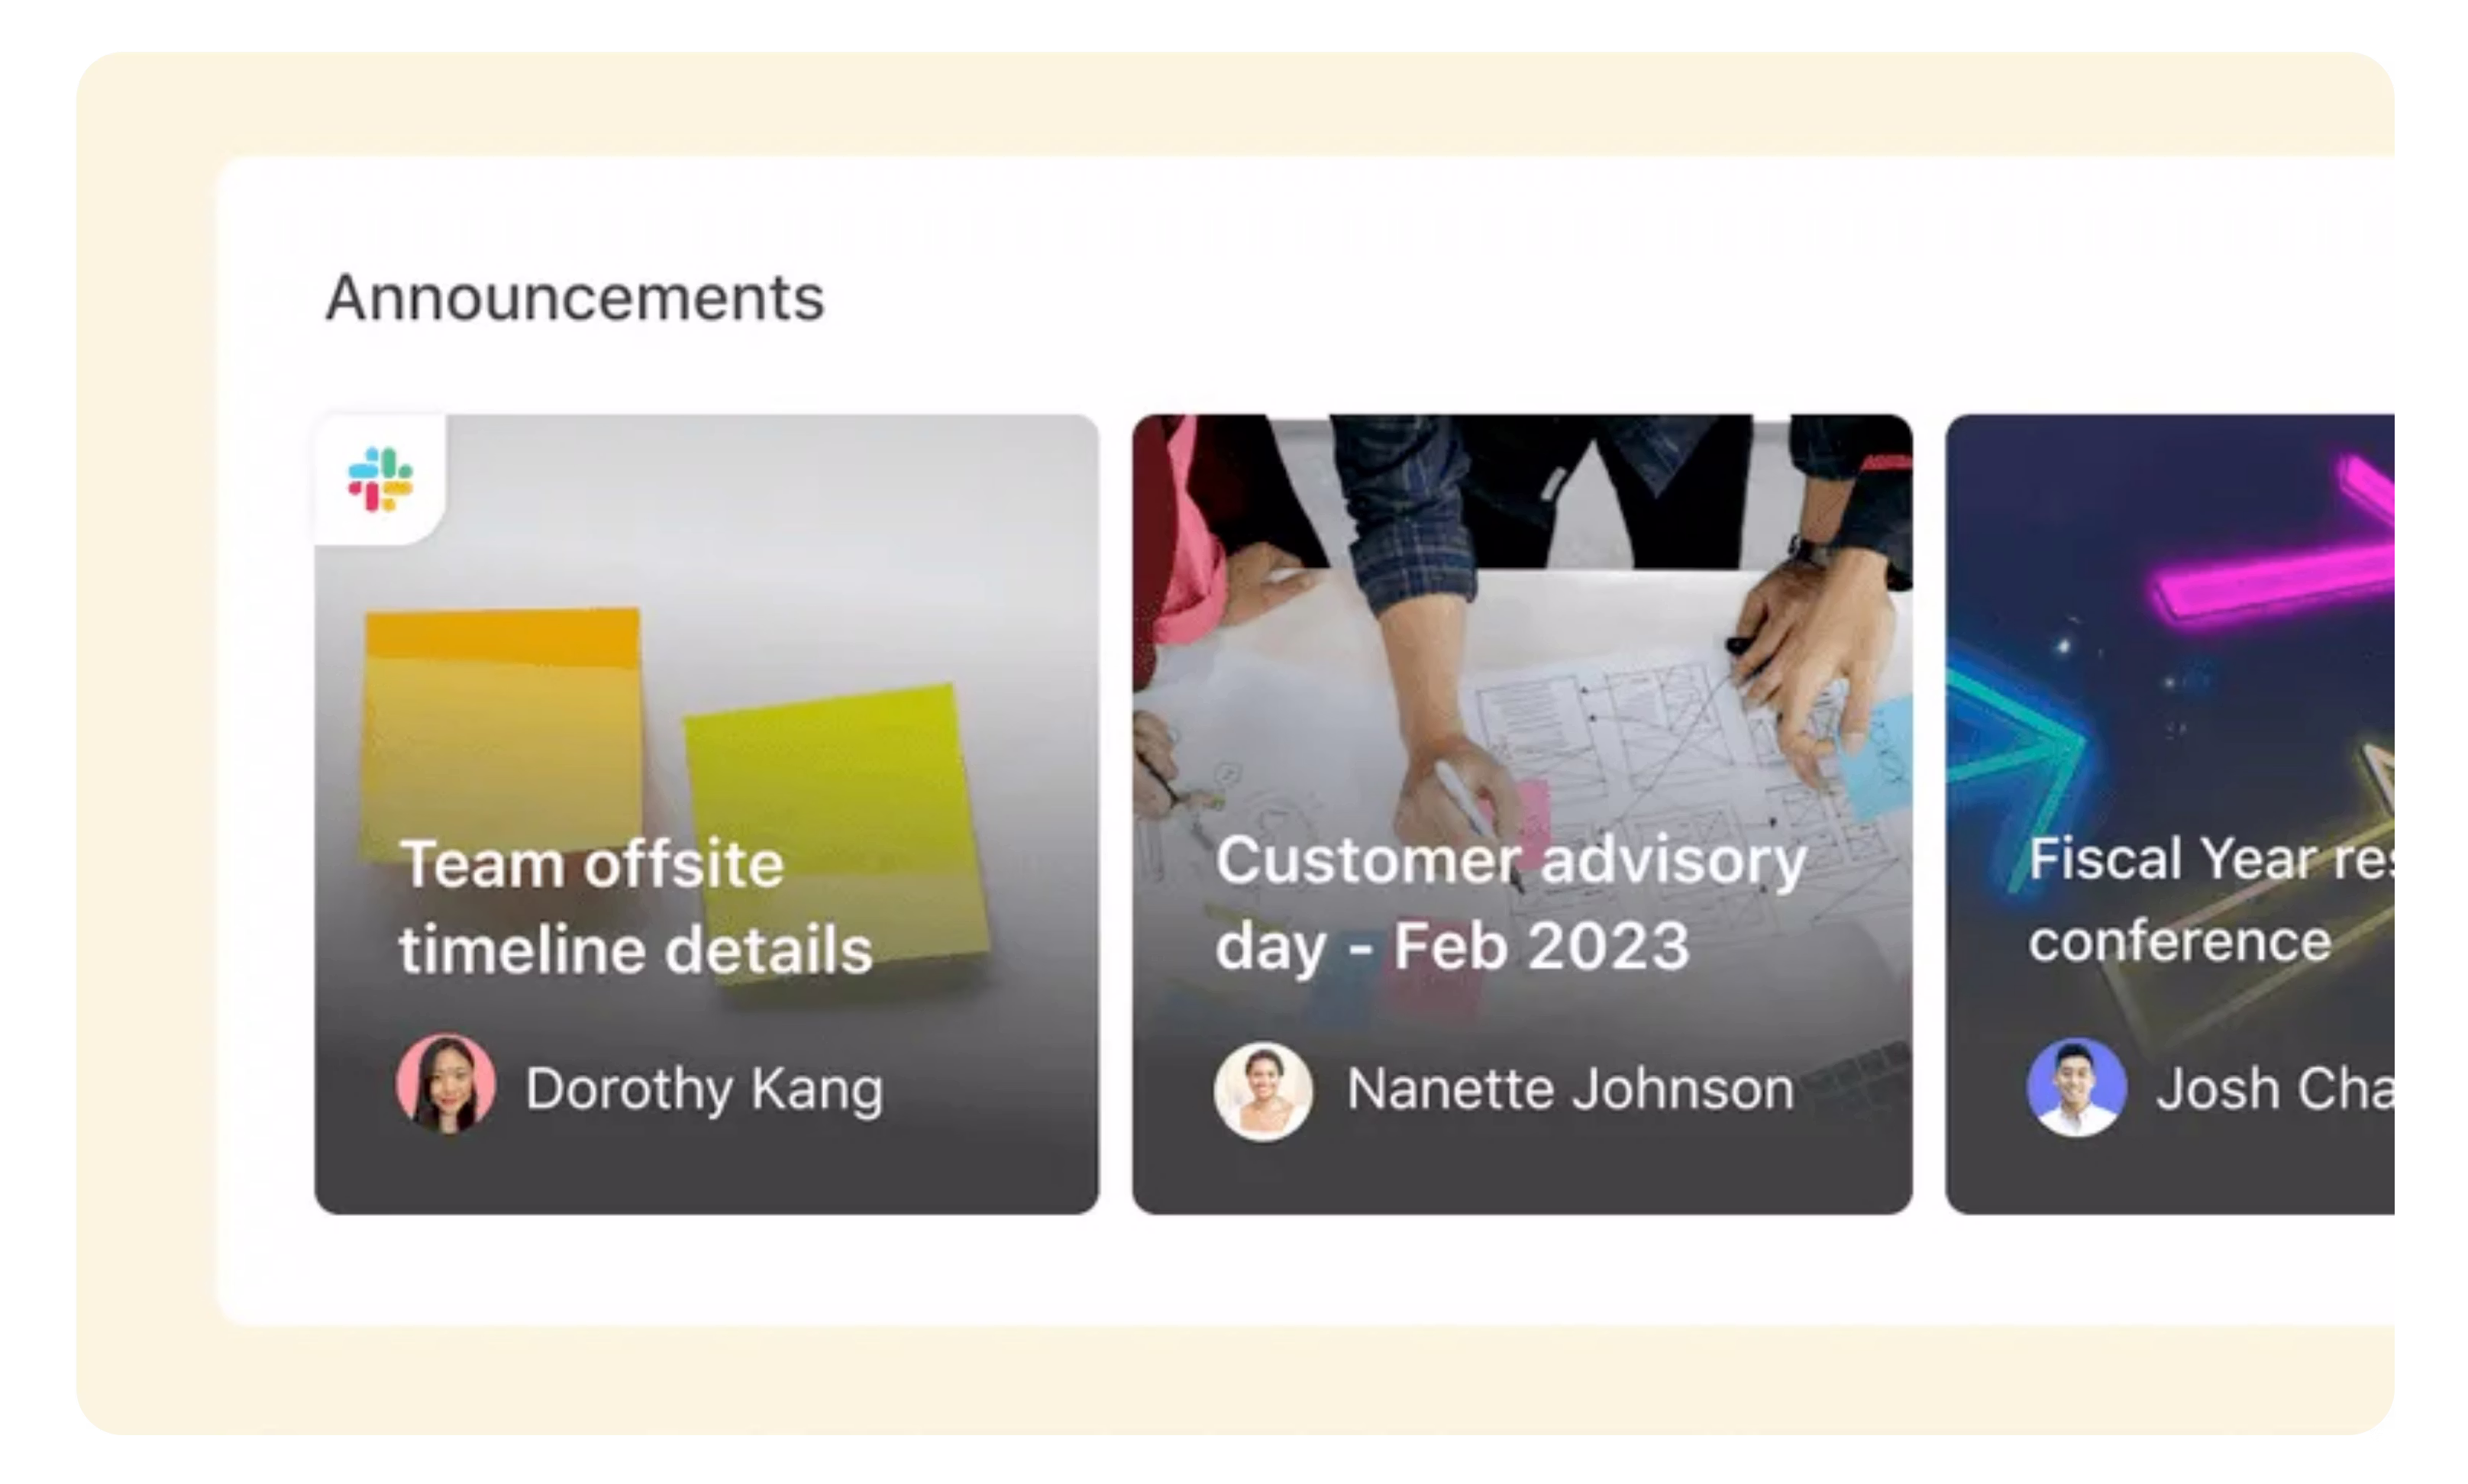
Announcements are a great way to promote updates on Glean's home page for your teammates to see, especially if they are using Glean as their new tab page.
Announcements can be posted organization‑wide or targeted to a limited set of teammates for whatever duration you choose.
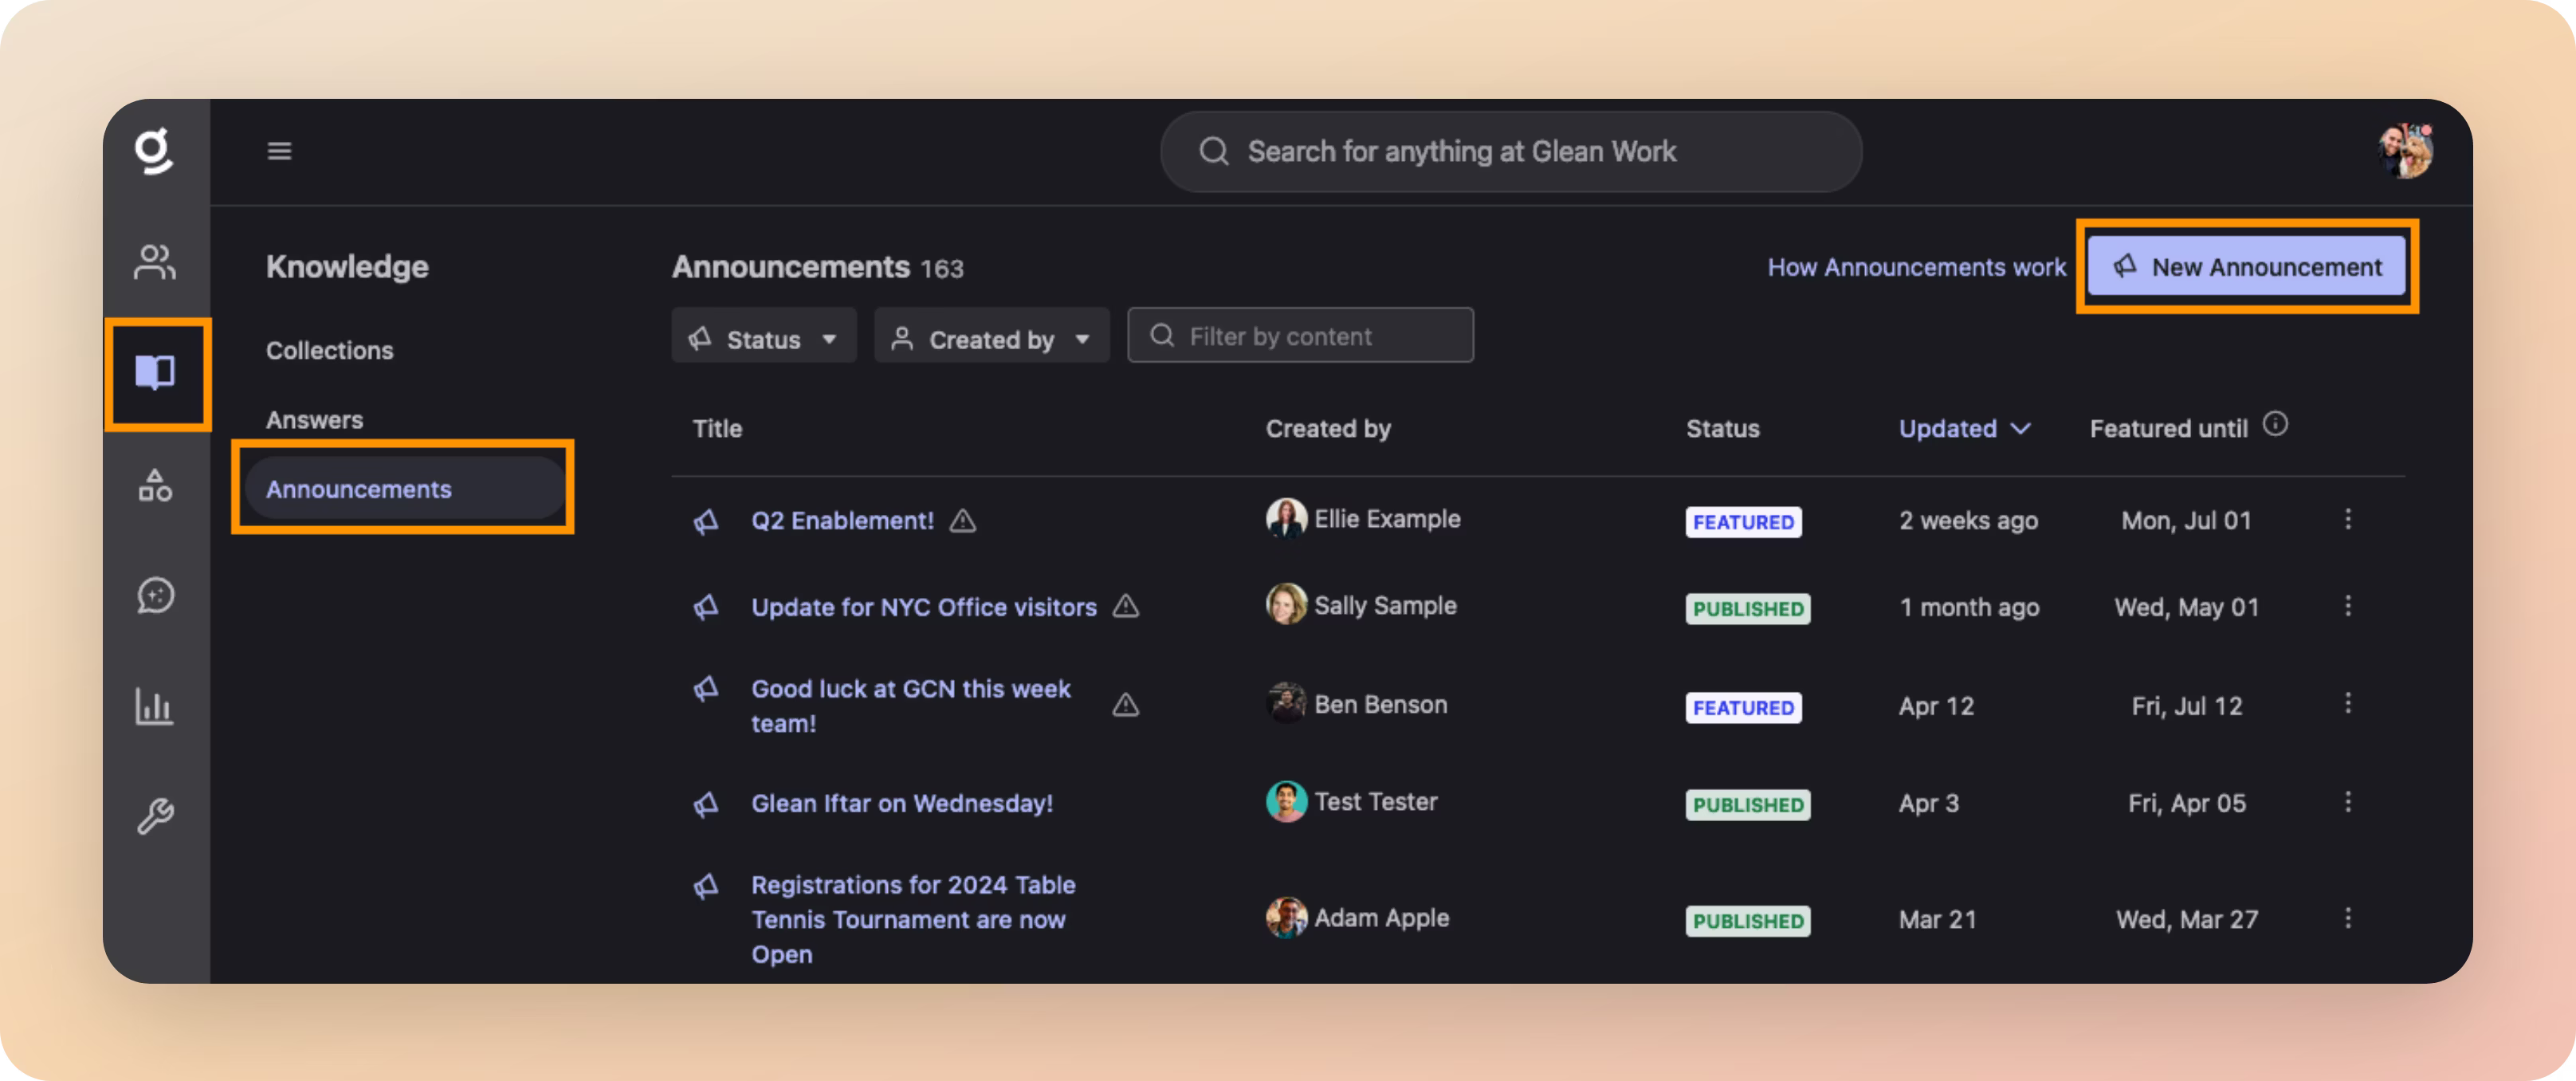
To create an Announcement, navigate to Knowledge > Announcements, then click the New Announcement button at the top‑right. Once posted, you will see the announcement on the Glean home page.
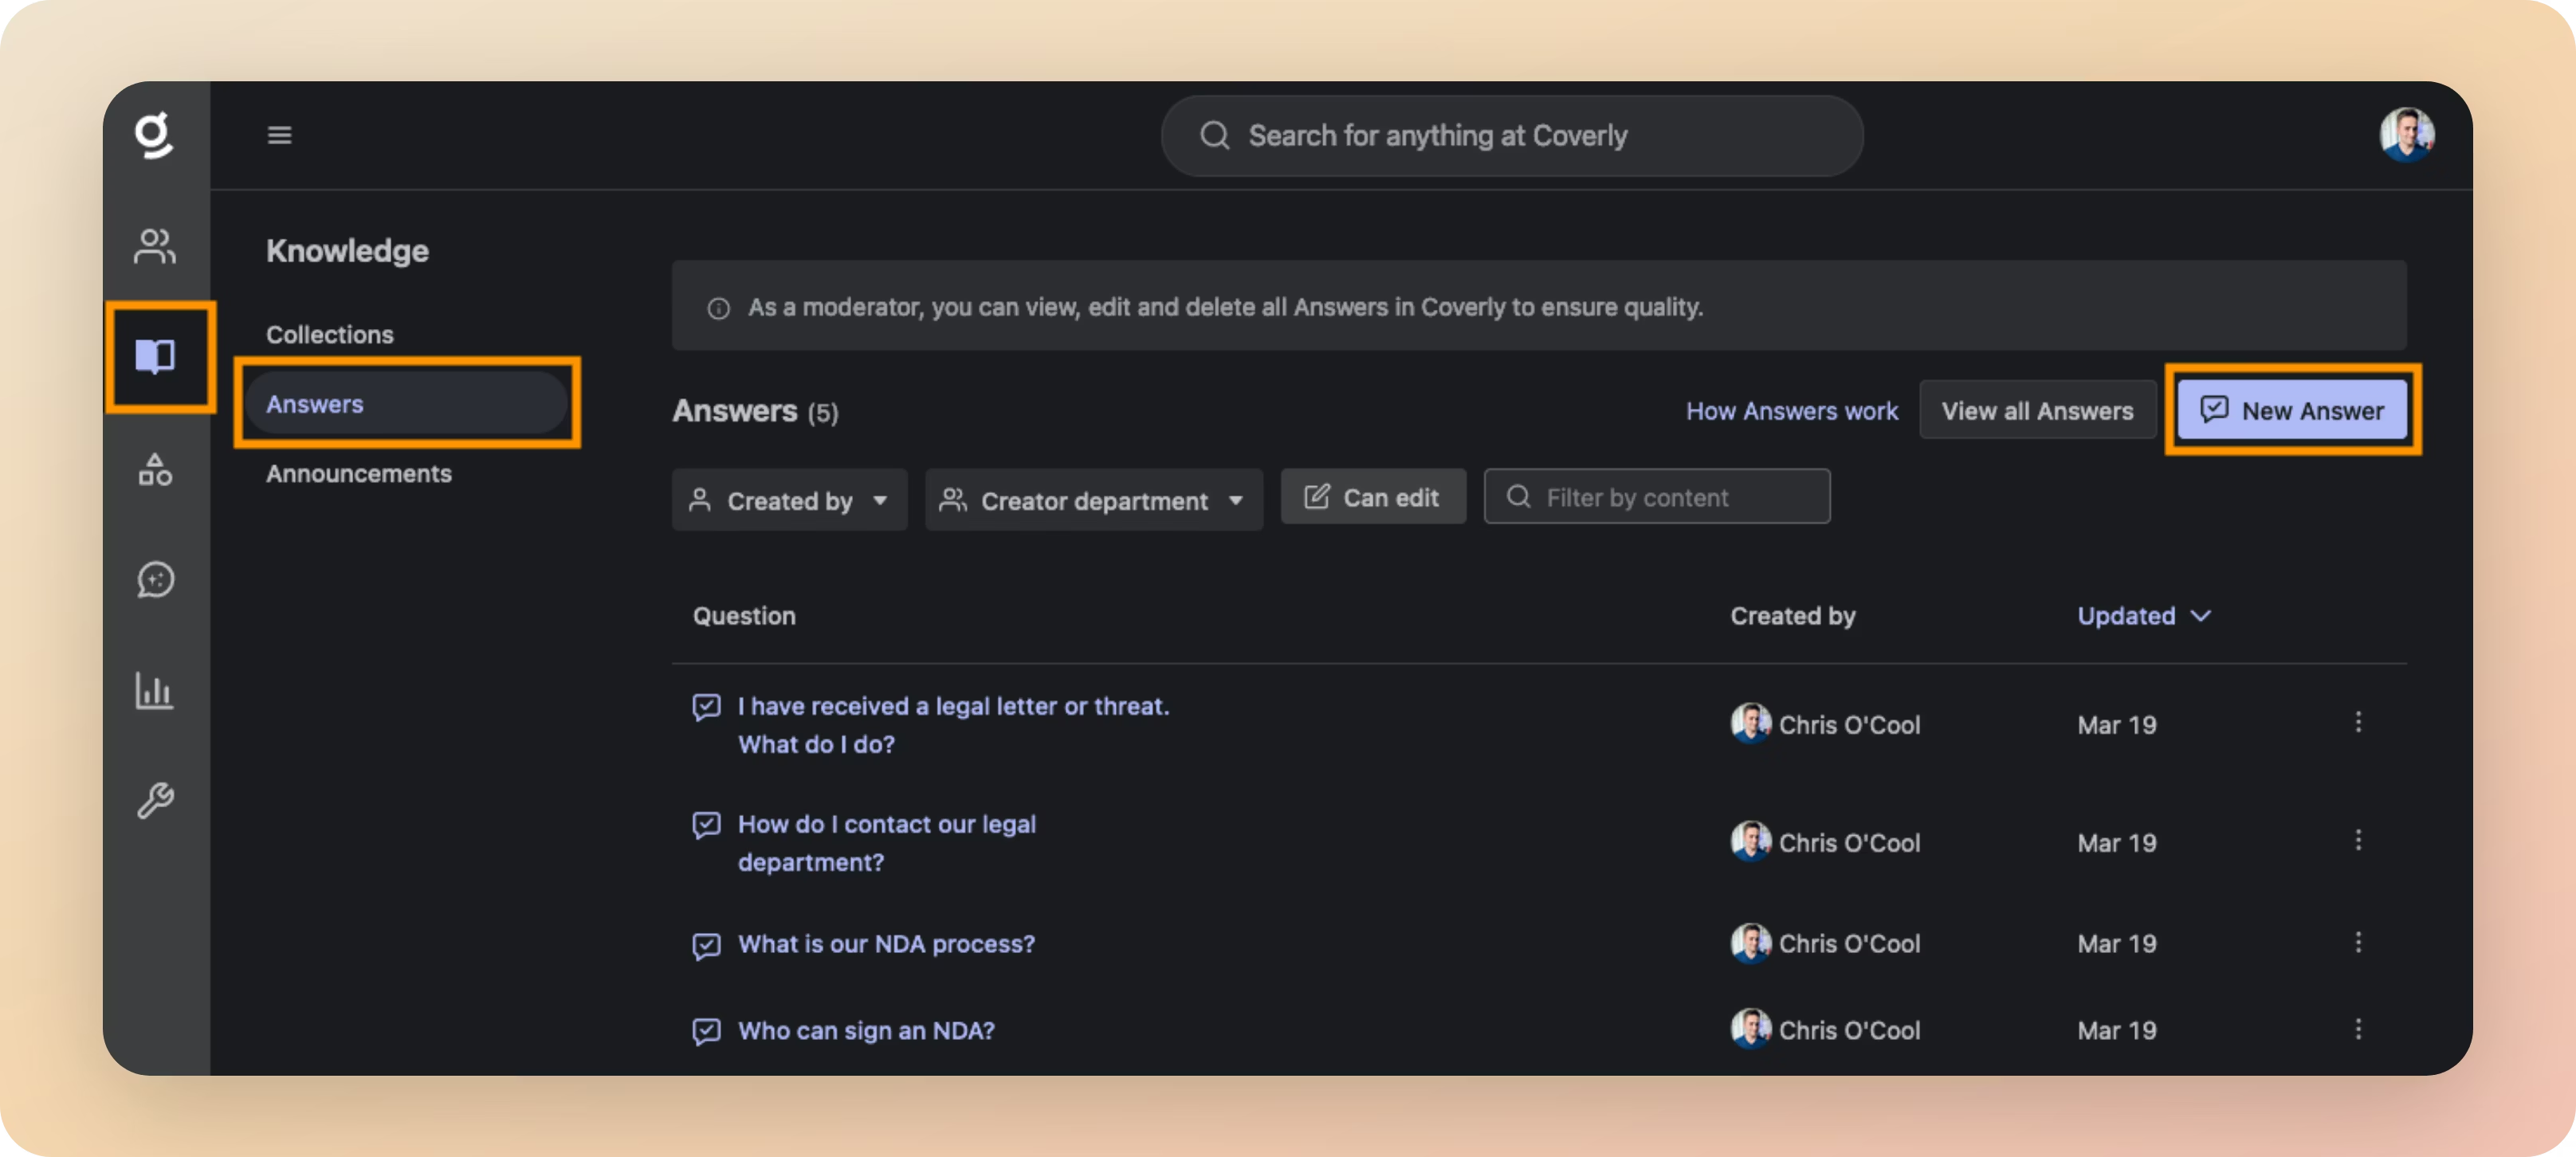
Answers
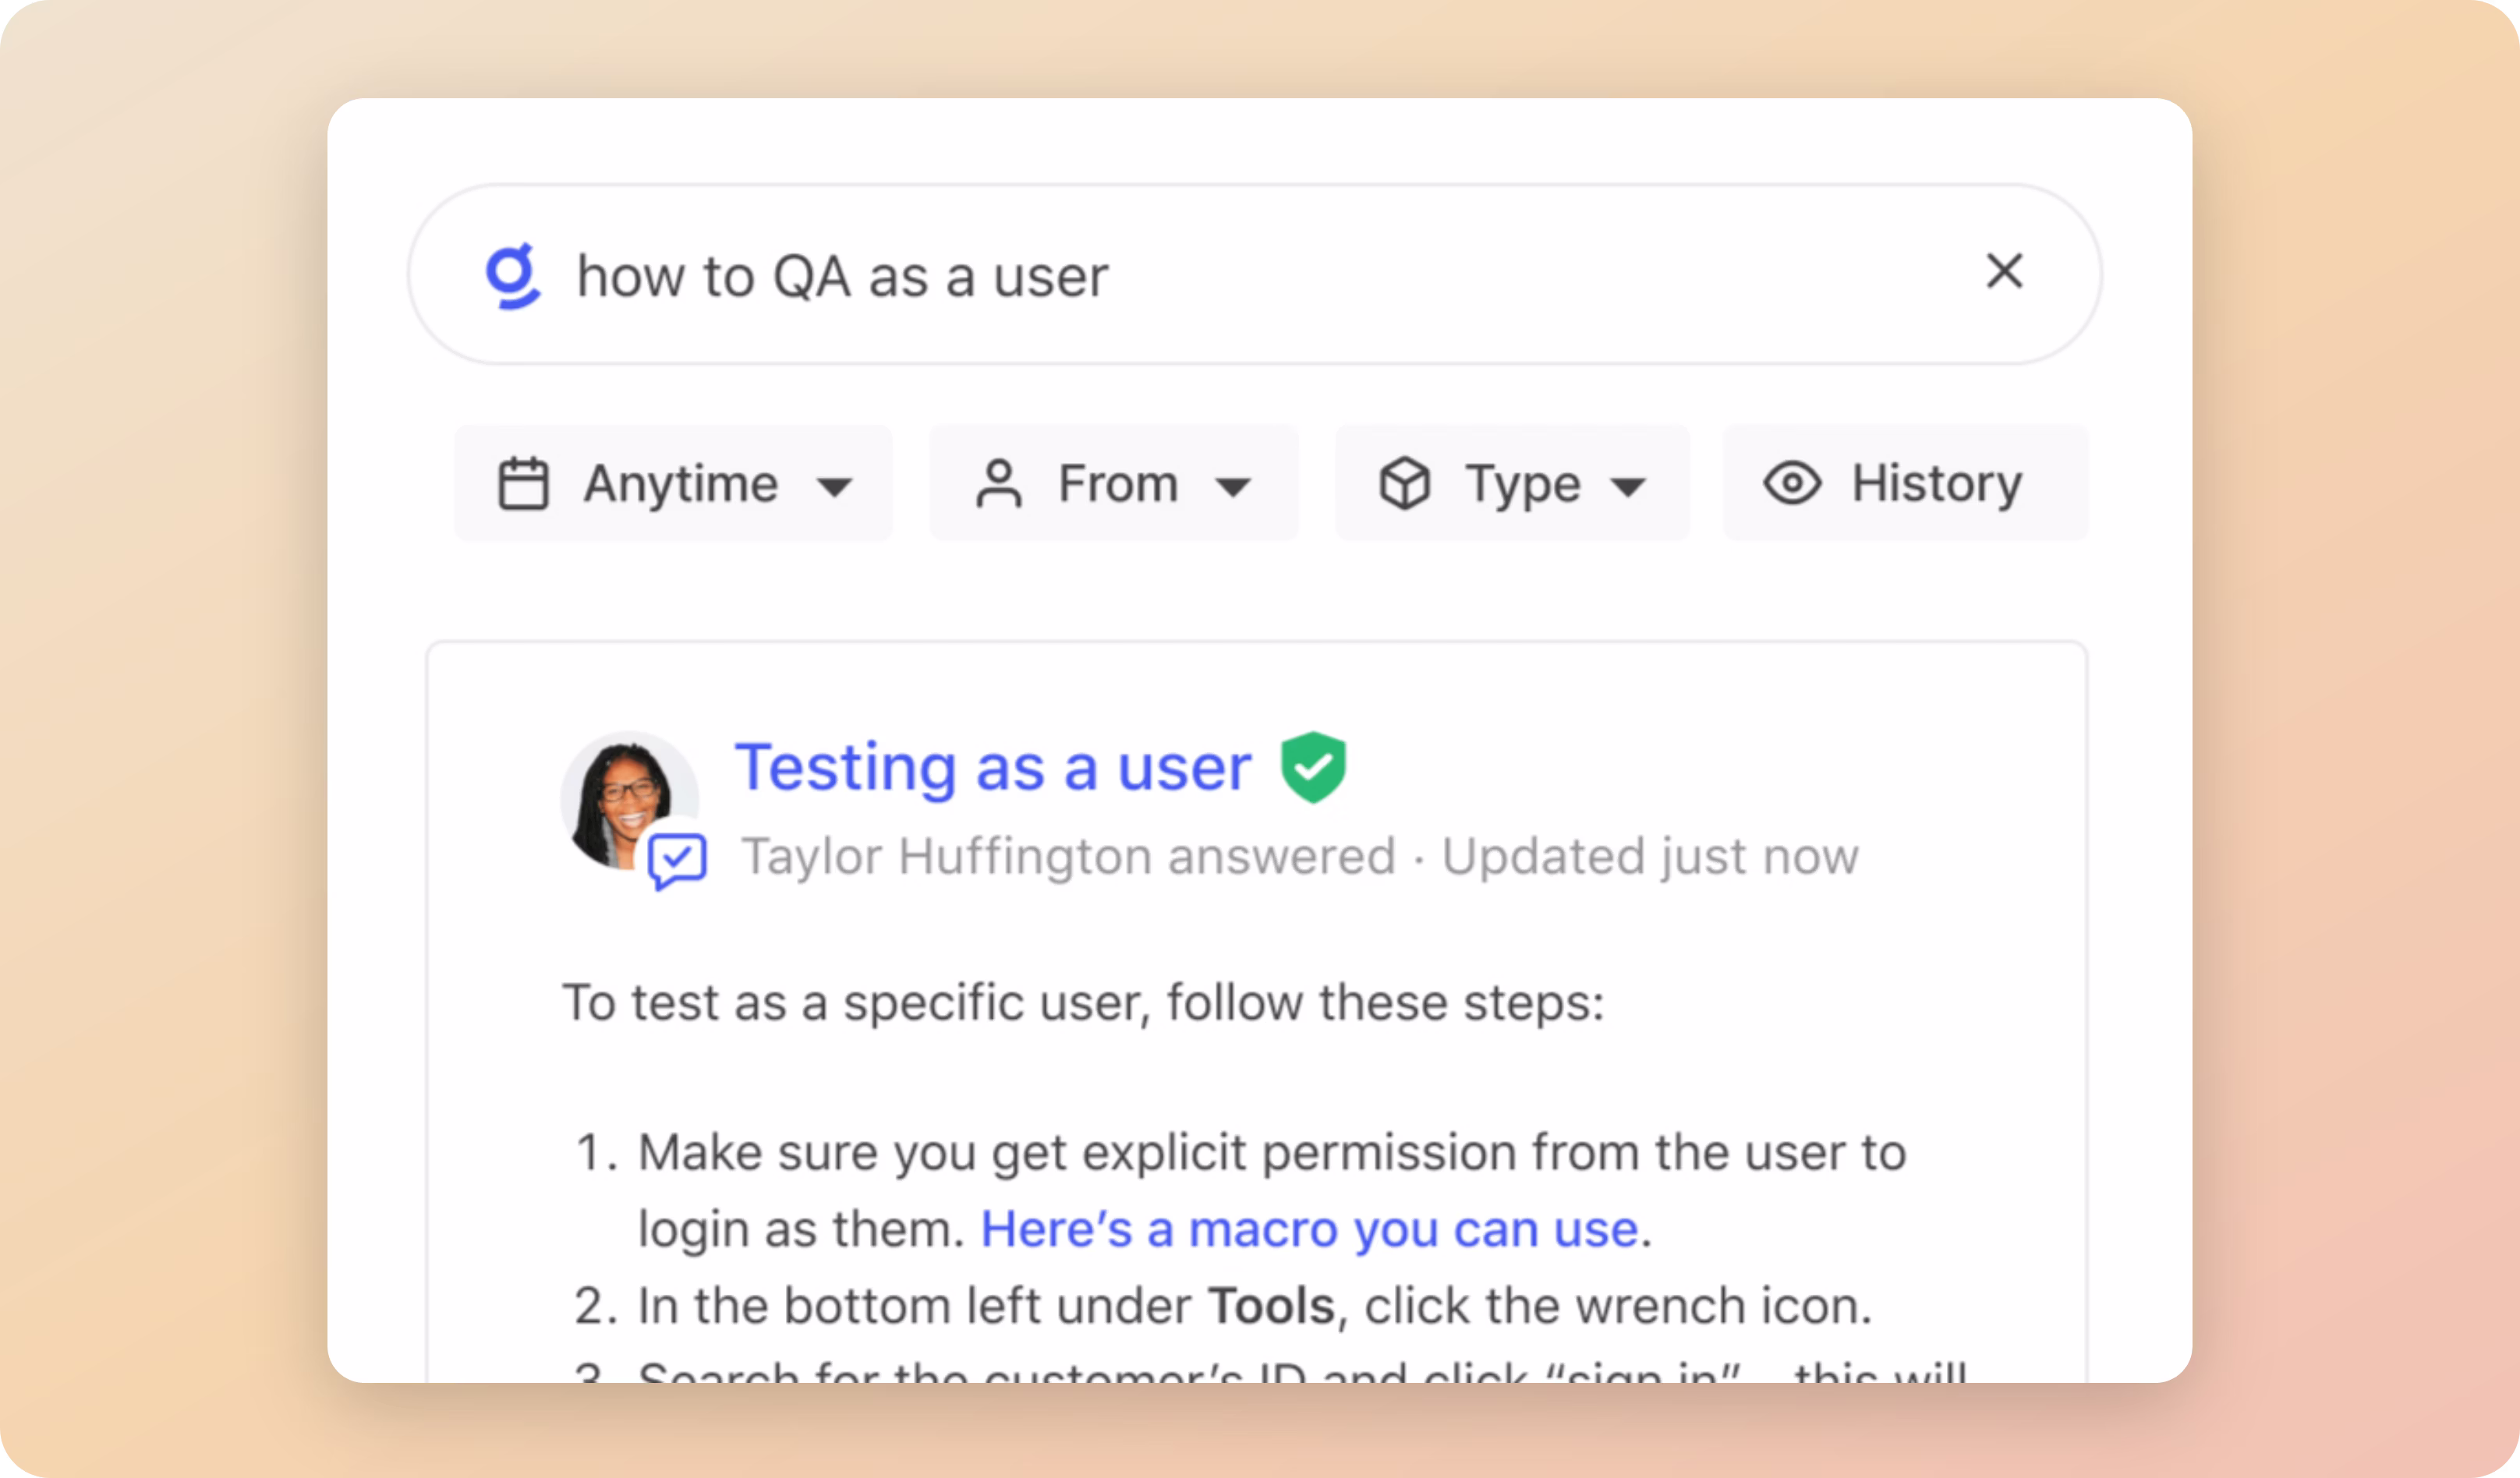
Answers allow your users to provide authoritative responses to frequently asked questions or important information: no more copying/pasting or rewriting the same Q&A for everyone.
Answers are automatically surfaced in search results in response to relevant queries. They can also be grouped together using the Collections feature (more on that below).
To create an Answer, navigate to Knowledge > Answers, then click the New Answer button at the top‑right.
More information: Using Answers
You should aim to populate Glean with ten Answers to questions that are frequently asked by your users. Here are some ideas to get you started:
- What is our Work From Home (WFH) policy?
- What benefits are available to me?
- What is the process for taking annual leave?
- What do I do if I (or a family member) is sick?
- How do I get access to Jira?
- How do I submit a feature request?
- How do I get a new laptop?
- Can I request a specific laptop model or brand?
- How do I get a new office badge?
- What are the 2024 holidays?
- What is our time off policy?
- What is our parental leave policy?
- What are our company values?
- Who is the best person to talk to about XYZ?
- When do we get paid?
- How do I book travel?
Go Links
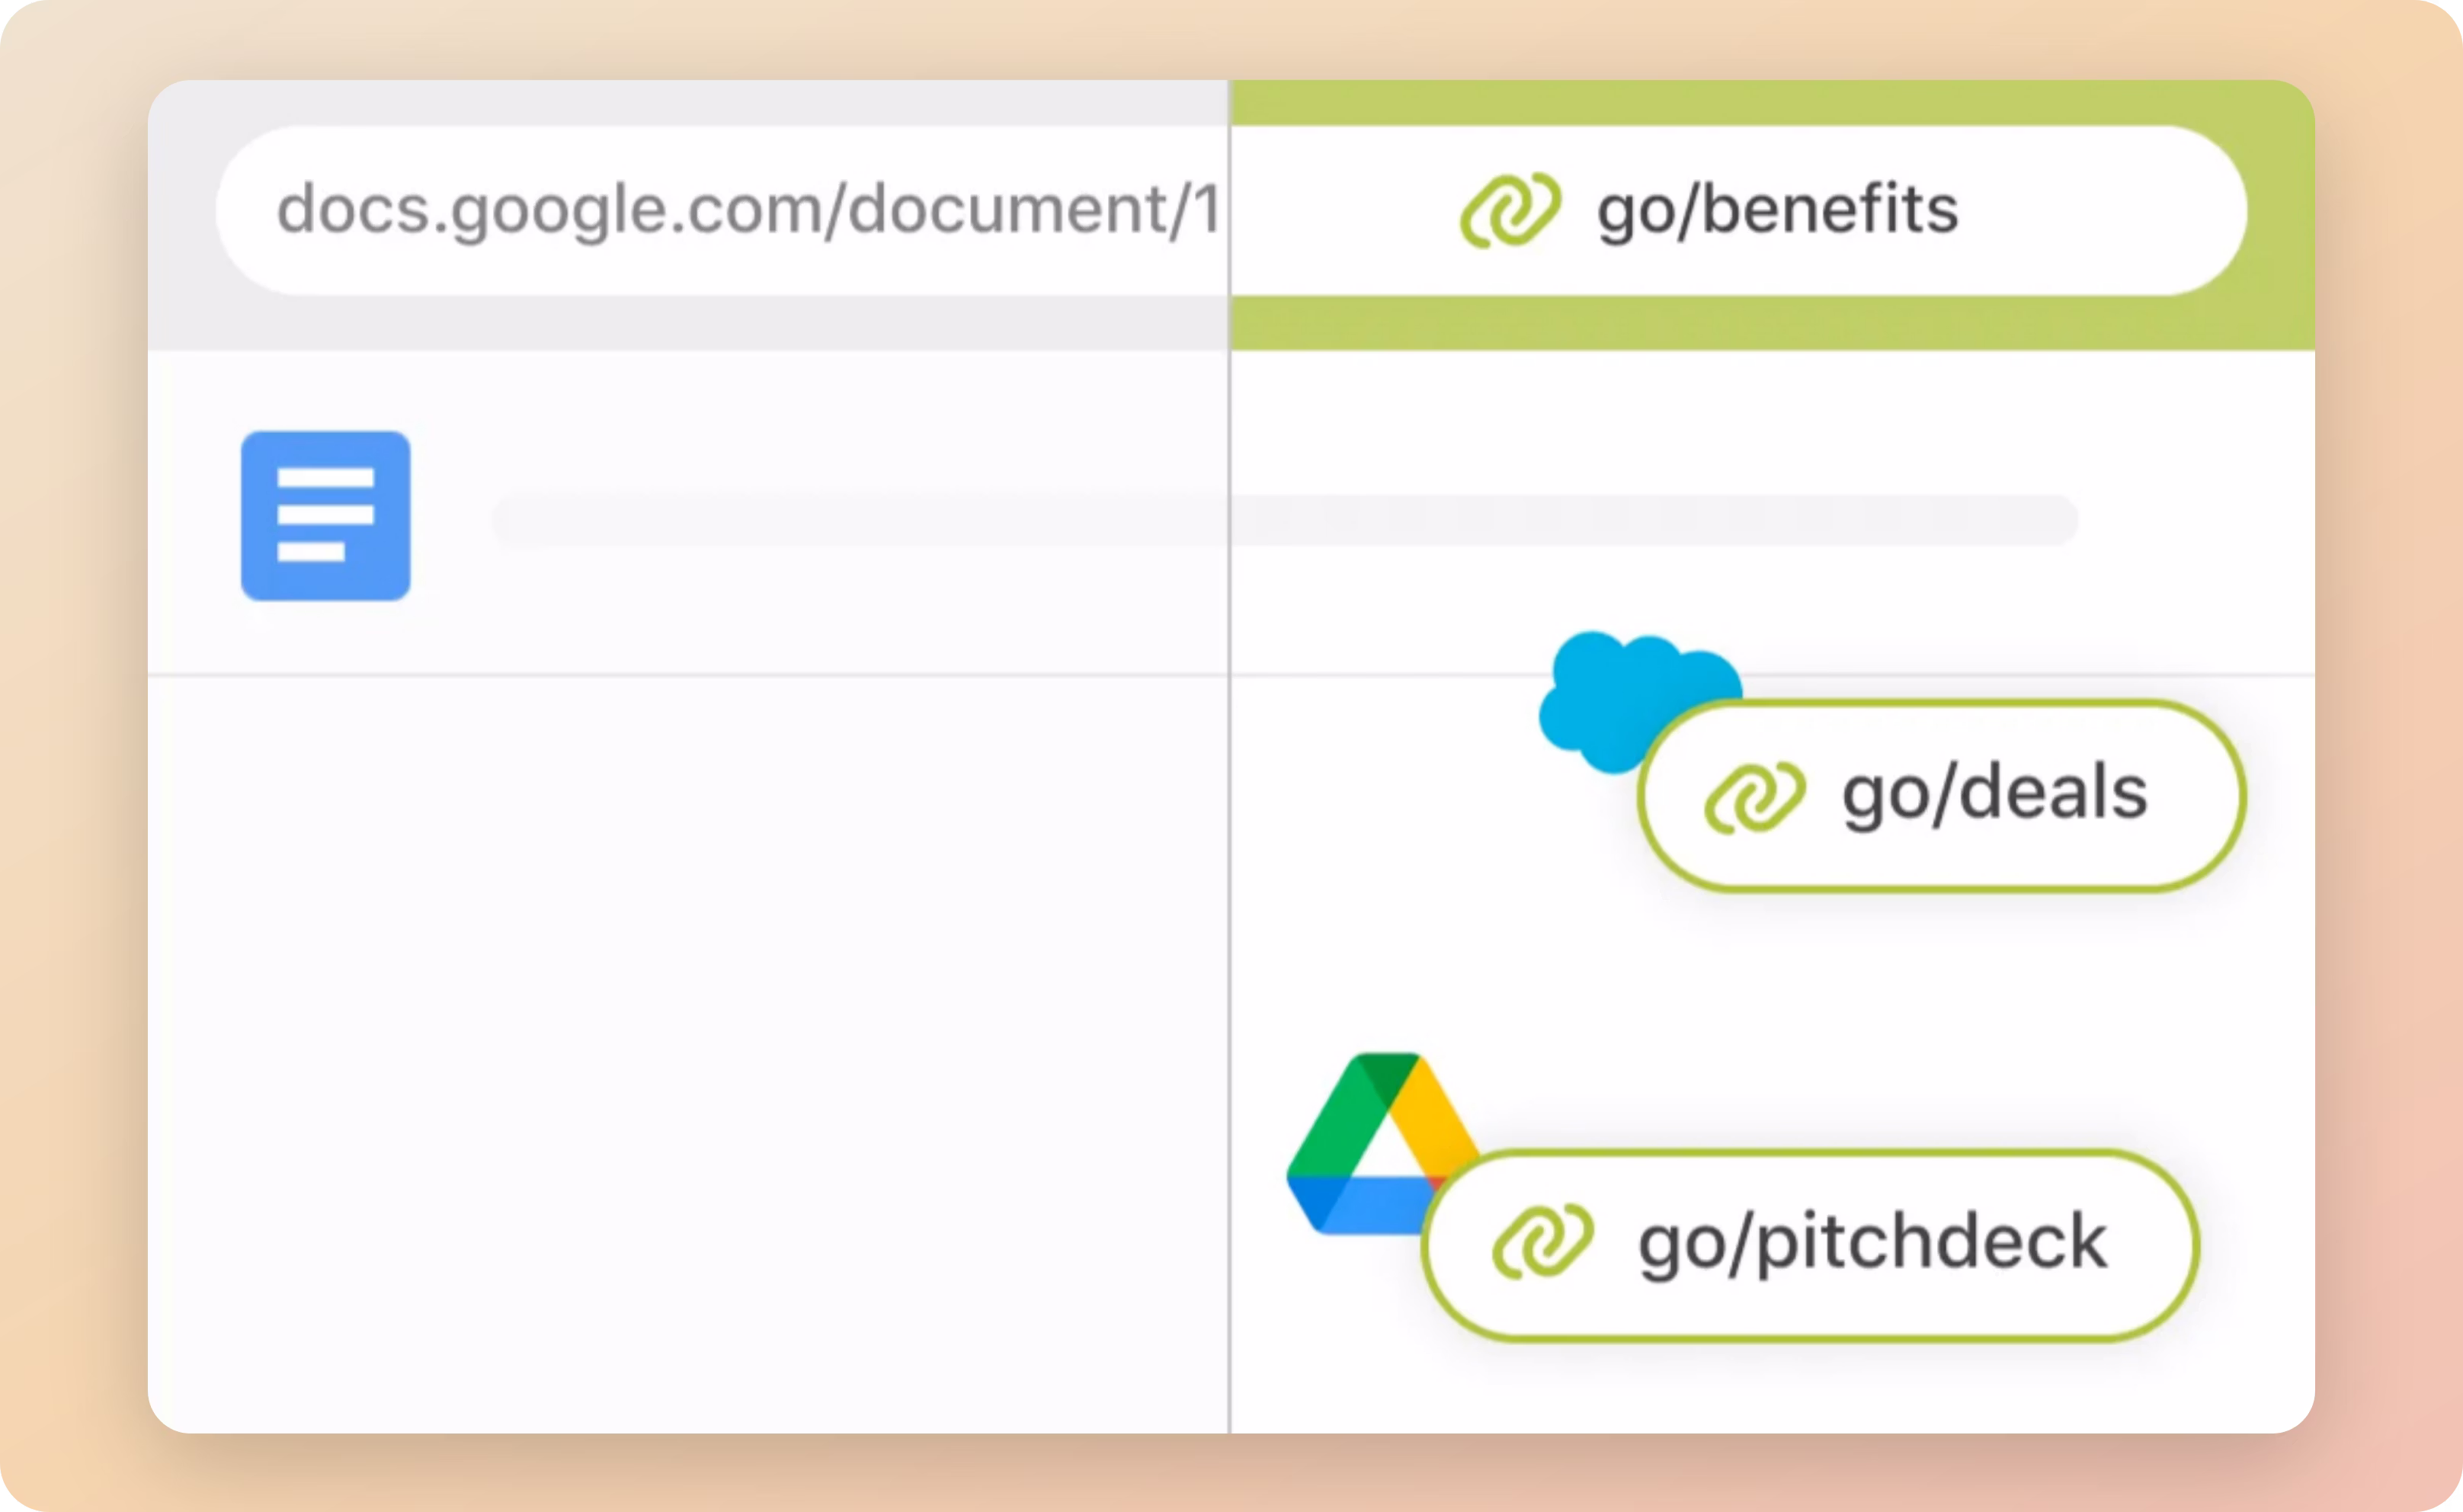
Go Links are memorable shortcuts that quickly redirect users to frequently used sites, documents, or internal resources. Go Links act like a mental bookmark: once you see it or hear it, you immediately know how to access it, both now and in the future.
To create a Go Link, navigate to Knowledge > Go Links, then click the New Go Link button at the top‑right.
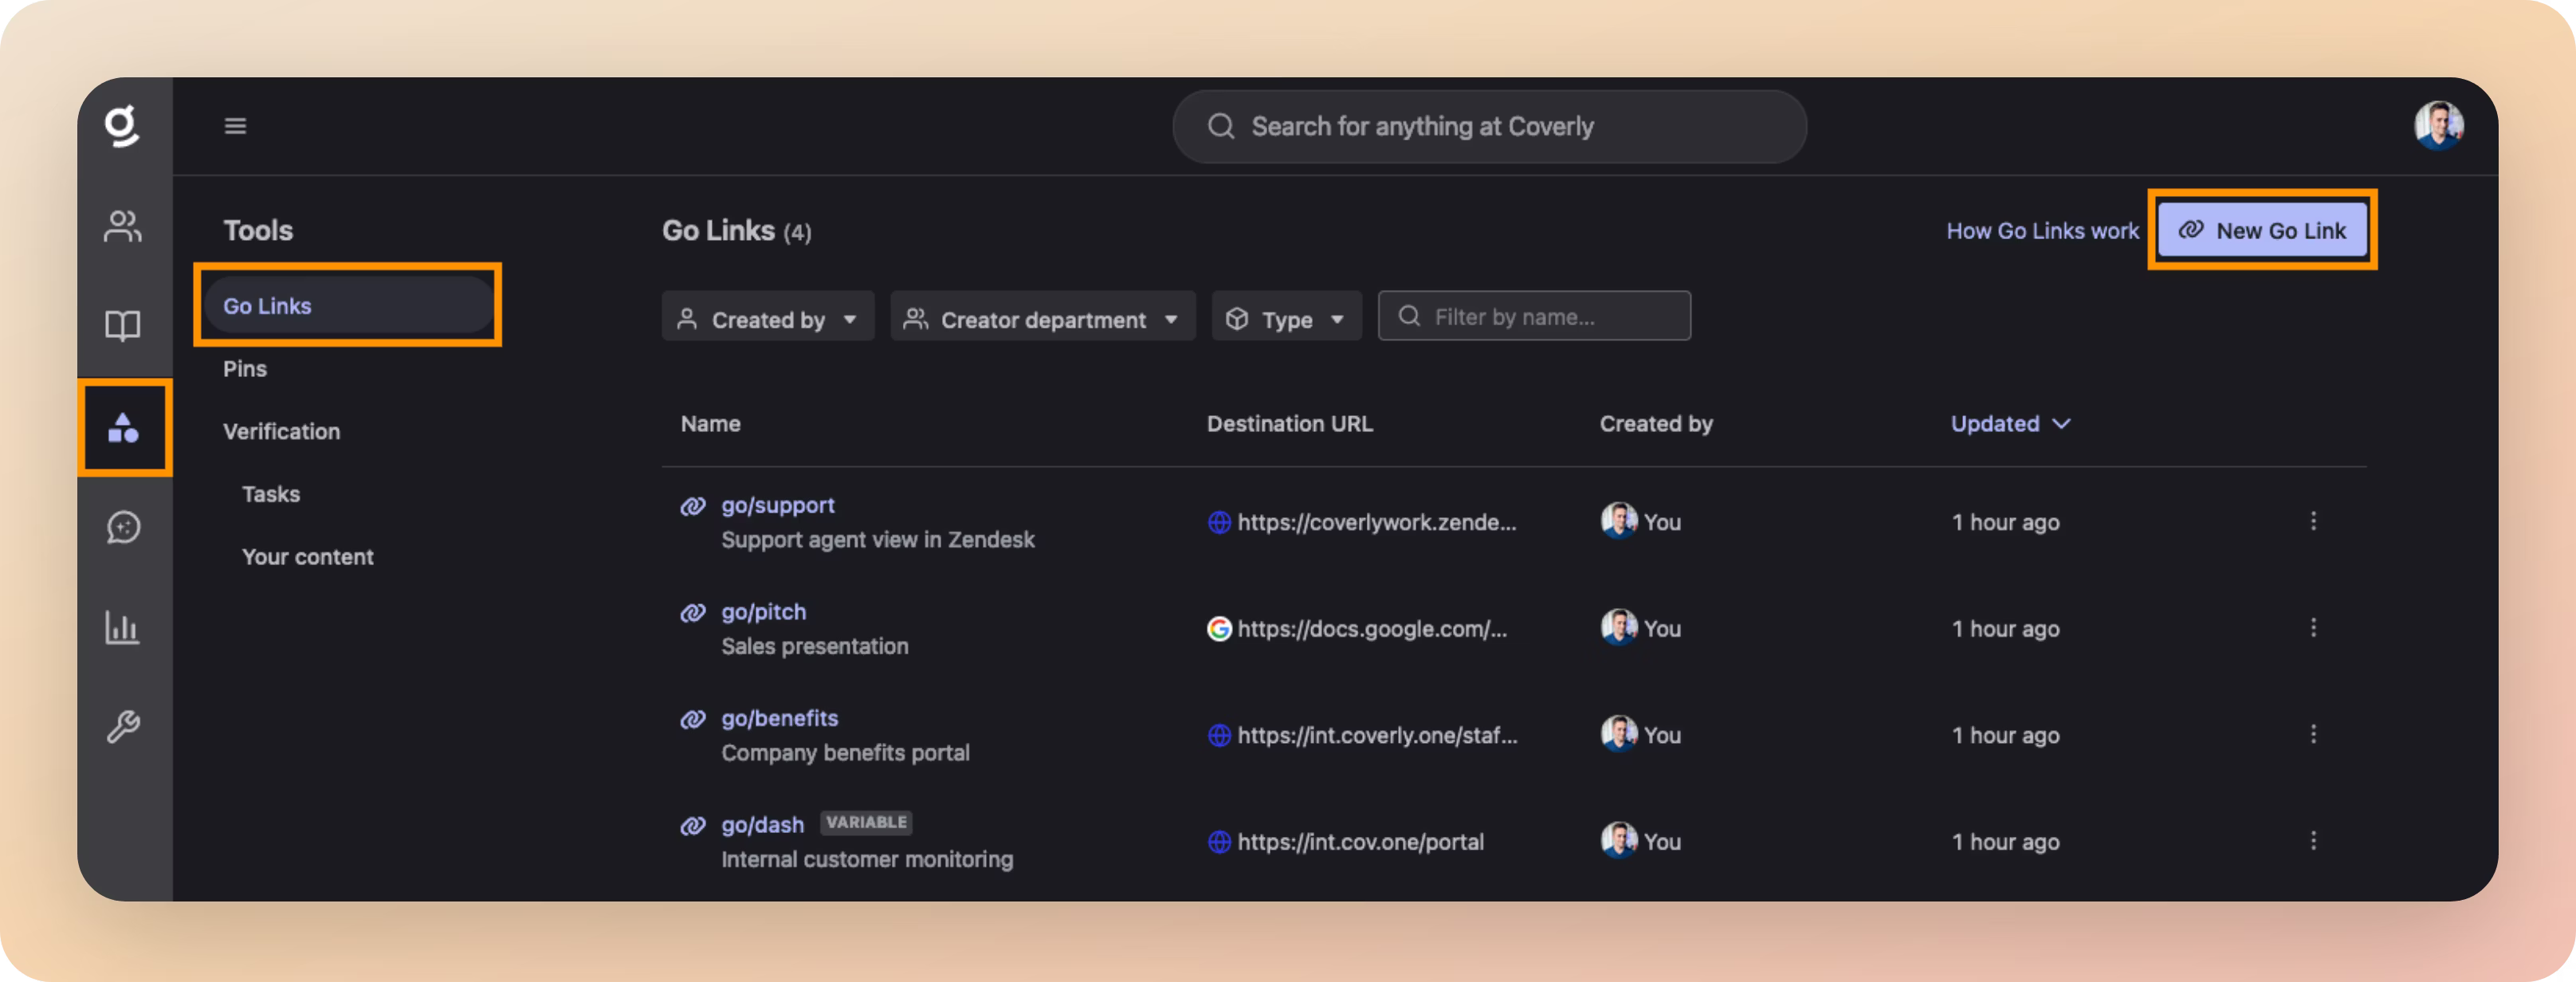
More information: Using Go Links
You should aim to populate Glean with five Go Links to frequently accessed resources. Here are some ideas to get you started:
| Go Link | Destination |
|---|---|
go/benefits |
Company benefits portal. |
go/help |
IT help desk. |
go/deals |
Salesforce Dashboard showing the current numbers for the quarter. |
go/sprint |
Specific Jira project for your engineering team. |
go/dashboard/<customer> |
Internal dashboard to monitor <customer> (This is a variable Go Link) |
go/it/setup |
Setup instructions for a new laptop. |
go/it/wifi |
Wifi access details for employees. |
go/pitch |
Your company sales presentation. |
go/pto |
New annual leave request. |
go/git |
Your main internal Git repository. |
go/allhands |
A folder containing recordings from previous company All Hands. |
go/fast |
Internet speedtest, e.g. https://fast.com |
go/docs |
Documentation hub. |
go/support |
Agent view in Zendesk. |
go/mail |
Outlook Email |
go/cal |
Work calendar |
go/roadmap |
Company roadmap presentation |
Collections
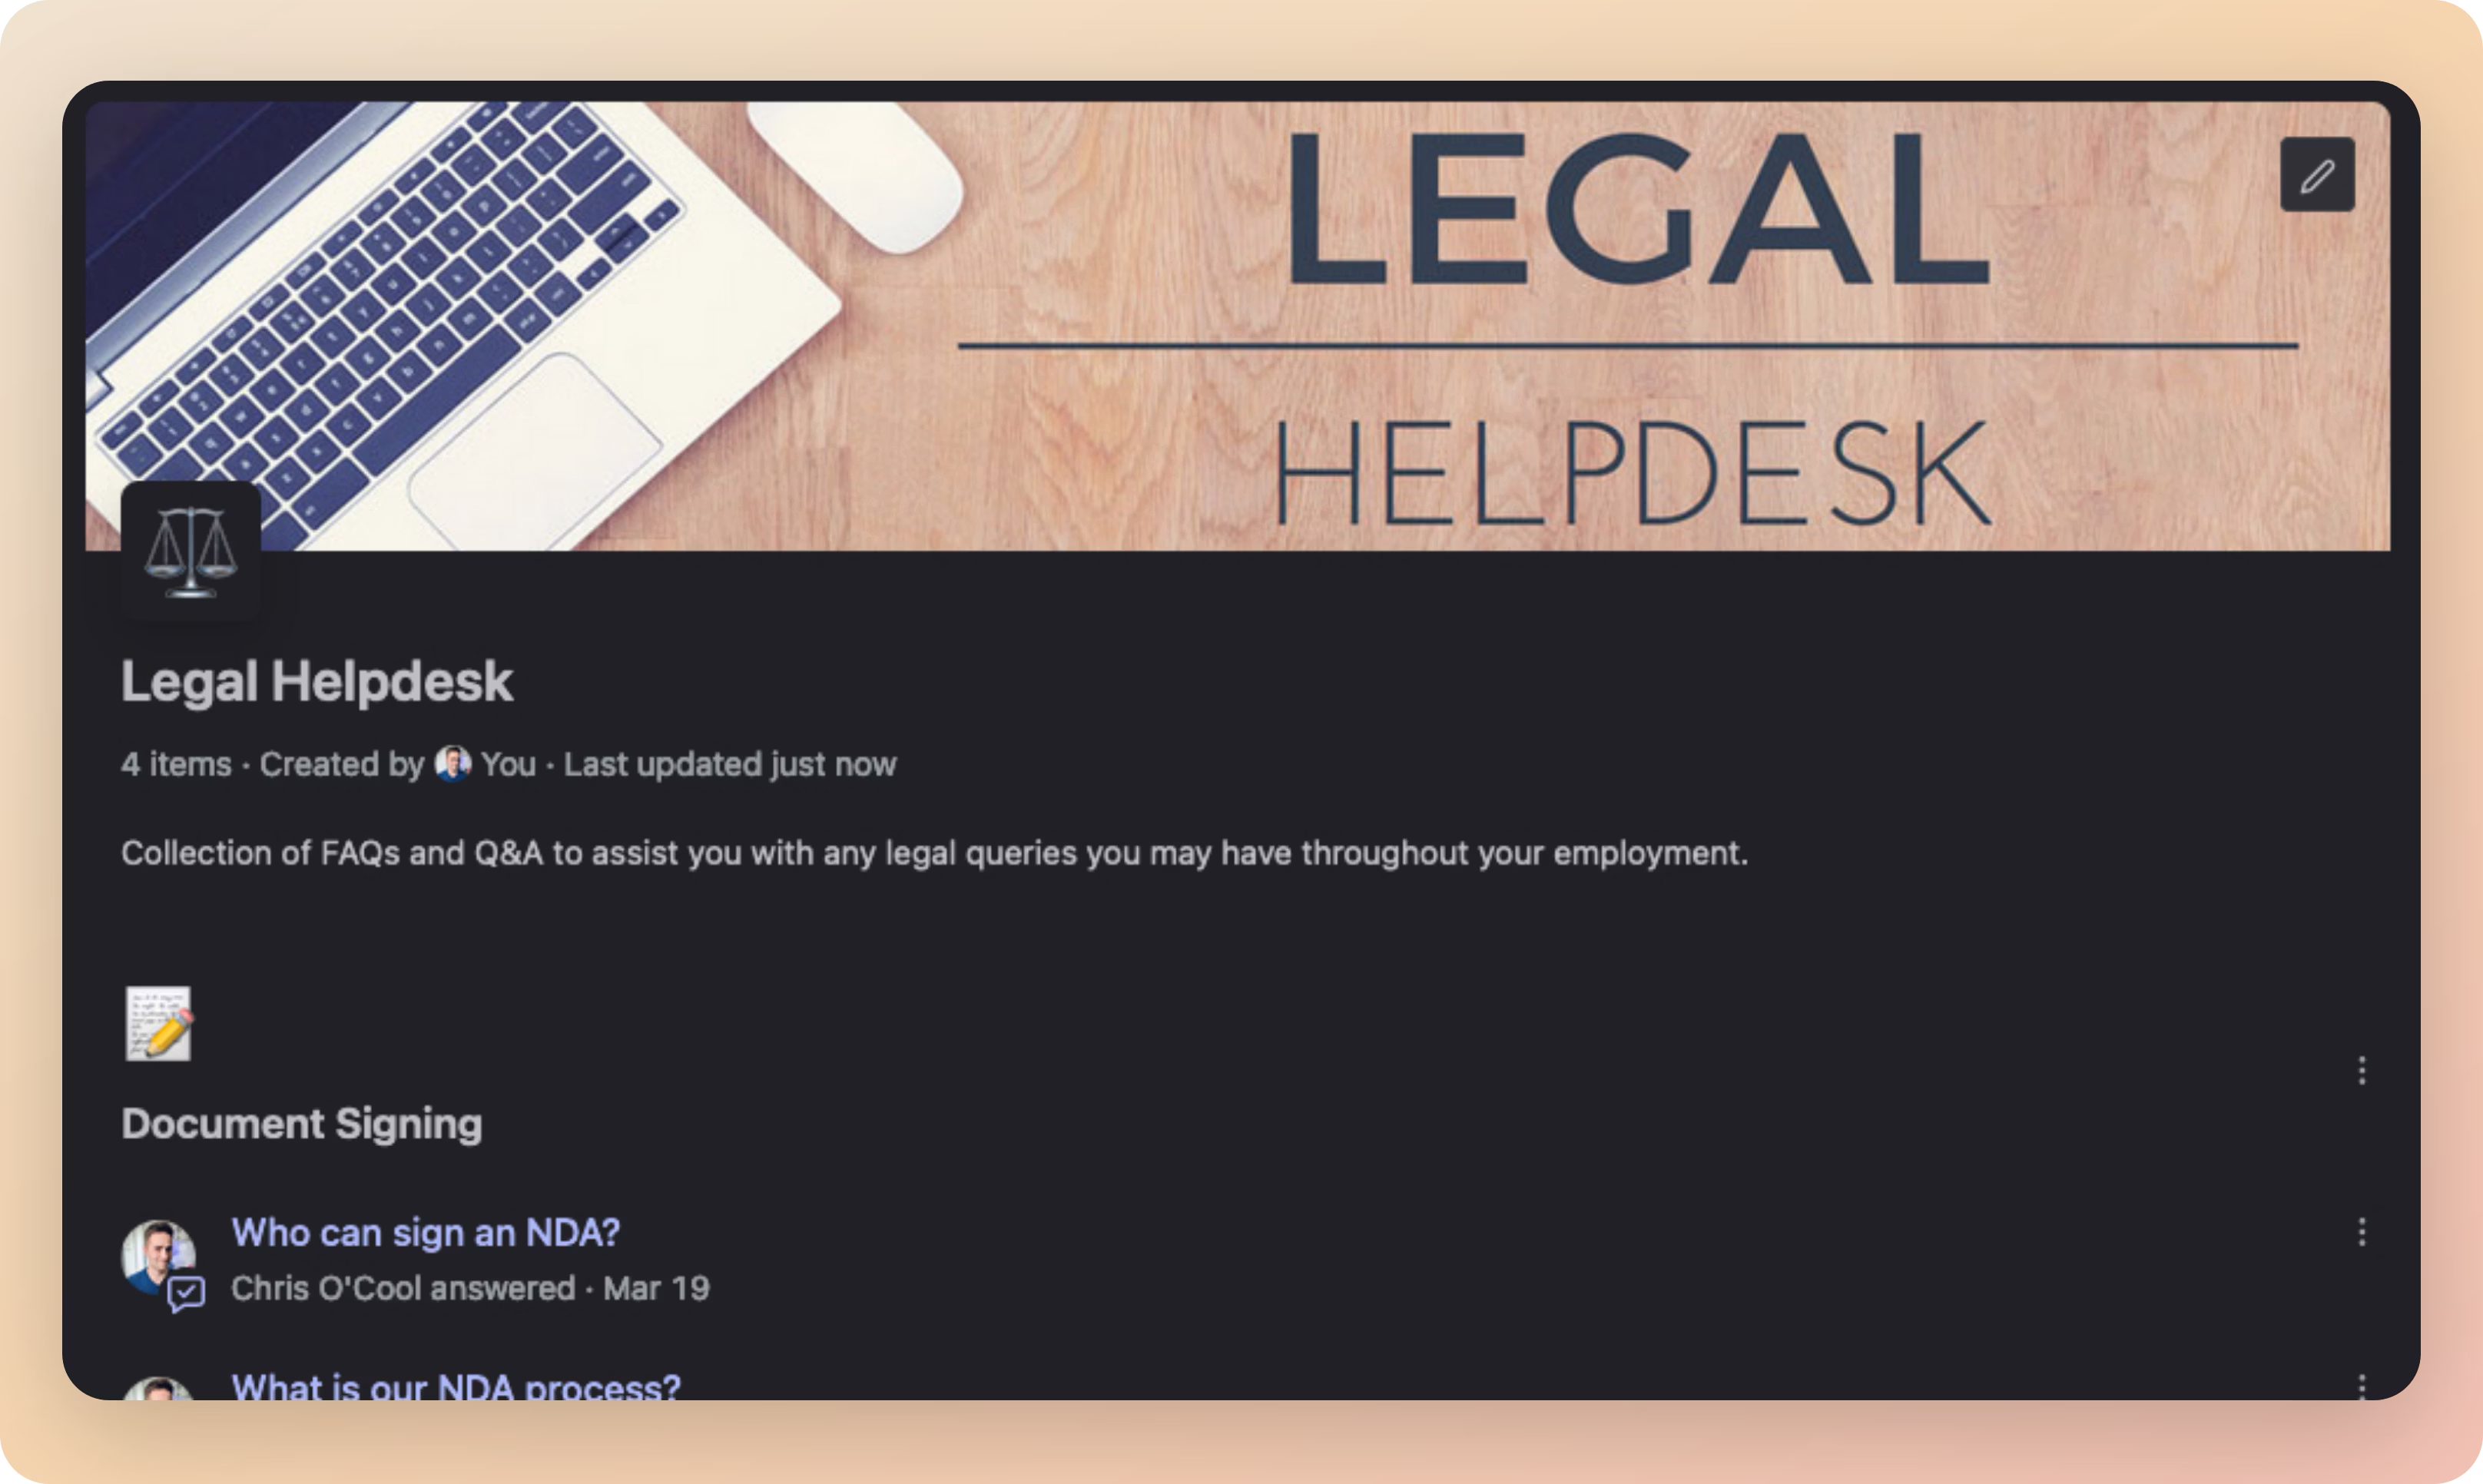
Collections are curated groups of documents or resources that are relevant to specific projects or topics. Think of them like a folder whose contents can span multiple different sources of data or apps.
Organize a set of links, write useful descriptions about them, and share the whole package with the rest of the organization. Collections can be featured on the Glean home page and targeted at different audiences; providing a single source of truth for useful resources.
To create a Collection, navigate to Knowledge > Collections, then click the New Collection button at the top‑right.

More information: Using Collections
You should aim to populate Glean with at least two Collections to aggregate useful information together. Here are some ideas to get you started:
| Collection Name | Description |
|---|---|
| New Employee Onboarding | All resources and checklists that a new employee needs to follow during their first week at the company. |
| Life @ [COMPANY] | Links to policy documents relating to benefits, annual leave, travel, and technology at the company. |
| Using Glean | Documents, answers, and links related to Glean to help employees use the platform. |
| Legal Helpdesk | FAQs and documents related to anything legal related at the company. |
| T&E Hub | All documents, apps, and resources that employees need to book travel and manage expenses. |
| [LOCATION] Office | Information relating to a specific company office, e.g. Sydney |
| [TEAM NAME] | Contact details, Slack/Teams channels, and key documents managed by a specific team or department within the company, e.g. Solution Engineering. |
| Project [NAME] | All key resources relating to a specific internal project. |
Document Verification

Document Verification allows content owners and moderators to mark content in Glean's Search Results as Verified or Deprecated. This is useful to indicate to your users whether a piece of information or document is up‑to‑date and reliable.
- Verified documents receive a green checkmark ✅ next to them in the search results.
- Deprecated documents receive a red cross ❌ next to them in the search results.
To Verify or Deprecate a document:
- Search for the document you wish to Verify or Deprecate.
- Click the 3 dots to the right of the search result to open a menu.
- Select Verify or deprecate, then the relevant option.
- Your page will refresh, and the document will now have a green checkmark or red cross visible next to it.
More information: Verifying Content
You should aim to verify key documents that are relied on by your employees, such as your Employee Handbook or Travel & Expense policy.
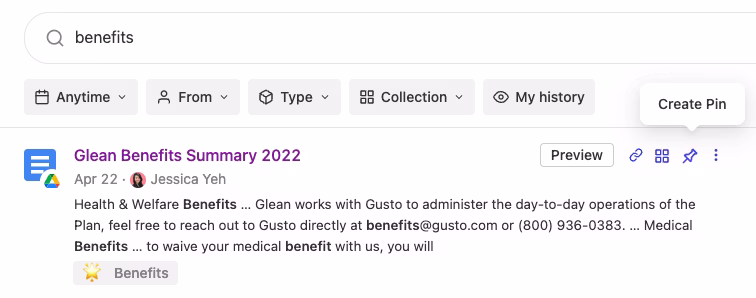
Pins
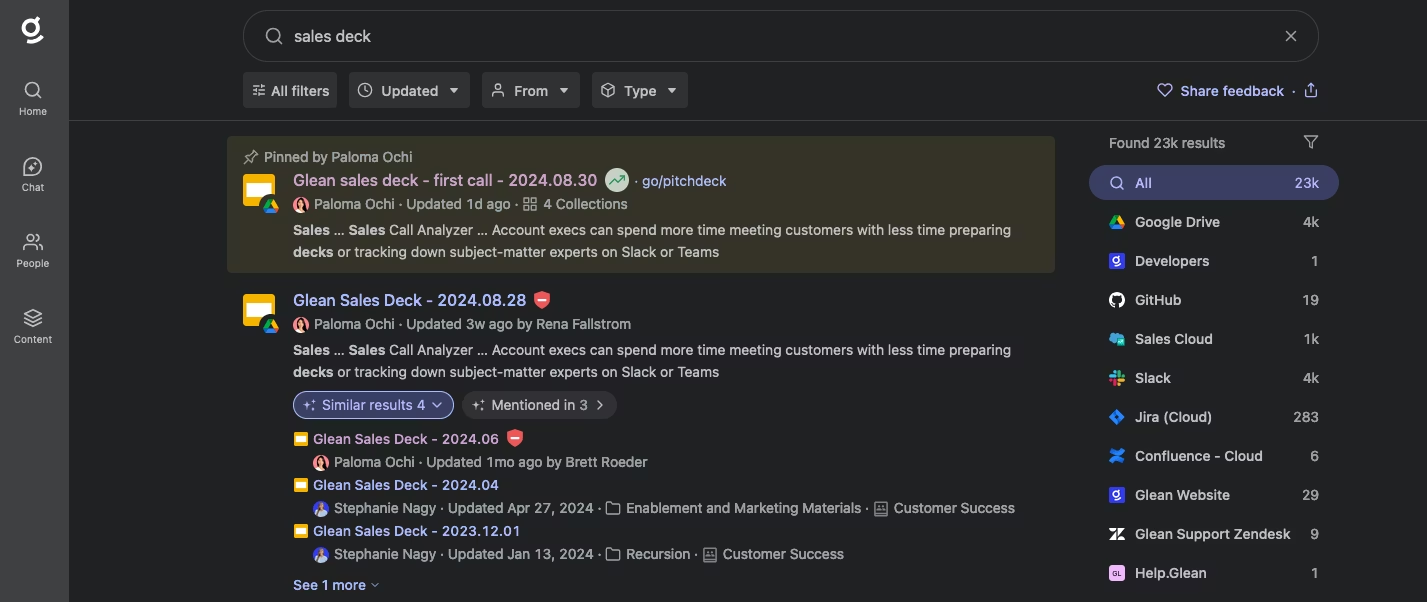
Pins allow you to push content to the top of search results based on specific keywords. Think of them as Google Ads (without the exchange of money!)
There are two types of Pins:
- Private Pins are only visible to the user who created them.
- Public Pins are visible to all users in the organization.
Pins are useful for promoting content that is important to your users, such as a new policy or a key document.
To create a Pin, navigate to Knowledge > Pins, then click the New Pin button at the top‑right. You can also pin content directly from the search results page.
More information: Using Pins
You should aim to create at least two Pins to promote key content to your users. For example:
- New Employee Handbook - Pin the new Employee Handbook to the top of search results for the keywords
handbookandonboarding. - New Travel & Expense Policy - Pin the new Travel & Expense Policy to the top of search results for the keywords
travelandexpense. - Benefits Hub - Pin the Benefits Hub to the top of search results for the keywords
benefitsandinsurance.
Customize Branding
In this step you will learn how to customize the branding of your Glean instance to match your organization's look and feel

Administrators can control several aspects of Glean's look and feel to ensure that it fits with the rest of the tools that employees use at work.
The customization options include the following:
- Company Branding: These settings control the look of Glean everywhere, and include support for custom logos and colors.
- Home page: These settings control how the Glean home page appears to users across your company, and include settings for a default background image, quick actions, and available home page widgets.
- Feature Enablement: These settings control which features within the Glean app are enabled/disabled for your employees. E.g. You may wish to disable the org chart from being accessed by your users.
You must be assigned the Admin or Super Admin roles to be able to customize the workspace appearance.
Company Branding
Admin Console > Settings > Appearance > Manage Branding
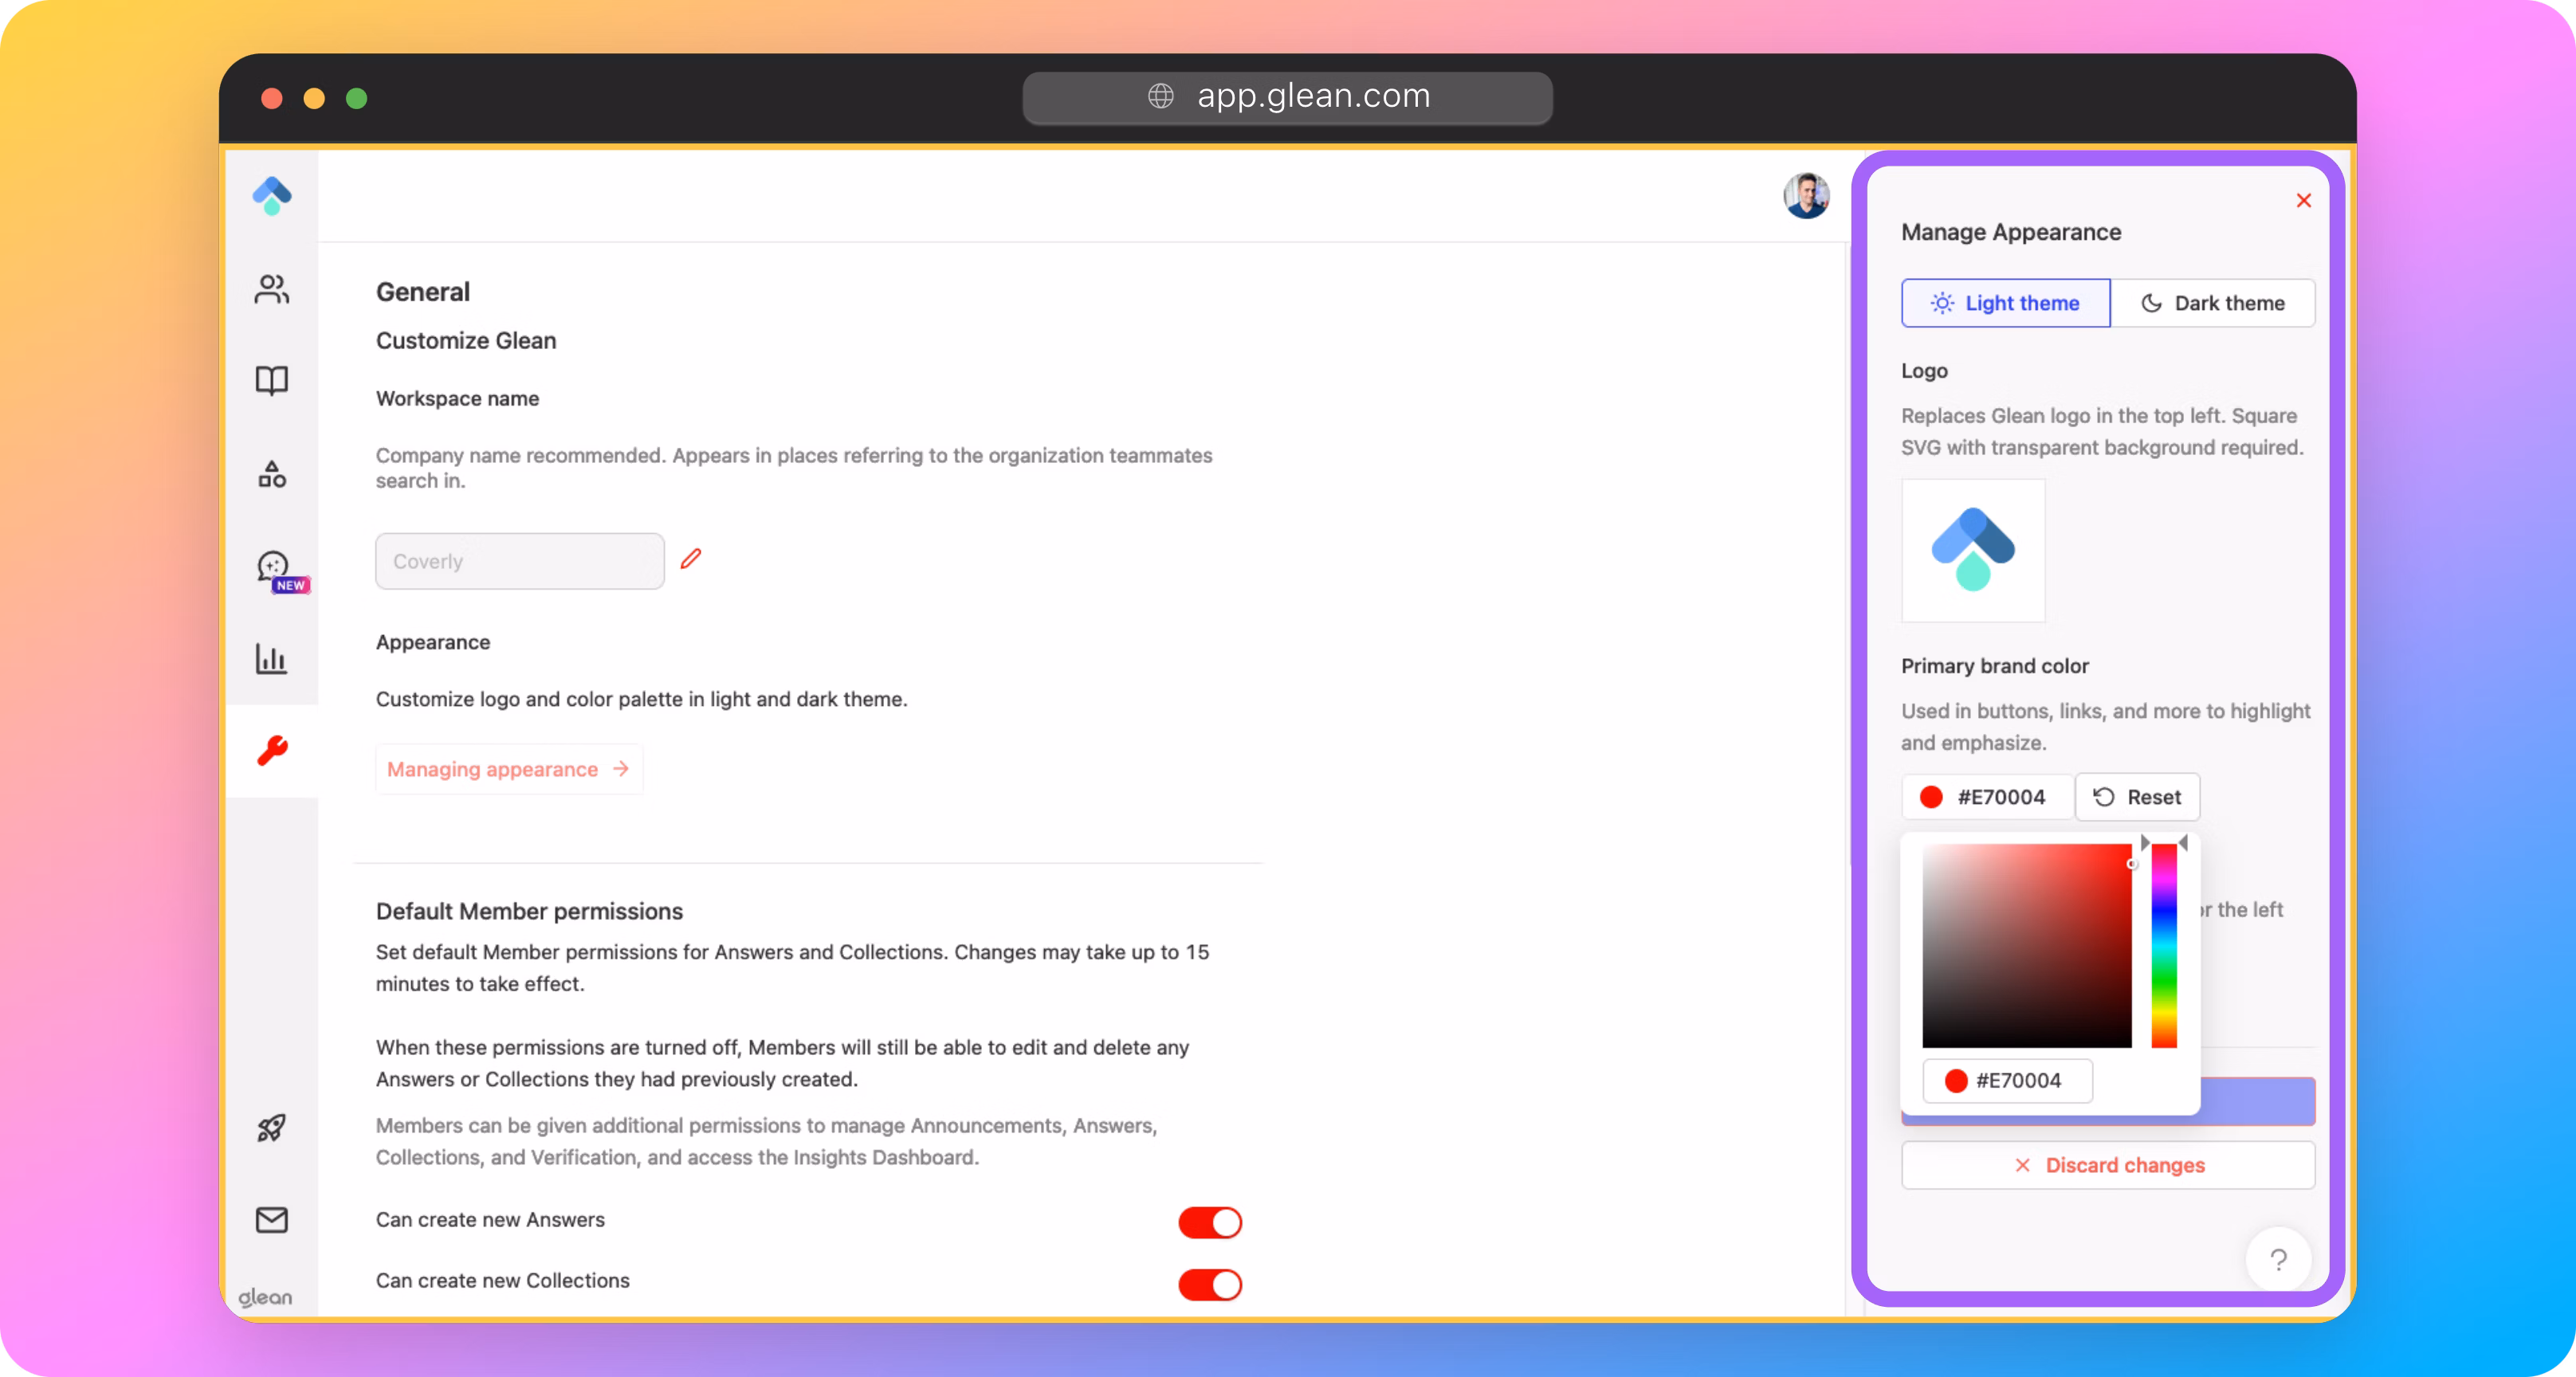
You can personalize the Glean UI to match your company's branding by adjusting:
- The company name displayed throughout the UI
- Logo
- Color theme
More information: Company Branding
Home Page
Admin Console > Settings > Appearance > Manage Home Page

Customize the look and feel of the Glean home page for your employees, including:
- Cards: Cards are the sections that are visible on the Glean home page for each of your users. These can include suggested documents, collections, and people celebrations.
- Quick Actions: Quick actions are the items that are displayed under the New button in the top‑right corner of the Home and New Tab pages; providing shortcuts for your employees to create new content across all of your apps.
- Default wallpapers: You can set the default wallpaper that is used for both light and dark modes when users first open Glean.
More information: Home Page Settings
Setup Glean Assistant
In this section, you will configure and activate Glean Assistant: a suite of enterprise‑grade Generative AI capabilities for your organization
Note
Before proceeding with this step, you should ensure that all of your initial data source crawls are complete and that your M/L workflows have run. Glean Assistant will not respond correctly until these steps have completed.
About Glean Assistant
Glean Assistant is a secure, enterprise‑ready digital workplace assistant that respects data access permissions and delivers personalized answers based on your organization’s data. Think of it like ChatGPT, but with secure access to your company’s information.
Glean Assistant is designed to enhance your workplace experience by providing you with the information you need, when you need it, in a secure and personalized manner. It understands your company’s content, internal language, people, and relationships, enabling Glean Assistant to deliver more relevant and accurate information than publicly available generative AI tools.
Setting Up Glean Assistant
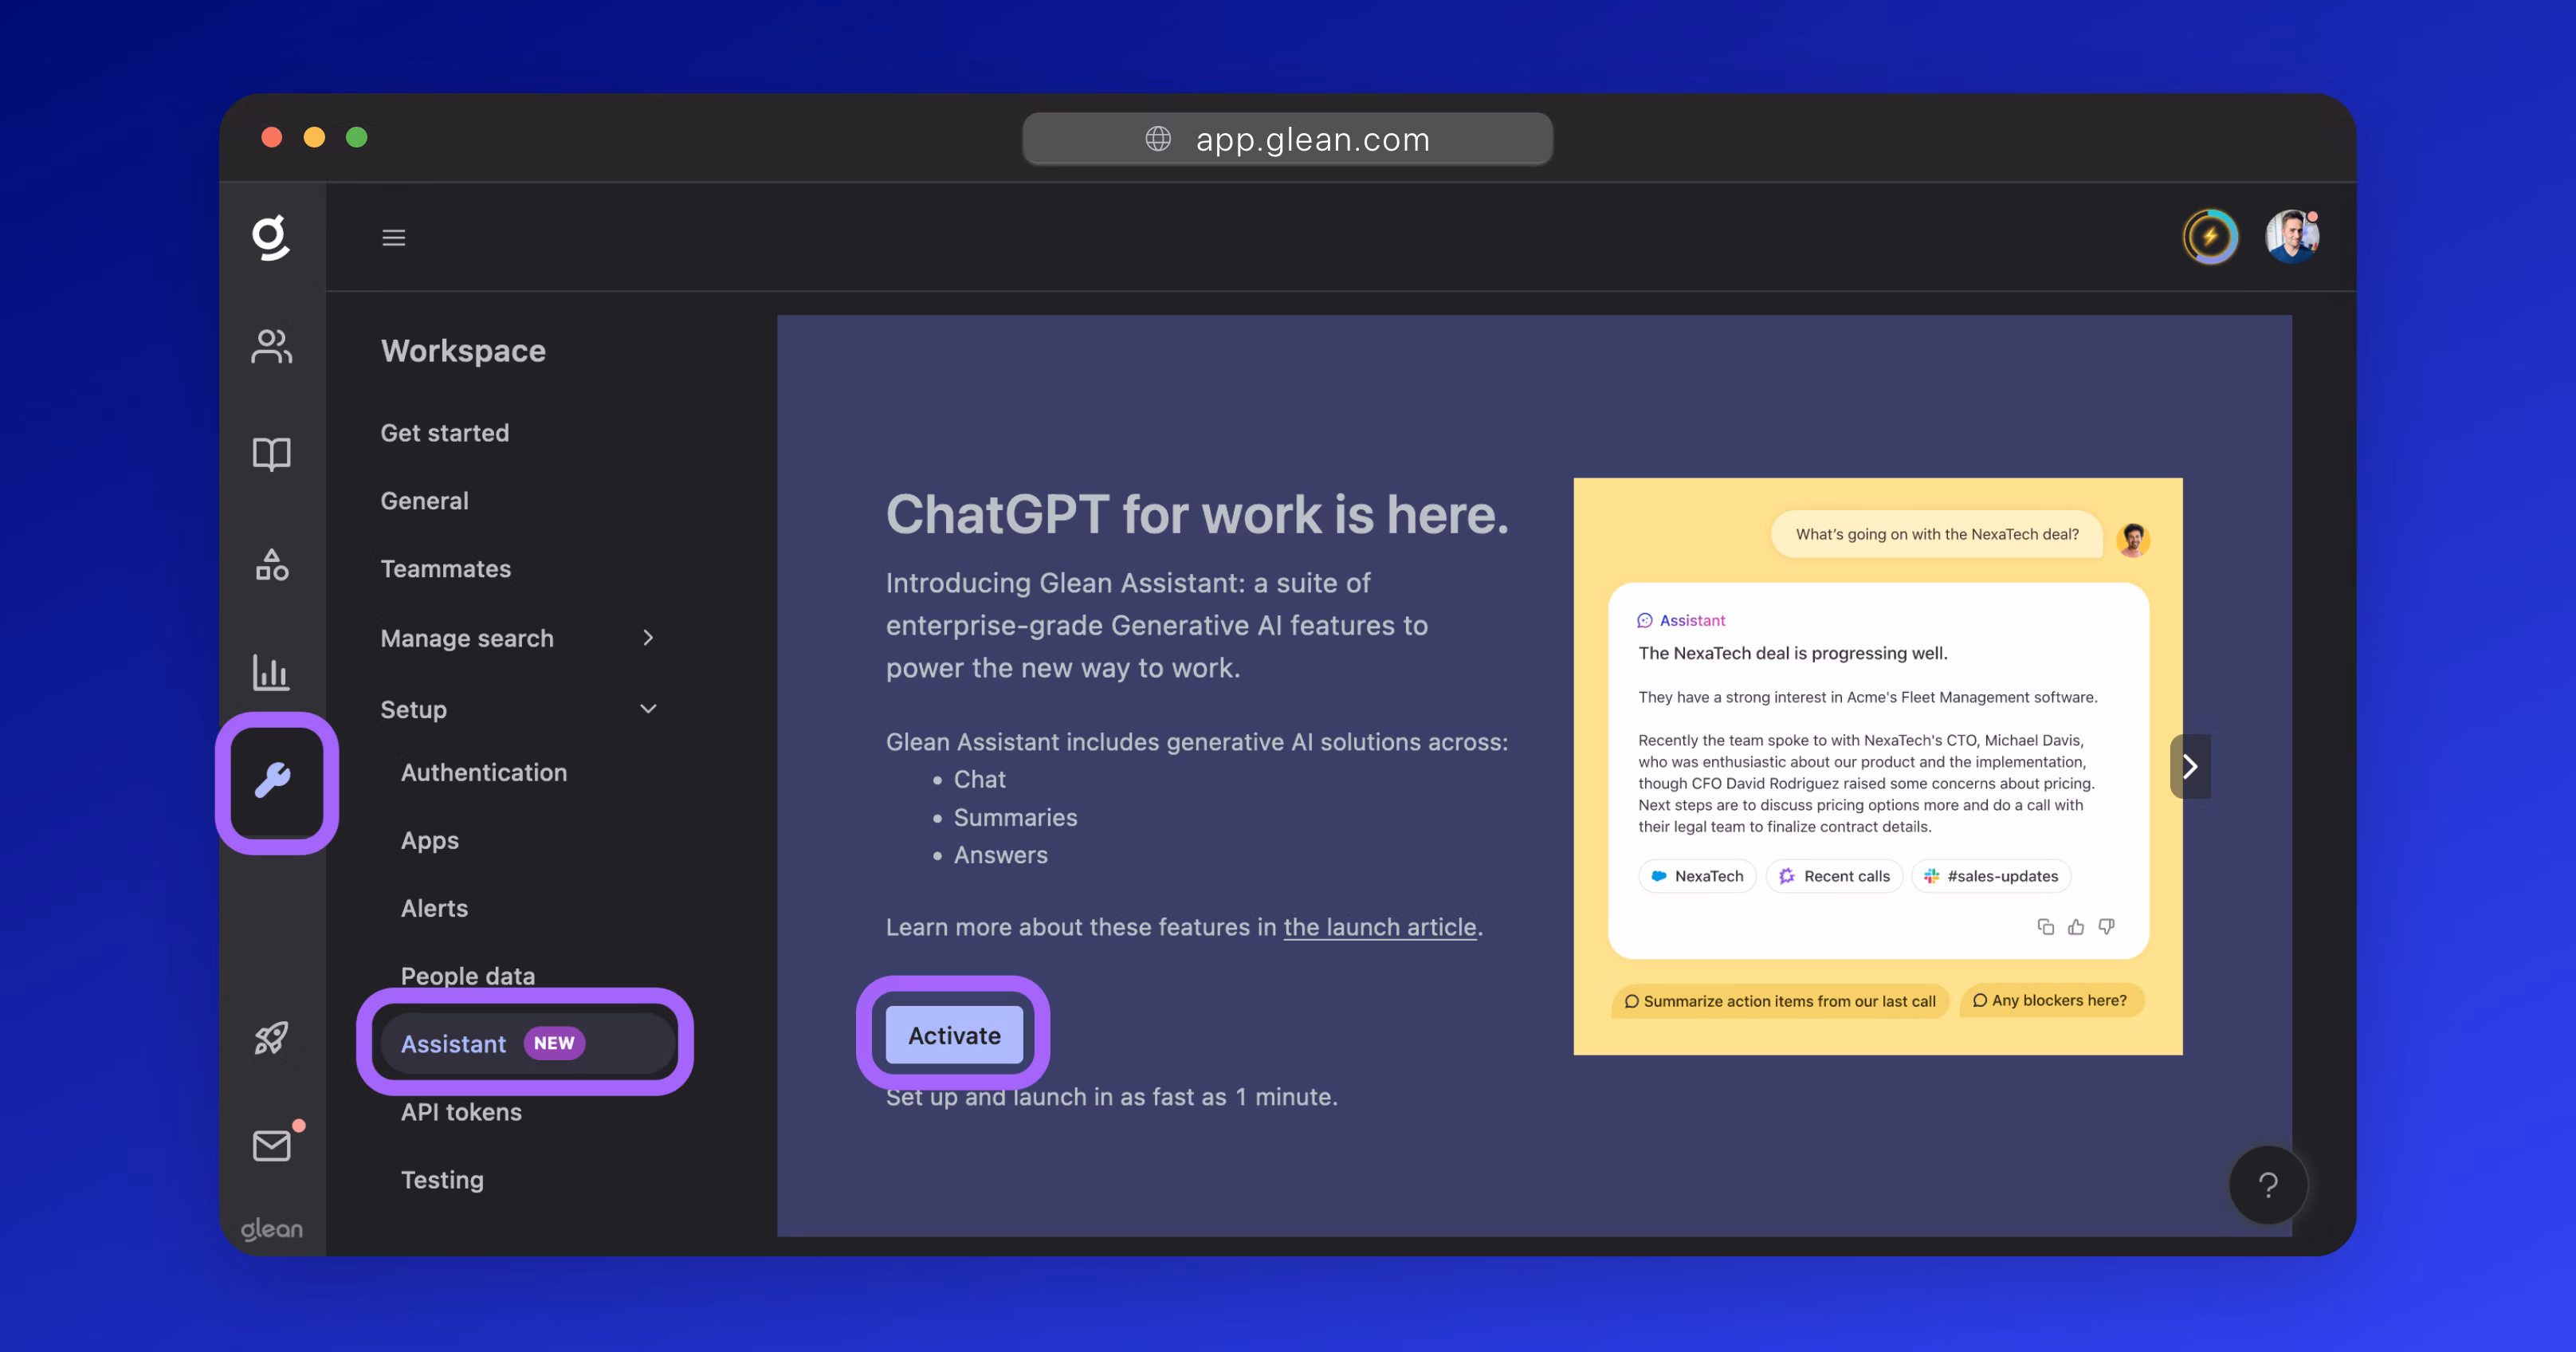
Activate Glean Assistant
You can activate Glean Assistant by navigating to Admin Console > Platform > Assistant > Setup, then selecting Activate.
If the Assistant menu option is greyed out or not visible, this means that either:
- Your People Data sync has not been completed.
- The initial crawling/indexing tasks for all data sources has not yet completed, OR
- The M/L workflows for your environment have not yet completed.
Once you have completed these steps, the Assistant menu option will become visible and you can activate Glean Assistant.
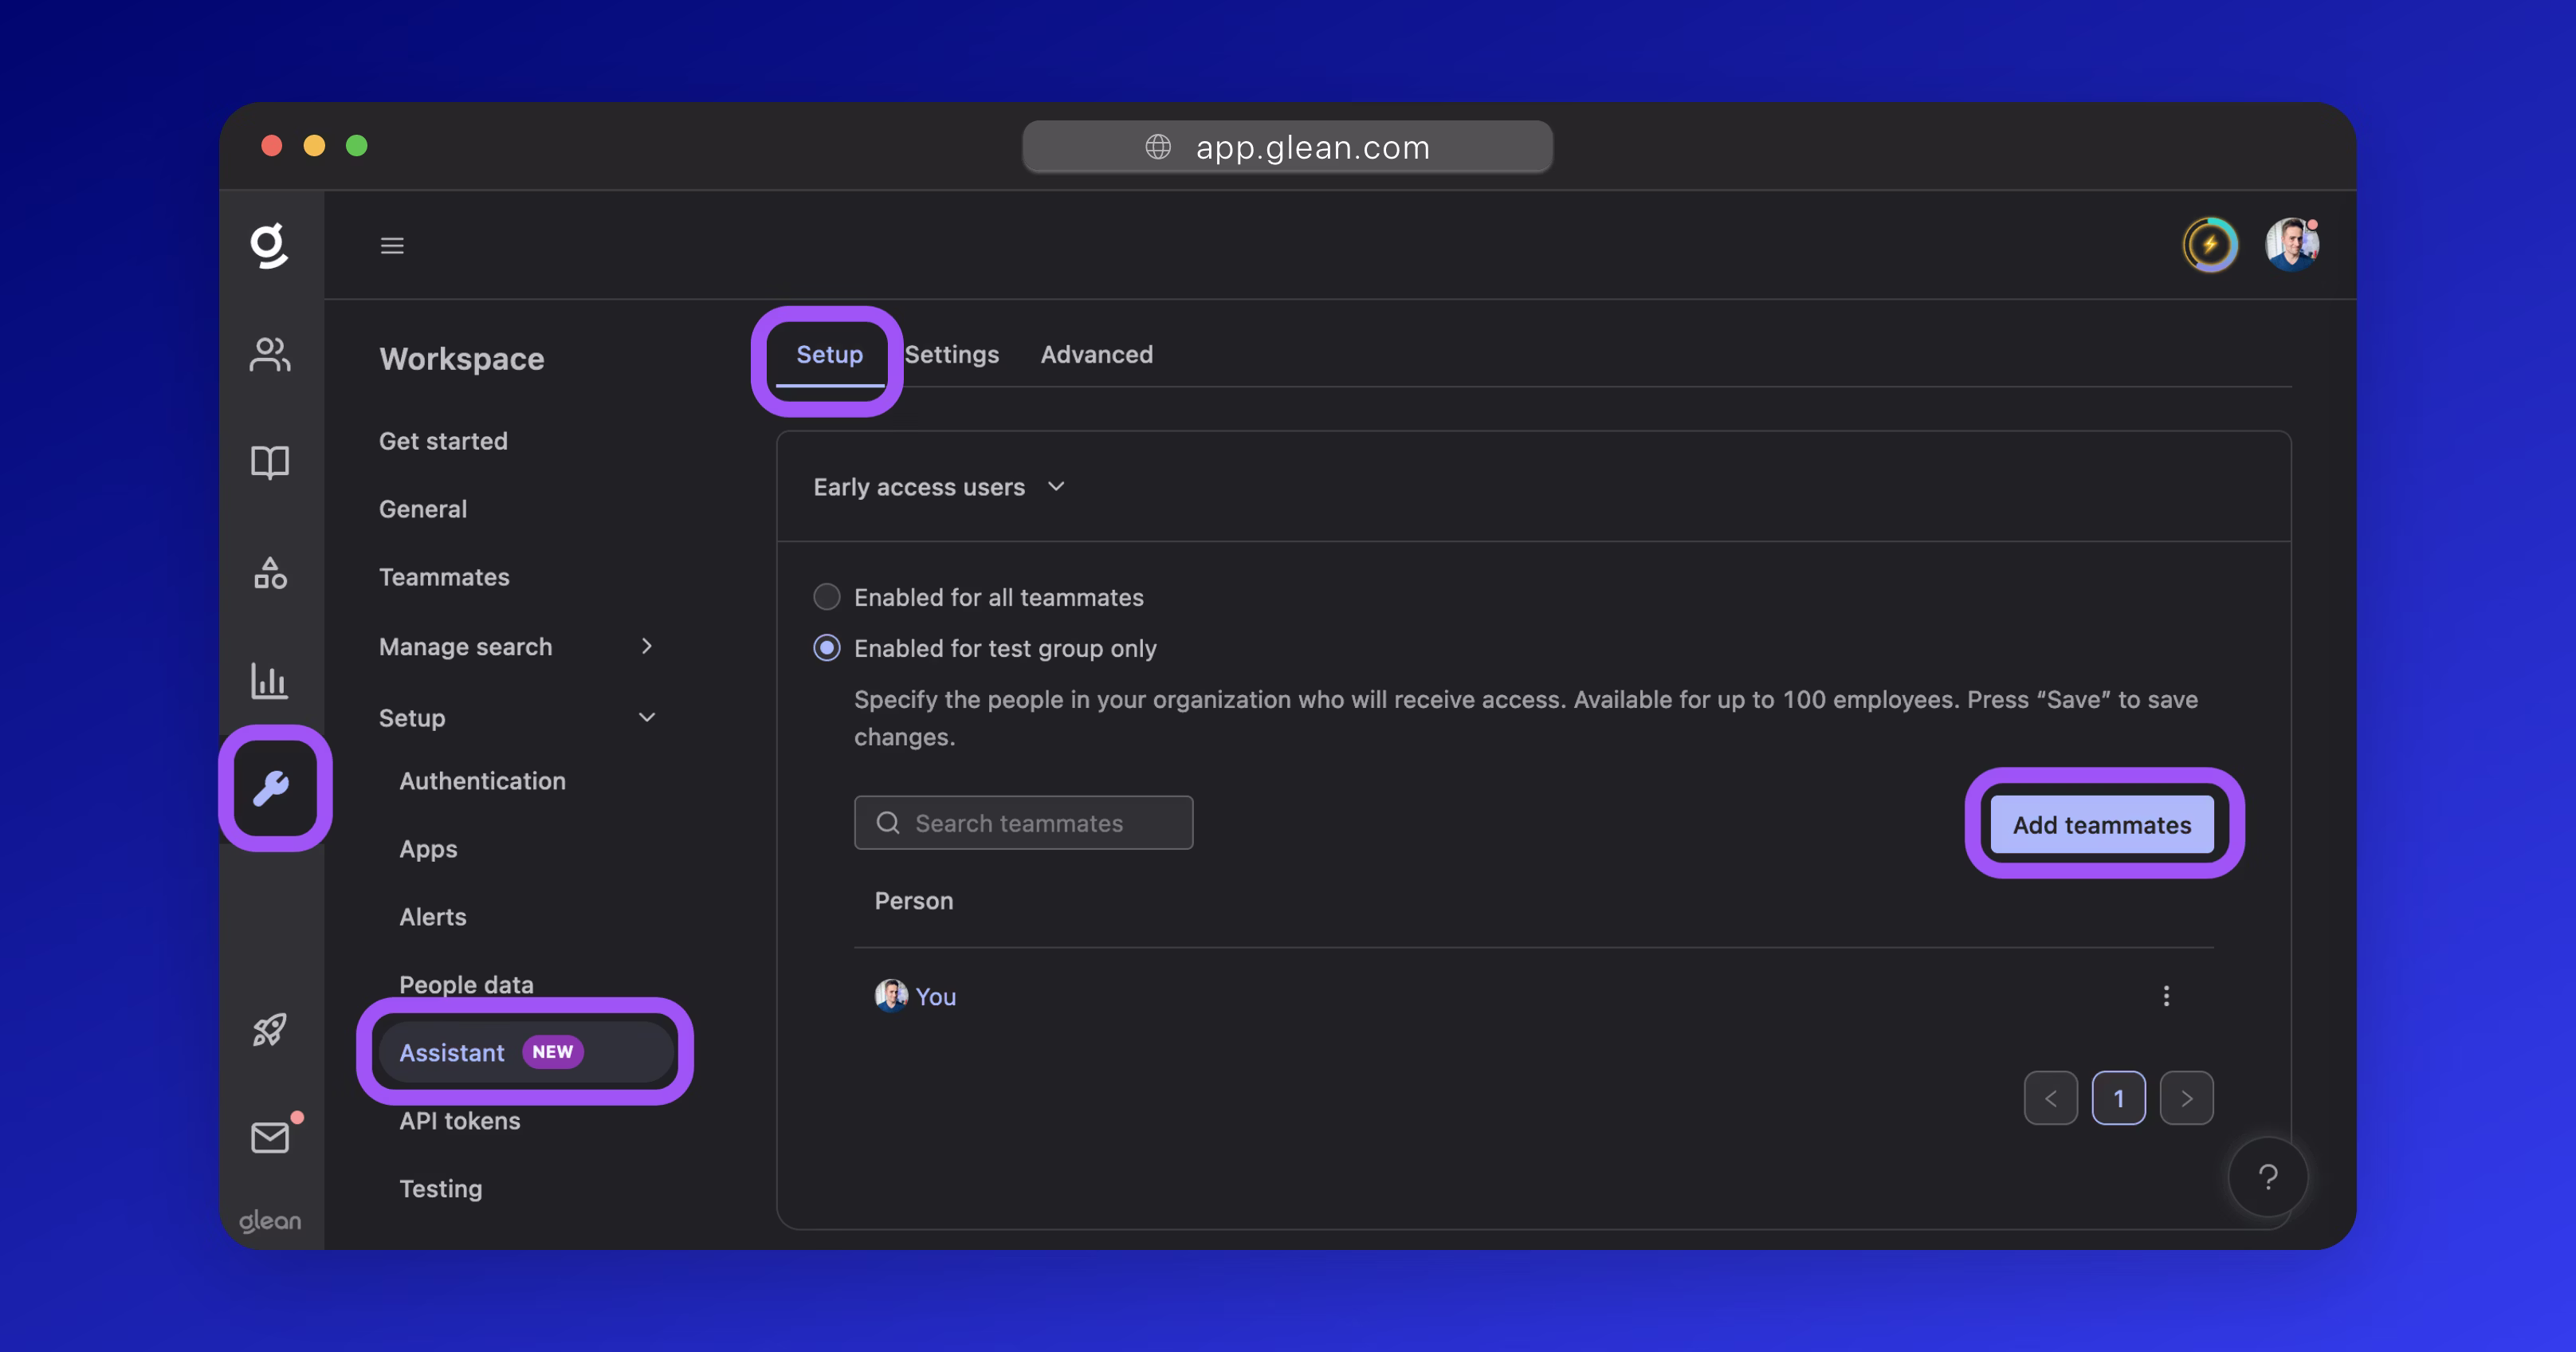
Assign Users
Glean Assistant can be enabled for the entire organization or for a selected test group of users. Glean recommends enabling Assistant for a test group first before proceeding with the rollout to the broader organization.
To assign users to Glean Assistant, navigate to Admin Console > Platform > Assistant > Setup, then click to open the User Access dropdown menu. Here you can select either:
- Enabled for all teammates
- Enabled for test group only
If you select Enabled for test group only, you can click the Add teammates button to specify the users who will have access.
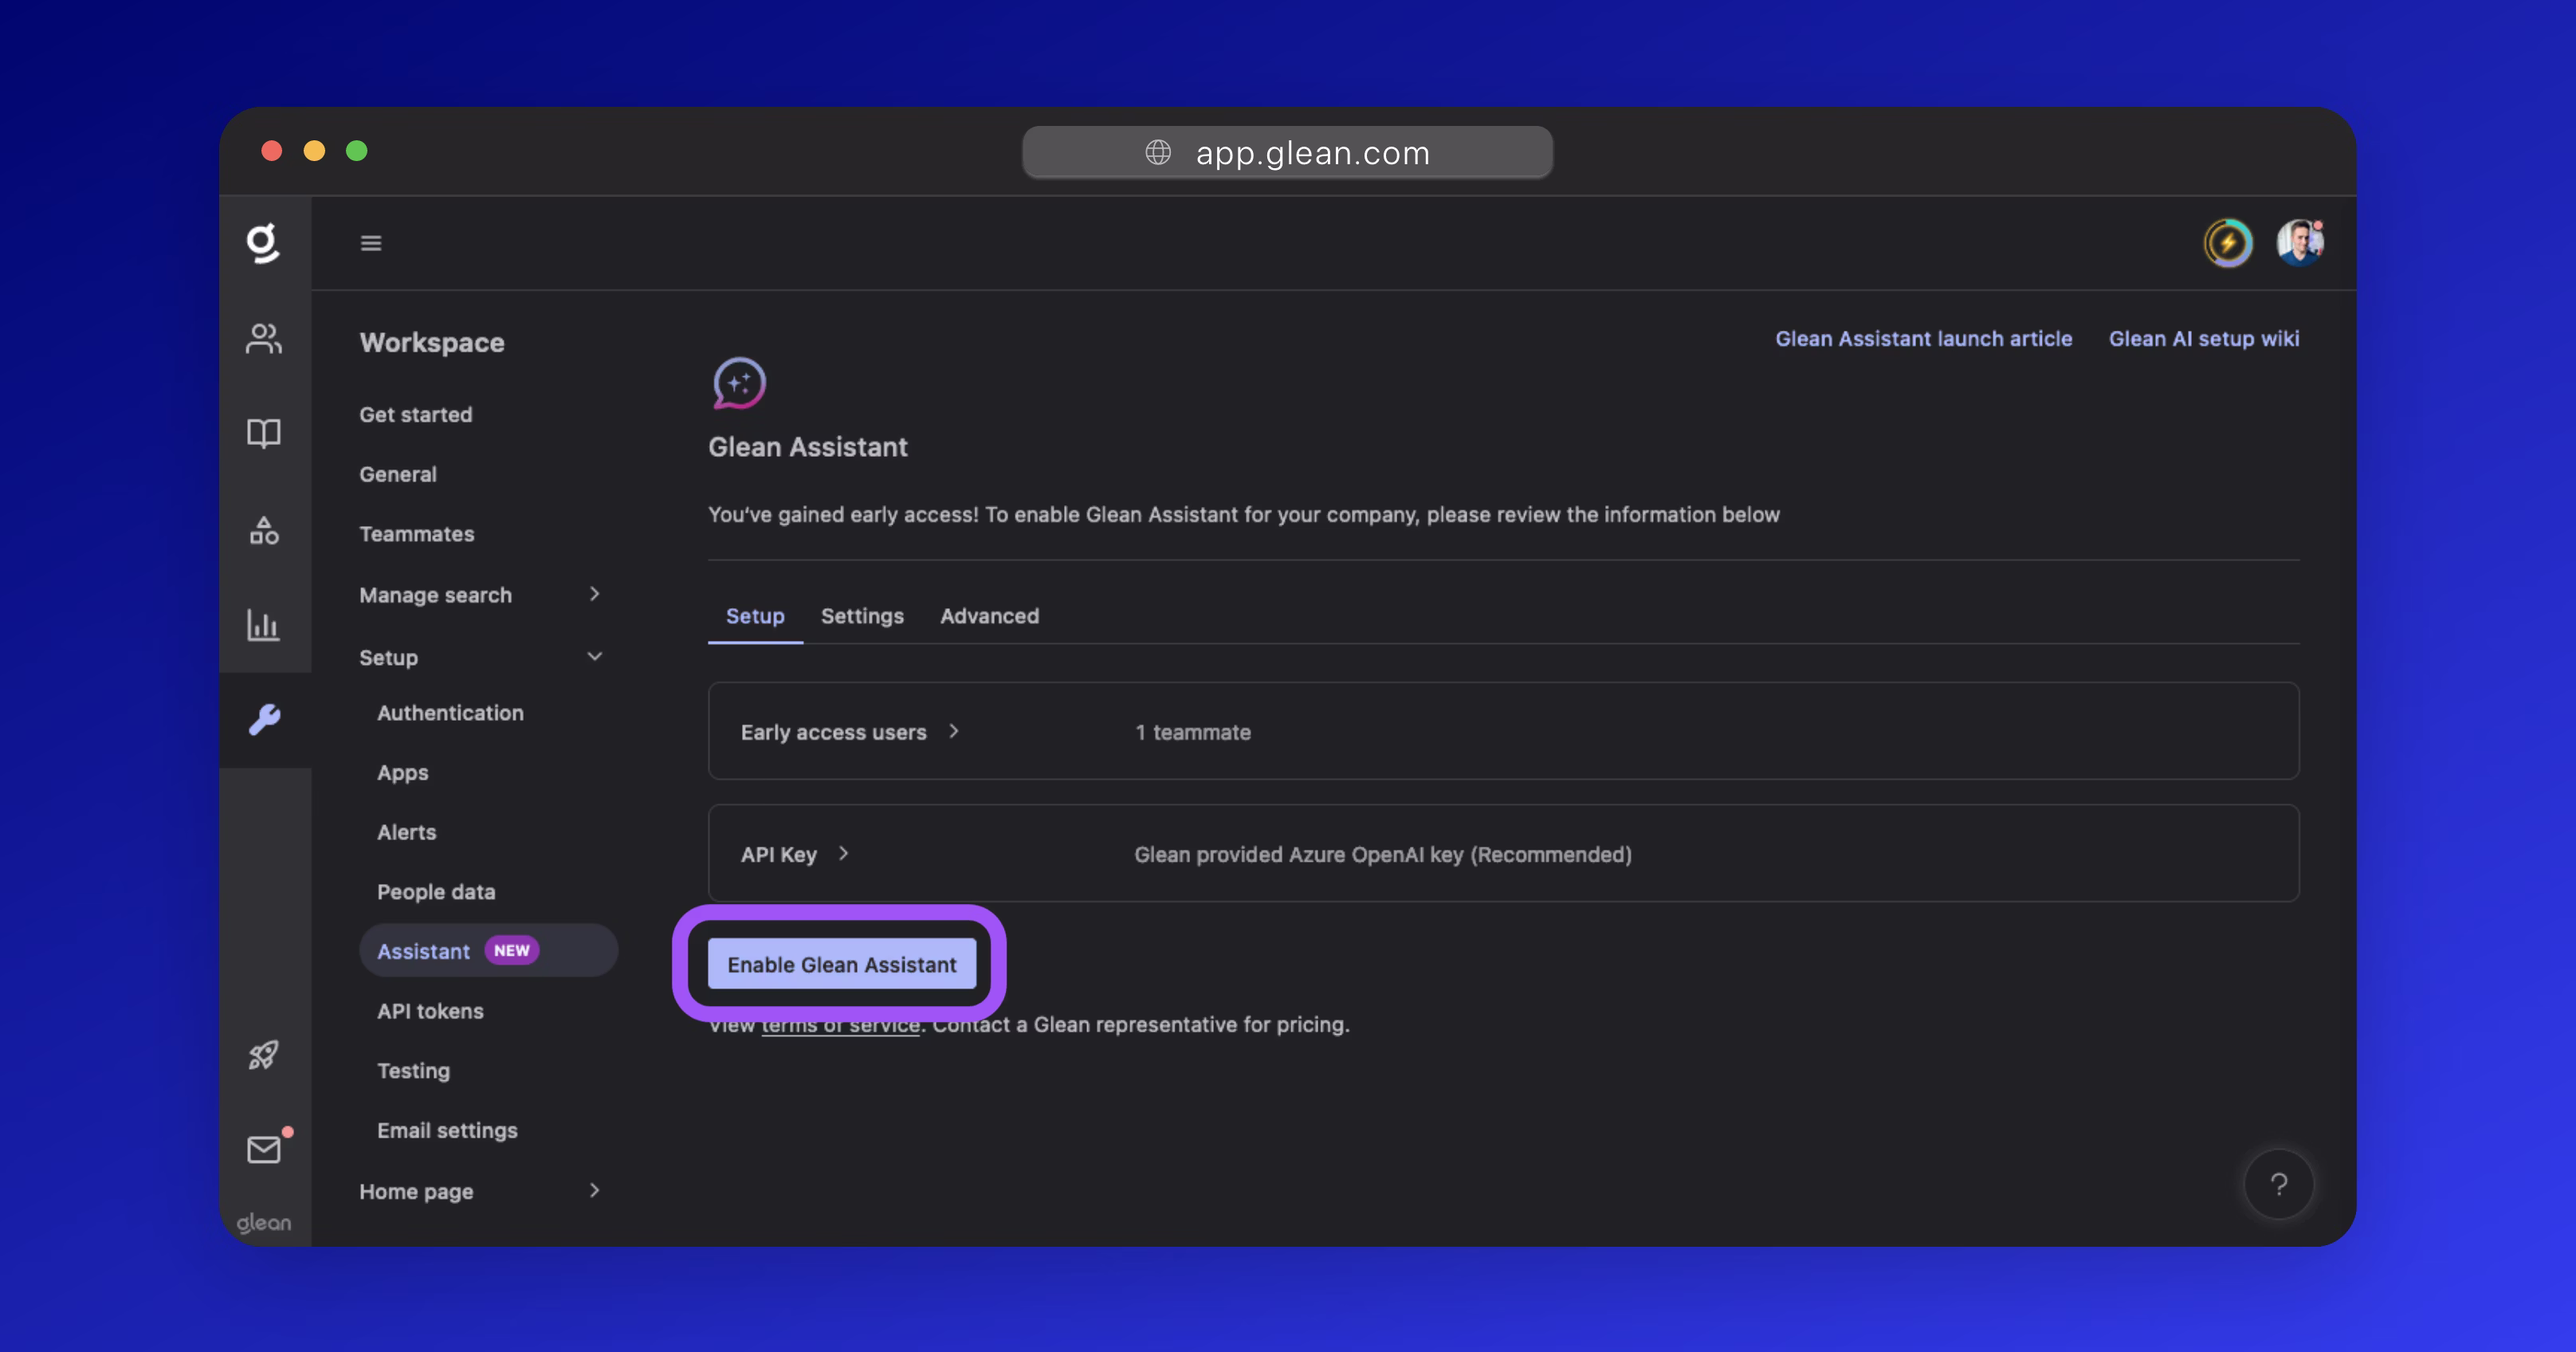
Enable Glean Assistant
Once you have specified the users that Assistant should be enabled for, click the Enable Glean Assistant button to turn on Assistant for those users.
Alternatively, you can also follow any of the applicable optional steps below to customize Assistant and its behavior.
Customizing Glean Assistant
There are a number of optional settings you can configure for Glean Assistant.
Select Your LLM
Glean supports a range of LLMs including:
- GPT
- Claude
- Gemini
In addition, Glean supports accessing your selected LLM via a variety of methods depending on the needs of your organization. For example, AWS Bedrock, GCP Vertex AI, etc.
You can select the LLM provider by navigating to Admin Console > Platform > Assistant > Setup, then expanding the LLM Provider section.
Receive User feedback
Users can provide feedback to Glean Assistant responses as positive (👍) or negative (👎) with accompanying comments. You can opt to have this feedback sent to a company email alias for review.
To configure settings related to user feedback, navigate to Admin Console > Settings > Help, expand the Feedback section, and click the Advanced preferences button.
More information: Receive User Feedback
Set Exclusion Rules
You can exclude certain content from ever being sent to an LLM across all Glean Assistant interfaces.
For example, if you exclude a document, Glean Assistant will not use any data from that document to generate responses; even if a user is permitted to access the document content.
To set explicit exclusion (or inclusion) rules, navigate to Admin Console > Platform > Assistant > Advanced, then expand the Exclusion rules and Inclusion rules sections.
More information: Restricting LLM Access to Content
Provide Custom instructions
You can optionally provide Glean Assistant with up to 5 custom instructions to better align its behavior with your enterprise requirements.
For example:
- Ensure that you remind users that their answers may not be accurate.
- Do not respond to any queries regarding salary.
- Only respond in German.
To set a custom instruction, navigate to Admin Console > Platform > Assistant > Advanced, then expand the Custom instructions section.
Warning
Custom instructions do not alter Glean Assistant's retrieval capabilities. They control the response generated by the LLM and are sent alongside data retrieved by Glean as deemed relevant to the user's query.
More information: Custom Instructions
Set a Disclaimer
You can set a disclaimer that will be displayed to users when they interact with Glean Assistant. This can be used to inform users about the limitations of Generative AI or to provide them with important information.
To set a disclaimer, navigate to Admin Console > Platform > Assistant > Advanced, then expand the Disclaimers section.
Using Glean Assistant
Chat
Glean Chat is the dedicated entry point for the Assistant and can be accessed by clicking on the message bubble icon from the left‑side menu of the Glean UI: Chat > New Chat
More information: Glean Chat
AI Answers
AI Answers are typically used in the context of search results, providing direct answers to user queries based on the content of your documents when a user makes a relevant search query.
More information: AI Answers
AI Summaries
The AI Summarization feature of Glean Assistant provides concise summaries of documents. This feature is designed to enhance your productivity by providing a quick overview of a document’s content without having to read the entire document.
To summarize a document, hover over a search result and click the Summarize button that appears at the top‑right of the result.
Slackbot
If your organization uses Slack, you can configure Glean Assistant as a bot within your Slack workspace to automatically answer questions as employees post them.
More information: Slackbot
Teamsbot
If your organization uses Microsoft Teams, you can configure Glean Assistant as a bot within your Teams workspace to automatically answer questions as employees post them.
Prompt Library
The Prompt Library allows you and/or your users to curate and save frequently used queries as prompts. These can be incredibly useful for performing repetitive Generative AI tasks, or for assisting less technical users make use of Generative AI.
More information: Prompt Library
Launch Preparation
This article will cover effective rollout strategies and tips to ensure you have maximum success and engagement when deploying Glean to your users
The time has come to go live and open Glean to your initial batch of users.
Implementing a new tool like Glean across your organization can be a transformative step, enhancing productivity and streamlining information access. However, the success of such a rollout largely depends on how well it is executed.
Pre-Launch Preparation
Checklist
- Initial Users Identified
- User Survey Conducted
- Feedback & Communication Channels Established
- Training Materials Prepared
- Launch Date & Kickoff Session Scheduled
- Office Hours Scheduled
- User Communications Sent Out
- Glean Browser Extension Deployed
- Glean populated with Announcements, Answers, Go Links, Collections, and Document Verifications; ready for initial wave of users.
1. Identify Users
To effectively manage user adaptation and ensure a smooth integration of Glean into your organization, it's advisable to start with a staggered rollout. Begin by selecting an initial group of approximately 100‑300 users. This approach allows you to closely monitor system performance and gather valuable feedback in a controlled setting.
Selection Criteria
Choose your initial users from a diverse range of departments or teams. This strategy ensures that you receive a broad spectrum of feedback, reflecting the varied ways in which different departments will utilize Glean. For instance, the engineering team might focus on different functionalities compared to what might be essential for the Sales or Marketing teams.
Alternatively, you could consider initiating the rollout within a single department or team. This method allows you to focus on specific use‑cases and streamline the initial integration process before expanding to other parts of the organization.
Encouraging Organic Growth
Promoting organic growth is essential for the successful adoption of the Glean across your organization. Often, colleagues of the initial users will notice the benefits of Glean and express interest in trying it themselves. Facilitate this process by allowing open access, which can significantly enhance the tool's acceptance and usage.
Success
Ensure that all new users complete an initial survey (see the sections below). This step is vital as it helps capture their feedback and experiences, aligning them with insights gathered from the initial user group.
Consider posting an Announcement in Glean that mandates this survey for all new users.
2. Survey Users
Before granting access to Glean, it is important to understand the current challenges your users face regarding data retrieval and internal communications within your organization. Conducting a preliminary survey with your initial wave of users will provide valuable insights into these challenges and how effective Glean is at addressing them.
The survey should aim to:
- Assess the current difficulties users experience when trying to find data and connect with the right people across various systems.
- Gauge user expectations regarding the potential time savings and efficiency gains from an enterprise search and company‑sanctioned Generative AI solution like Glean.
- Collect feedback on desired features and functionalities that users find most critical in such a tool.
Initial Survey Template
Glean offers a comprehensive survey template designed to gather all necessary user insights effectively. This template can be used as‑is or can be customized to better fit the specific needs of your organization.
- Glean Initial User Survey (Google Forms)
You should ensure that all users have completed the survey before being provided with access to Glean.
3. Establish Feedback Channels
To ensure the successful adoption and continuous improvement of Glean within your organization, it is essential to establish robust and accessible channels for user feedback.
A highly effective way to gather and manage feedback is through dedicated channels on communication platforms such as Slack or Microsoft Teams, as this allows users to engage more collaboratively.
- Create a Dedicated Channel: Establish a specific channel on Slack or Teams for all things related to Glean. Name it something intuitive like #glean‑feedback or #glean‑support.
- Encourage Active Participation: Promote this channel as the go‑to place for sharing insights, feedback, questions, ideas, and any issues users encounter with Glean.
- Involve the Glean Team: If possible, include members from your Glean account team in this channel. Their presence can be incredibly beneficial as they can provide expert responses to technical queries, offer solutions, and take action on the feedback provided in a faster timeframe.
Success
If direct involvement of the Glean team in the feedback channel is not feasible, you should ensure that a weekly touchpoint with them is established to go over the feedback collected through the channel.
4. Schedule a Live Kickoff Session
Schedule a 60 minute live session with your initial group of users to ensure a comprehensive introduction to Glean.
This session should encompass a range of topics including basic functionality, advanced features, and best practices for using Glean effectively. It should also guide users on how to submit feedback, highlight potential pitfalls (gotchas), and more broadly, explain how Glean aligns with the company's strategic vision for Generative AI and Knowledge Management.
Session Planning
- Executive Endorsement: Begin the event with a pre‑recorded message from your CIO or another key executive. This message talk about the impact of Generative AI on the business and the importance of Glean as a strategic tool.
- Duration and Format: Aim for a length of 60 minutes for the session. It should ideally be a hybrid of in‑person and virtual/livestreamed.
- Topics:
- Explore the home page and how it aggregates company content.
- How to search across company apps using both keywords (like a traditional Google search) and natural language.
- E.g. "expense policy" vs "what's the maximum I can expense on a hotel when travelling?"
- How to use Glean Assistant to find answers and generate content.
- "Who do I talk to about X?"
- "Write an email to X about Y"
- "Generate me some python code to do X."
- People Profiles and the Organization Chart.
- Using Announcements, Answers, and Collections.
- How to create and use Go Links.
- The importance of Document Verification.
- Where to get help and submit feedback.
Success
Instead of relying on static slides, conduct the entire session in the live Glean environment. This shows real‑time usage of the tool and will help train your users on how to effectively leverage the platform.
Set expectations
Make it clear that while Glean is powerful, it will not be able to surface content from apps or data sources that it is not yet connected to.
Success
Consider creating a specific Answer in Glean that lists the company apps that Glean is currently connected to, and encourage users to submit feedback with the apps/datasources they would like to see added.
Encourage Feedback
Stress the importance of each user providing feedback during the kickoff. You should explain how their insights and suggestions are crucial for refining Glean and enhancing its functionality within the company.
Remind users about the established feedback channel in Slack/Teams, and encourage them to use it to share ideas, questions, and/or issues.
5. Schedule Office Hours
Scheduling weekly office hours is an effective strategy to provide ongoing support, address any issues, and discuss specific features with your users in detail.
- Set a Regular Schedule: Choose a consistent time each week for the office hours. Communicate the time during the kickoff and consider posting an Announcement in Glean with the details.
- Weekly Focus Areas: Each session should focus on general Q&A, and discussion on feedback and improvements, however you should also plan a deep dive into a specific Glean feature each week. This will help ensure regular attendance from your users.
- Participation Reminders: Actively encourage users to participate in these sessions. Ensure the meeting invite is recurring, that you have posted an Announcement in Glean, and that you are reminding your users weekly in the feedback channel.
6. Send Comms to Users
Refer to below email template below for a company‑wide communication to inform of a managed Chrome/Edge install.
Email Template
Subject: Introducing Our New Tool: Enhance Your Productivity with Glean!
Dear [NAME],
We are thrilled to introduce Glean, a transformative tool designed to boost your productivity and streamline your workflow. As part of our commitment to enhancing your efficiency at work, Glean combines the power of search and Generative AI to simplify how you access information across our company apps.
What is Glean?
Think of Glean as a blend of Google and ChatGPT, tailored for our company's ecosystem. It serves as a central hub for all key company content, enabling you to effortlessly locate documents, find answers, and generate content across all our tools, including [APP LIST], and more. This integration means less time switching between applications and more time focusing on what matters.
Key Features:
- Unified Search Interface: Seamlessly search across [APP LIST], and other tools directly from your browser.
- Your New AI Assistant: Glean assists by providing instant answers, generating content, and automating repetitive tasks, all within seconds.
- Easy Access: Setting Glean as your new tab page makes accessing any company resource faster and more intuitive.
Launch Details:
Starting from [LAUNCH DATE], Glean will be automatically installed on your browser. This update will set Glean as your default new tab page, enabling you to seamlessly access search across all company apps. For a detailed guide on how to leverage Glean effectively, please visit the Glean User Guide.
We are confident that Glean will significantly enhance your daily productivity by minimizing the time spent searching for information and maximizing the time spent on achieving your goals.
We look forward to your feedback and are excited to see how Glean will support your success at [COMPANY NAME].
Best Regards,
[DEPARTMENT]
7. Deploy the Glean Browser Extension
If you have not already deployed the Glean Browser Extension to your user's managed devices, you should do so now.
The best way to drive Glean adoption at your company is by deploying the Glean browser extension and apps. Once installed, the user's new tab page in their browser is updated to the Glean home page ensuring that search and generative AI features are immediately at their fingertips when they need it.
Without the Glean extension, a user must access Glean by explicitly typing https://app.glean.com into their browser, or by clicking the Glean tile in your company's SSO App Library. Both of these options have significant friction to them, and on their own, lead to poor adoption of Glean.
8. Populate Content
If you have not already populated your Glean environment with Announcements, Answers, Go Links, Collections, and verified documents, you should do so now before your users start to access the platform.
Having content populated for these features creates an engaging first experience with Glean for your users, and has a notable impact on adoption and ongoing activity.
Post-Launch Tasks
Congratulations on the successful launch of Glean! Now that you’ve introduced your team to Glean, it’s important to keep the momentum going. Make sure you:
- Conduct a follow‑up survey with your users.
- Plan your phase expansion to additional user groups.