Insecure Kubernetes for Evaluation Purposes
This post details the process of setting up applications on AWS EKS with deliberate security vulnerabilities to evaluate cloud security vendors' workload protection capabilities during Proof of Concept/Value tests.
It includes deploying a containerized public-facing web service (Rocket.Chat) on Amazon's EKS, along with an insecurely configured MongoDB database and AWS S3 public bucket. The setup prioritizes the AWS Management Console over CLI commands, although using AWS CLI and eksctl could streamline the process.
Danger
This exercise intentionally incorporates insecure configurations to assess the efficacy of cloud security solutions. It should not be replicated for production use or outside of a controlled environment.
1.0 - Setup Infrastructure
In this section, the following infrastructure and services will be deployed:
- A VM running an outdated version of Ubuntu Server (Ubuntu Server 16.04).
- An outdated version of MongoDB running on the aforementioned VM (MongoDB Community Edition 4.4.5).
- An Amazon EKS Cluster in the same VPC as the above VM.
- An Amazon S3 storage bucket configured for Public Read access.
- A containerized web application that leverages MongoDB as a database (Rocket.Chat)
1.1 - AWS CLI & kubectl
To begin, we need to ensure that we have two CLI tools on our machine to allow us to interact with our Kubernetes cluster once we have set it up:
- AWS CLI: Facilitates interaction with AWS services using the CLI.
kubectl: Enables communication with the Kubernetes API and interaction with the active cluster.
Install Homebrew
Homebrew is a package manager for macOS and will be used to install both the AWS CLI and kubectl tools.
Install Homebrew (if it has not been already):
/bin/bash -c "$(curl -fsSL https://raw.githubusercontent.com/Homebrew/install/master/install.sh)"
Verify that Homebrew was installed correctly:
brew --version
...
Homebrew 4.0.28
Install & Configure AWS CLI
Install the AWS CLI using Homebrew:
brew install awscli
Verify that the AWS CLI was installed correctly:
aws --version
...
aws-cli/2.13.1 Python/3.11.4 Darwin/22.3.0 exe/x86_64 prompt/off
Next, configure the AWS CLI and authenticate it with the AWS account that will be used:
-
Navigate to the security center of the selected AWS account: console.aws.amazon.com/iamv2/home#/security_credentials
-
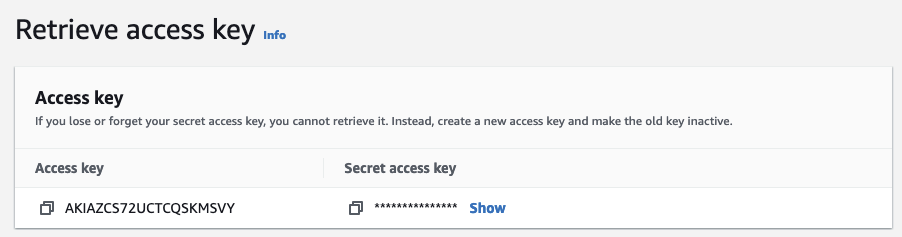
Scroll down to the Access keys section and select Create access key.

- Note down both the Access key and Secret access key (the Secret access key will not be shown again after you leave this page). Click Done.
- Run the following command to authenticate the AWS CLI using the Access key and Secret access key:
aws configure

AWS Access Key ID [None]: <your-access-key-value>
AWS Secret Access Key [None]: <your-secret-access-key-value>
Default region name [None]: <your region, eg: ap-southeast-2>
Default output format [None]: json
- Check that the credentials were saved correctly:
aws configure list
...
      Name                    Value             Type    Location
      ----                    -----             ----    --------
   profile                <not set>             None    None
access_key     ****************ZYXW shared-credentials-file
secret_key     ****************abcD shared-credentials-file
    region           ap-southeast-2      config-file    ~/.aws/config
Install kubectl
Install the latest version of kubectl using Homebrew:
brew install kubectl
Note that the version of kubectl must be within one minor version difference of the cluster. That is, if the cluster is configured to use v1.27, then kubectl v1.26, v1.27, or v1.28 must be used.
To install a specific version of kubectl, see here.
Verify that kubectl was installed correctly:
kubectl version --short --client
...
Client Version: v1.25.4
Kustomize Version: v4.5.7
1.2 - Deploy Ubuntu Server (16.04)
Create a new Key Pair to access the VM
To start, we need to provide AWS with the public SSH key that we plan to use to securely log into the VM we will deploy. If you already have a key pair available in AWS, you can skip this step.
If you have an existing key pair on your local system, you can use that, otherwise follow the instructions here to generate a new key pair. The following steps will guide you through uploading the public key from your system into AWS so that we can assign it to our VM.
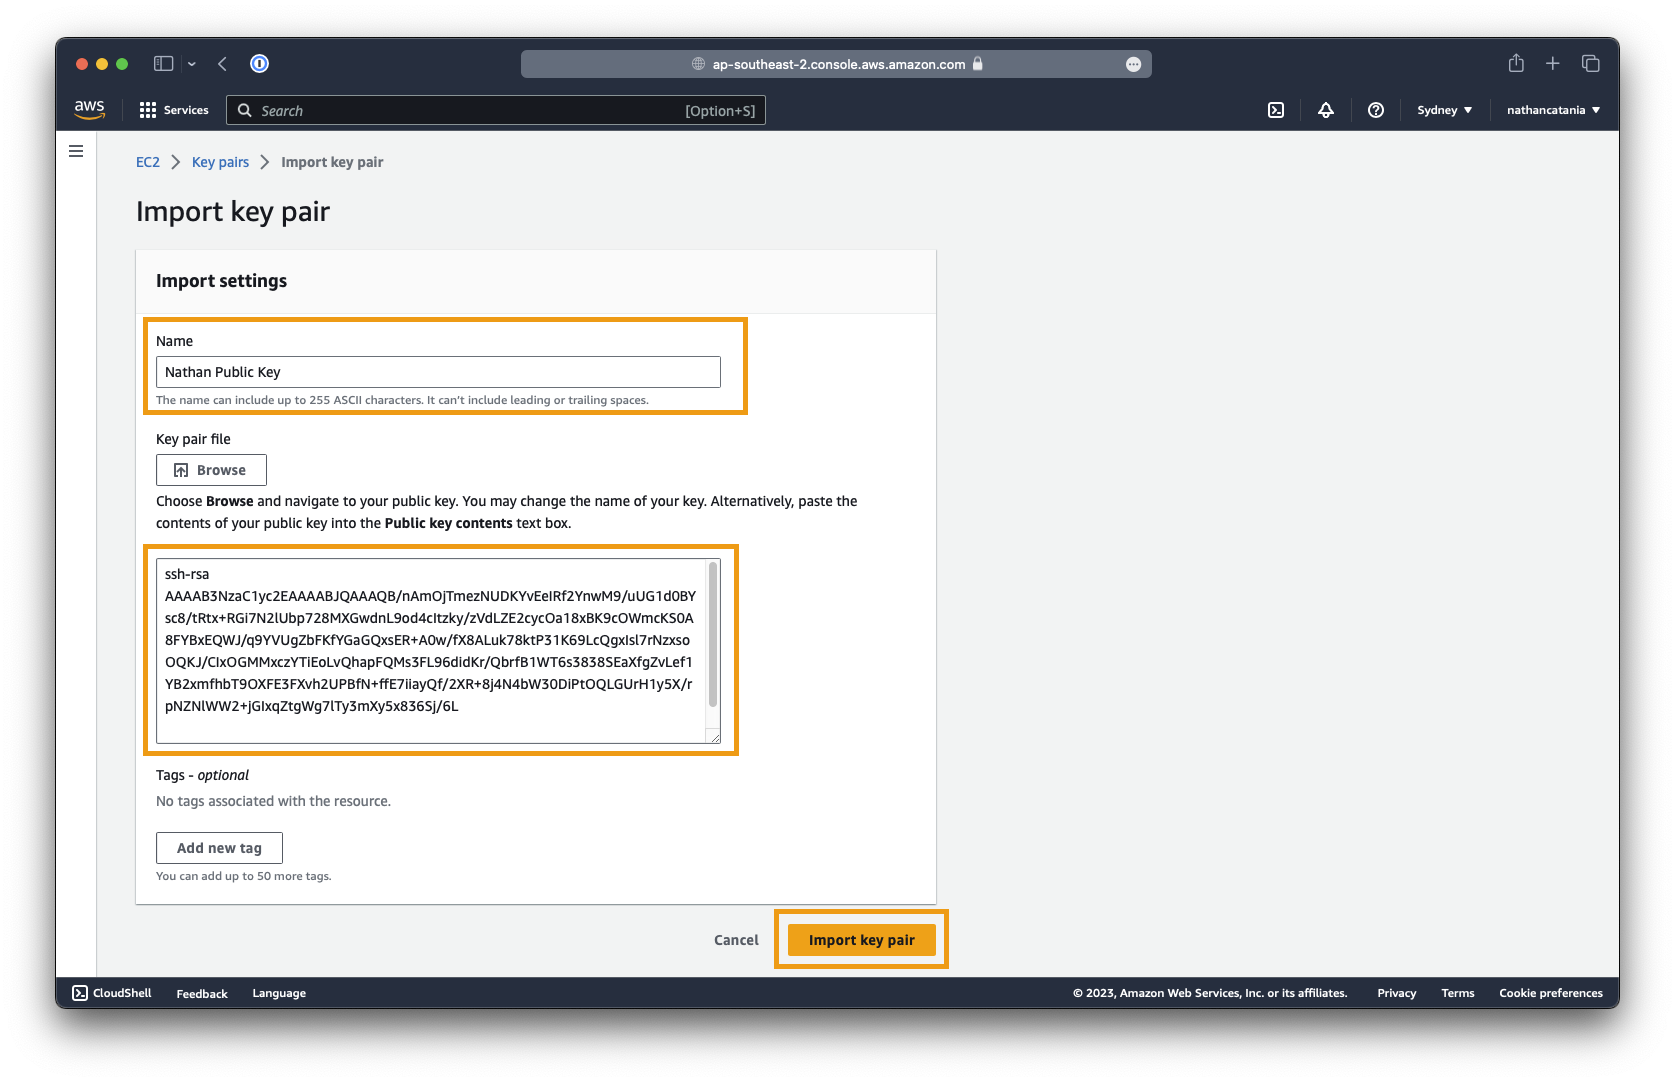
- Open the Key Management System (KMS) Console of AWS.
- Click the Actions button and select Import key pair.
-
Provide the key pair with a name (eg:
My AWS Key). This is the name of the key that will be visible when selecting a key to assign to a new VM. -
Next, select the
id_rsa.pubfile associated with your public key to upload, OR paste in the public key contents. -
Assuming your key pair is saved in the default location (
~/.ssh/id_rsa.pub), open Terminal and execute the following command to get the contents of the public key:
cat ~/.ssh/id_rsa.pub
- The output should be similar to as follows (paste your own output into AWS):
ssh-rsa AAAAB3NzaC1yc2EAAAABJQAAAQB/nAmOjTmezNUDKYvEeIRf2YnwM9/uUG1d0BYsc8/tRtx+RGi7N2lUbp728MXGwdnL9od4cItzky/zVdLZE2cycOa18xBK9cOWmcKS0A8FYBxEQWJ/q9YVUgZbFKfYGaGQxsER+A0w/fX8ALuk78ktP31K69LcQgxIsl7rNzxsoOQKJ/CIxOGMMxczYTiEoLvQhapFQMs3FL96didKr/QbrfB1WT6s3838SEaXfgZvLef1YB2xmfhbT9OXFE3FXvh2UPBfN+ffE7iiayQf/2XR+8j4N4bW30DiPtOQLGUrH1y5X/rpNZNlWW2+jGIxqZtgWg7lTy3mXy5x836Sj/6L

(this is not a real public key)
Deploy the VM
- From the AWS EC2 Console, click Instances in the left sidebar, then and click Launch instances.
- Set the name of the VM to
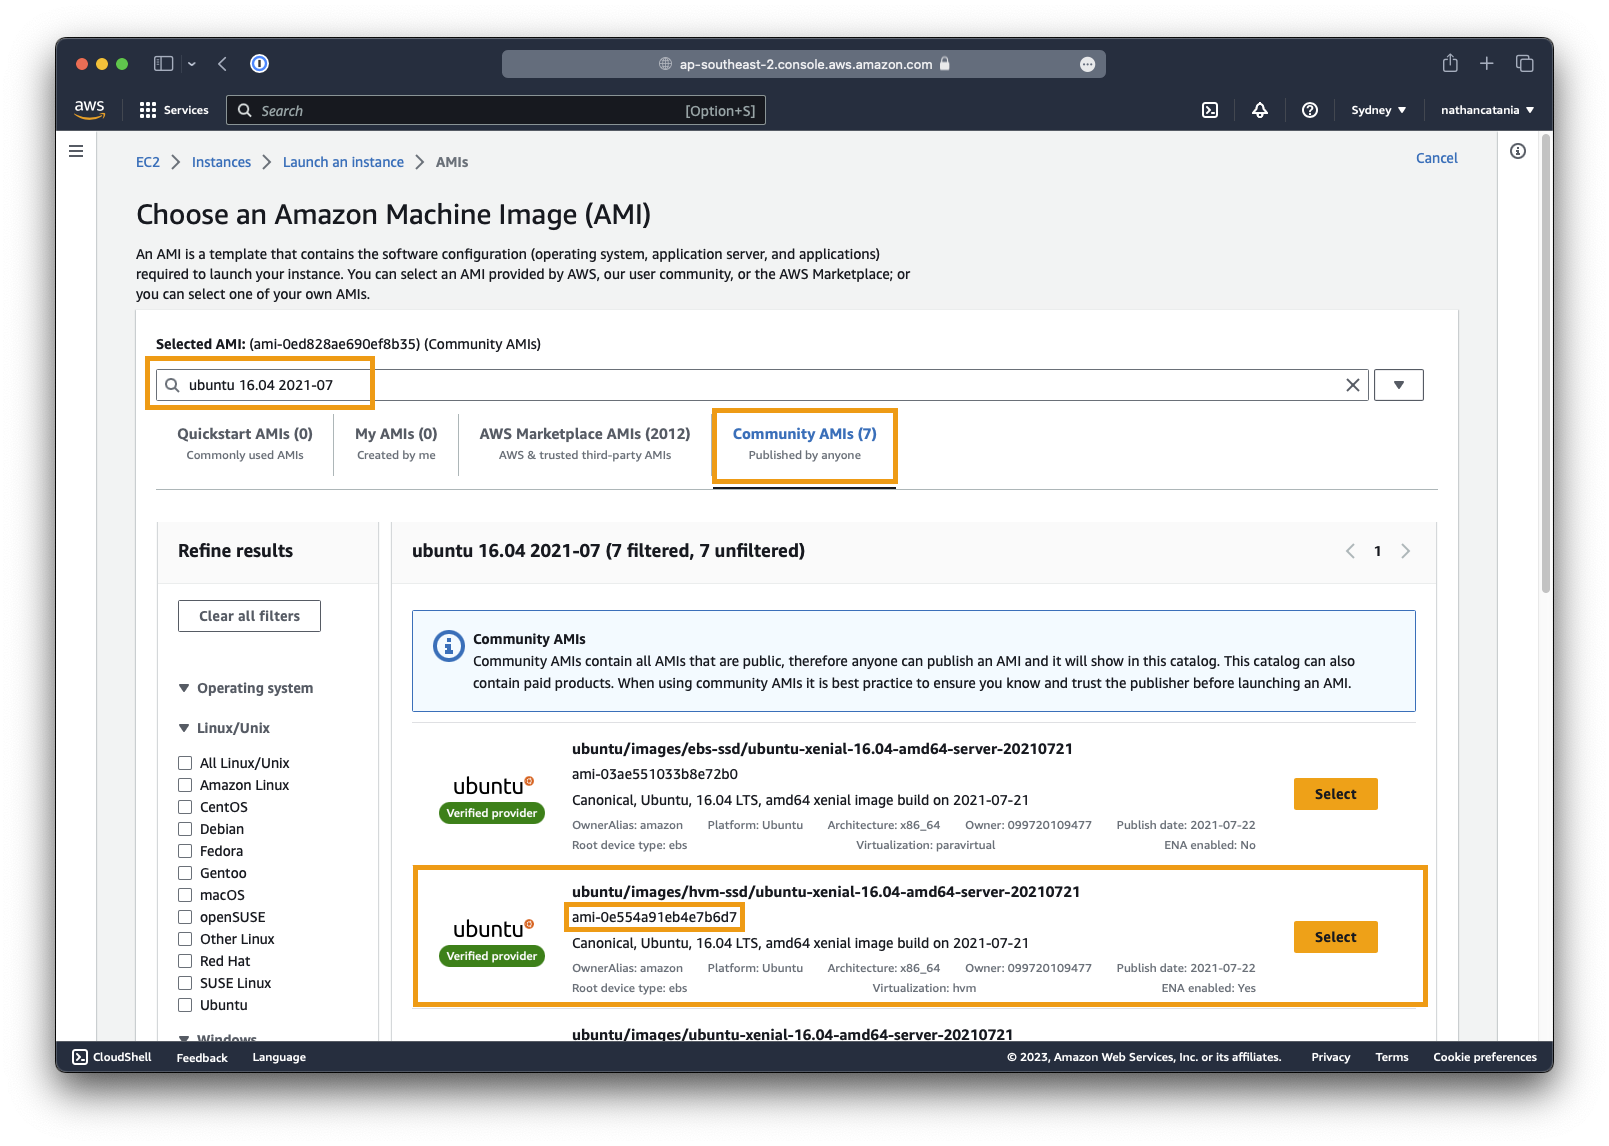
MongoDB - When prompted to select an OS / AMI image, select Browse more AMIs.
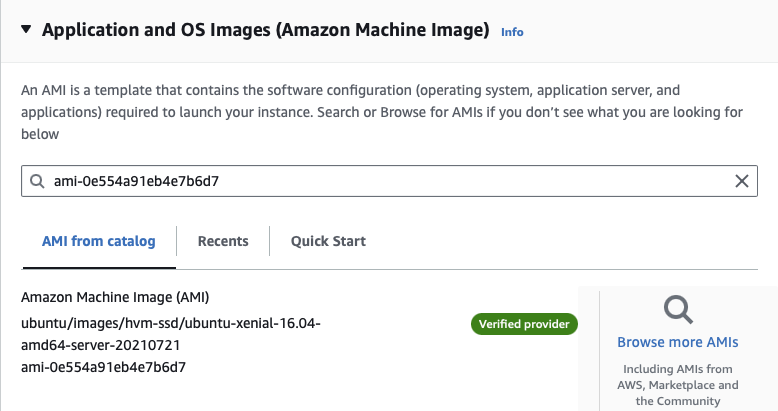
-
Click the Community AMIs tab, then search for
ami-0e554a91eb4e7b6d7(the AMI ID of the Ubuntu Server 16.04 LTS image we need). -
Select the AMI
ubuntu/images/hvm-ssd/ubuntu-xenial-16.04-amd64-server-20210721 -
Alternatively, search for
ubuntu 16.04 amd64and select an available AMI. Be mindful of the publish dates: the more out-of-date, the better.
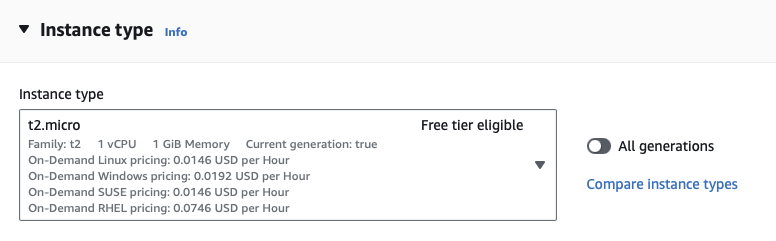
- Back on the main Launch an instance screen, under Instance type, select the cheapest instance with 1 vCPU and 1GB memory. At the time of posting this is
t2.microwhich is also eligible for the AWS Free Tier.
-
Under the Key pair section, select either an existing public key, or the name of the public key you uploaded earlier.
-
Under Network Settings, click the Edit button.
-
Ensure that Auto-assign public IP is set to enable (for now).
-
Create a new security group called
Mgmt Accessand put in two rules:- Type: SSH Source type: My IP
- Type: All ICMP - IPv4 Source type: My IP
-
These rules will allow you to connect to your MongoDB VM (and test connectivity to it using
ping) across the internet. To secure this access (somewhat), we are limiting connections to only those from your own IP address.Danger
In practice, this is not recommended for internal services and your should close off ALL public exposure to the VM to ensure it is secured.
VMs should be managed via an inside-out ZTNA service like Cloudflare, Zscaler, or Tailscale to ensure that nothing is exposed directly to the internet.

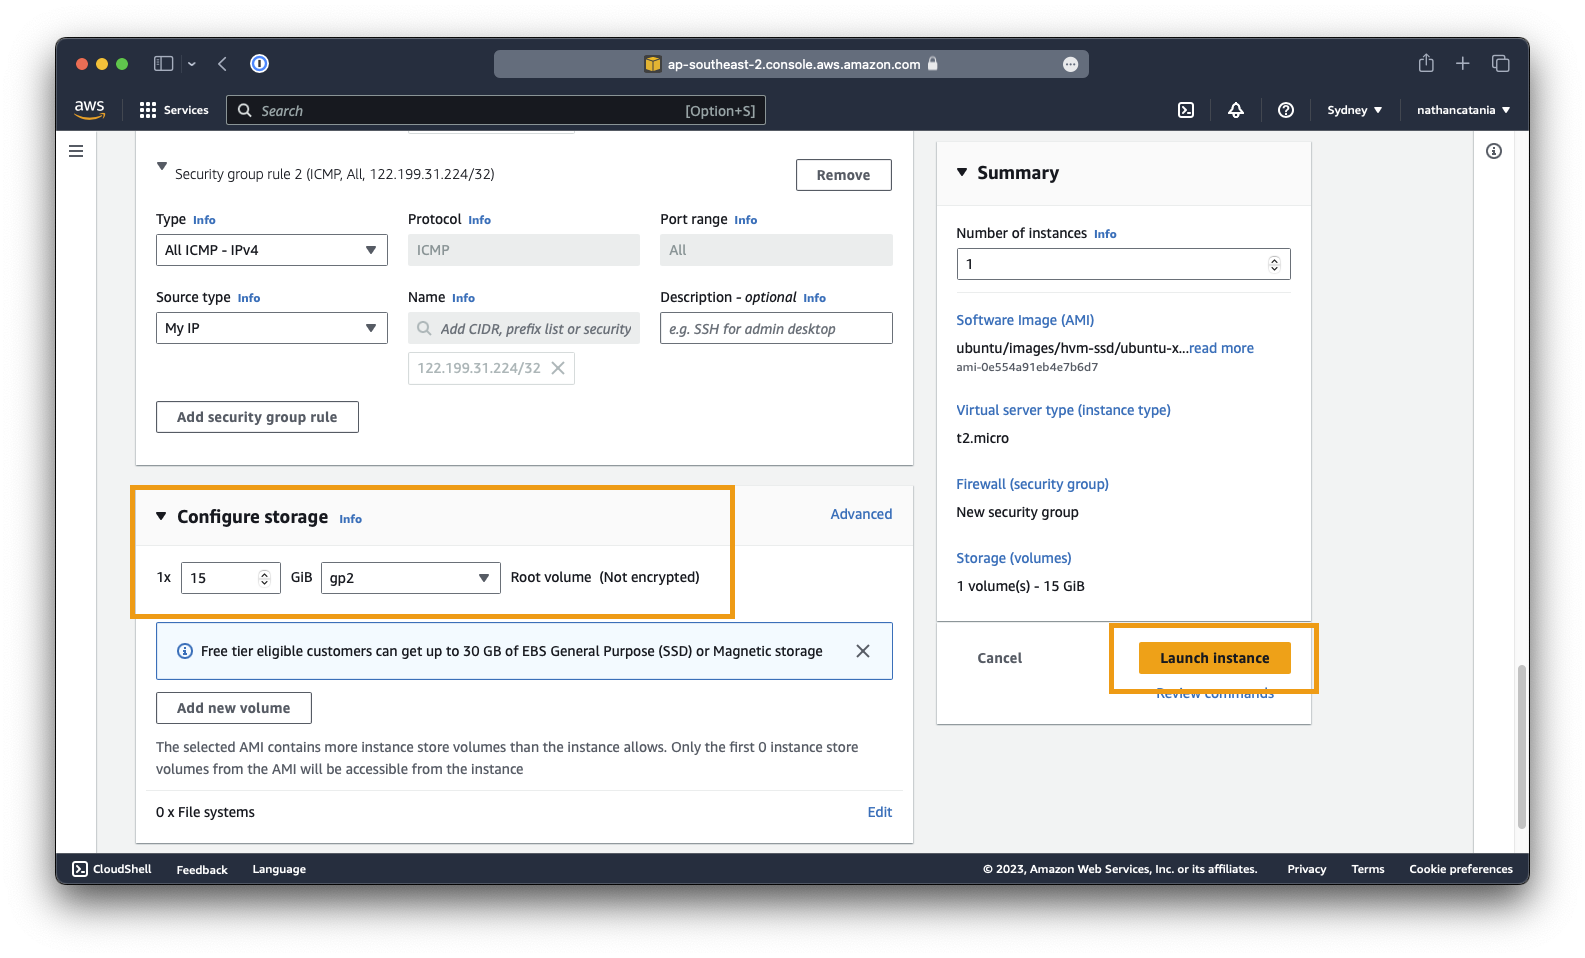
- Under Configure storage, set the root volume to 15GB of
gp2storage. - Finished! When you are ready to deploy the VM, click Launch instance.
Connect to the VM
-
Return to the EC2 console where you should now see your
MongoDBVM with an instance state of eitherPendingorRunning. If it isPending, wait a few moments before attempting the below. -
Select the MongoDB VM from the instance list, and in the table that appears at the bottom of the screen, under the Details tab, take note of the Public IPv4 address.
-
Open a new terminal window and SSH to the public IP address of the VM. The default username will be
ubuntu:
ssh ubuntu@<your-vm-public-ip>
You can also manually specify the path of the private key to use if you have multiple key pairs on your machine:
ssh -i ~/.ssh/your_private_key ubuntu@<your-vm-public-ip>
1.3 - Deploy MongoDB (4.4.5)
In this section, we will deploy an older version of MongoDB (version 4.4.5, released Apr 8, 2021) to the VM we deployed in the above section and configure the database so that it is ready to store data from our web app (Rocket.Chat).
The official documentation for MongoDB v4.4 is available here.
Install MongoDB
First, update the package list on the VM:
sudo apt-get update
Install gnupg and curl:
sudo apt-get install gnupg curl
Import the MongoDB public GPG key. This is required so we can access the software repository for v4.4:
curl -fsSL https://pgp.mongodb.com/server-4.4.asc | \
   sudo gpg -o /usr/share/keyrings/mongodb-server-4.4.gpg \
   --dearmor
Create the list file for Ubuntu 16.04:
echo "deb [ arch=amd64,arm64 signed-by=/usr/share/keyrings/mongodb-server-4.4.gpg ] https://repo.mongodb.org/apt/ubuntu xenial/mongodb-org/4.4 multiverse" | sudo tee /etc/apt/sources.list.d/mongodb-org-4.4.list
Update the package database again. This time you will see it fetch data from repo.mongodb.org:
sudo apt-get update
Install MongoDB 4.4.5:
sudo apt-get install -y mongodb-org=4.4.5 mongodb-org-server=4.4.5 mongodb-org-shell=4.4.5 mongodb-org-mongos=4.4.5 mongodb-org-tools=4.4.5
Start the MongoDB service and set it to start at boot:
sudo systemctl daemon-reload
sudo systemctl start mongod && sudo systemctl enable mongod
Check that the MongoDB service is now running:
sudo systemctl status mongod
...
● mongod.service - MongoDB Database Server
   Loaded: loaded (/lib/systemd/system/mongod.service; disabled; vendor preset: enabled)
   Active: active (running) since Sun 2023-07-16 06:30:13 UTC; 9s ago
     Docs: https://docs.mongodb.org/manual
 Main PID: 13891 (mongod)
    Tasks: 33
   Memory: 60.0M
      CPU: 791ms
   CGroup: /system.slice/mongod.service
           └─13891 /usr/bin/mongod --config /etc/mongod.conf
MongoDB listens on port TCP 27017 for incoming requests. To check that the port is correctly bound:
netstat -ln
...
    Active Internet connections (only servers)
    Proto Recv-Q Send-Q Local Address           Foreign Address         State
    tcp        0      0 0.0.0.0:22              0.0.0.0:*               LISTEN
>>  tcp        0      0 127.0.0.1:27017         0.0.0.0:*               LISTEN
    tcp6       0      0 :::22                   :::*                    LISTEN
    udp        0      0 0.0.0.0:68              0.0.0.0:*
From the above we can see that MongoDB is only listening on localhost, meaning that it won't be able to accept connections from other machines. To fix this, we need to configure MongoDB to accept connections from all network interfaces, not just localhost.
Open the MongoDB configuration file in a text editor:
sudo nano /etc/mongod.conf
Look for the net section in the config file. Change the bindIP from 127.0.0.1 to 0.0.0.0 so that it reflects the below:
net:
  port: 27017
  bindIp: 0.0.0.0
Save your changes (CTRL+X, then Y), then restart the MongoDB service:
sudo systemctl restart mongod
Verify that MongoDB is now listening on 0.0.0.0:27017 instead of 127.0.0.1:27017:
netstat -ln
...
    Active Internet connections (only servers)
    Proto Recv-Q Send-Q Local Address           Foreign Address         State
    tcp        0      0 0.0.0.0:22              0.0.0.0:*               LISTEN
>>  tcp        0      0 0.0.0.0:27017           0.0.0.0:*               LISTEN
    tcp6       0      0 :::22                   :::*                    LISTEN
    udp        0      0 0.0.0.0:68              0.0.0.0:*
Start a MongoDB shell to check that everything is working:
mongo
...
MongoDB shell version v4.4.5
connecting to: mongodb://127.0.0.1:27017/?compressors=disabled&gssapiServiceName=mongodb
Implicit session: session { "id" : UUID("62b53e34-9d3b-4ed1-83c6-0f10c5a1dc2d") }
MongoDB server version: 4.4.5
Welcome to the MongoDB shell.
For interactive help, type "help".
For more comprehensive documentation, see
    https://docs.mongodb.com/
Questions? Try the MongoDB Developer Community Forums
    https://community.mongodb.com
>
You can press CTRL+C to quit the shell.
Create a user and database for the web app to use
Next, we need to create a user and database in MongoDB that our web app can use. Access to MongoDB shell:
mongo
Create and switch to the database for the web app (rocketchat):
use rocketchat
Paste in the below making sure to substitute the password and database name as needed:
db.createUser({user: "rocketchat", pwd: "youwillneverguess", roles: [{role: "readWrite", db: "rocketchat"}]})
This command will create a user named rocketchat with the insecure password youwillneverguess and grant it readWrite permissions on the rocketchat database. You will need the username/password combo later on when we deploy the web app.
Check that the user was created successfully:
db.getUser("rocketchat")
The output should be similar to the below. If you see null, ensure you are using the right database (i.e.: use rocketchat):
> use rocketchat
switched to db rocketchat
> db.getUser("rocketchat")
{
    "_id" : "rocketchat.rocketchat",
    "userId" : UUID("0e6e3c22-60de-4507-af9c-782821507b30"),
    "user" : "rocketchat",
    "db" : "rocketchat",
    "roles" : [
        {
            "role" : "readWrite",
            "db" : "rocketchat"
        }
    ],
    "mechanisms" : [
        "SCRAM-SHA-1",
        "SCRAM-SHA-256"
    ]
}
1.4 - Configure an Amazon EKS Cluster
Kubernetes is an open-source platform designed to automate the deployment, scale, and operation of application containers. Kubernetes allows you to build application services that span multiple containers, schedule those containers across a cluster, scale those containers, and manage the health of those containers over time.
Amazon EKS (Elastic Kubernetes Service) is a managed service used to run Kubernetes on AWS.
In this project, we will be using EKS to manage the deployment and scaling of our containerized web application and the underlying EC2 host VMs (AKA "Workers") that the containers will run on.
Create an IAM Role for the EKS Cluster
Because the Kubernetes cluster managed by EKS makes calls to other AWS services on our behalf (like EC2 to bring up a worker), we need to create a role that restricts what EKS can do. Letting it have free rein within our entire AWS account would be very bad.
Amazon has instructions on how to do this for EKS here, or you can follow the instructions below:
-
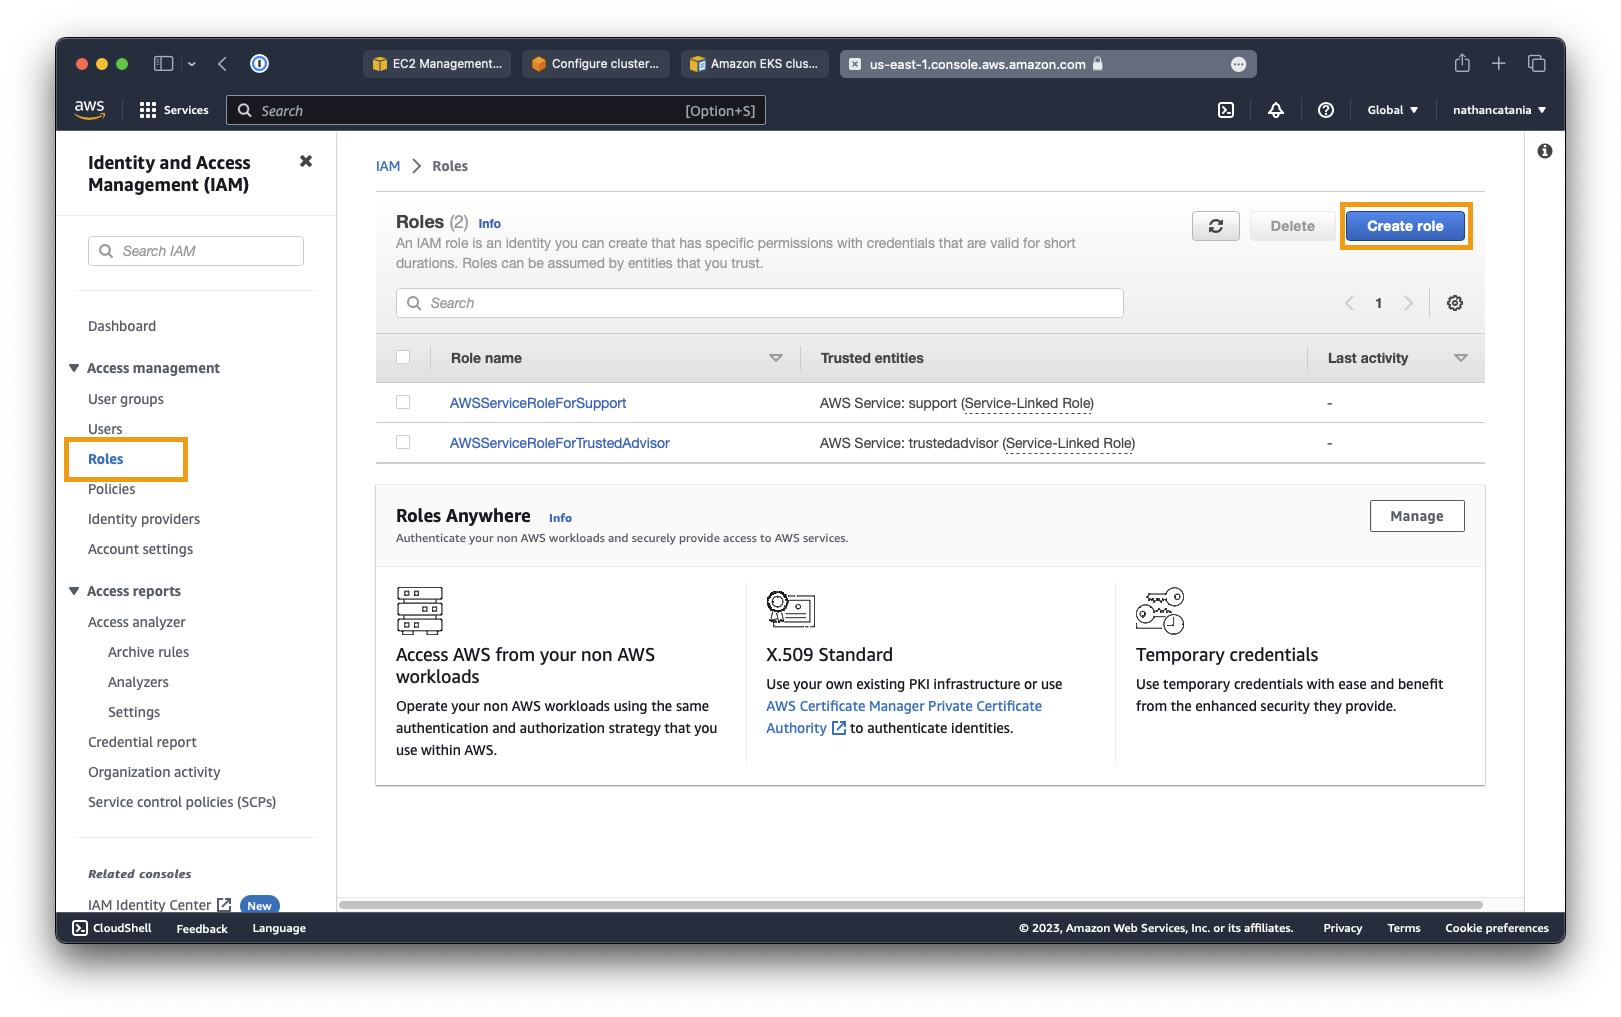
Open the AWS IAM Console.
-
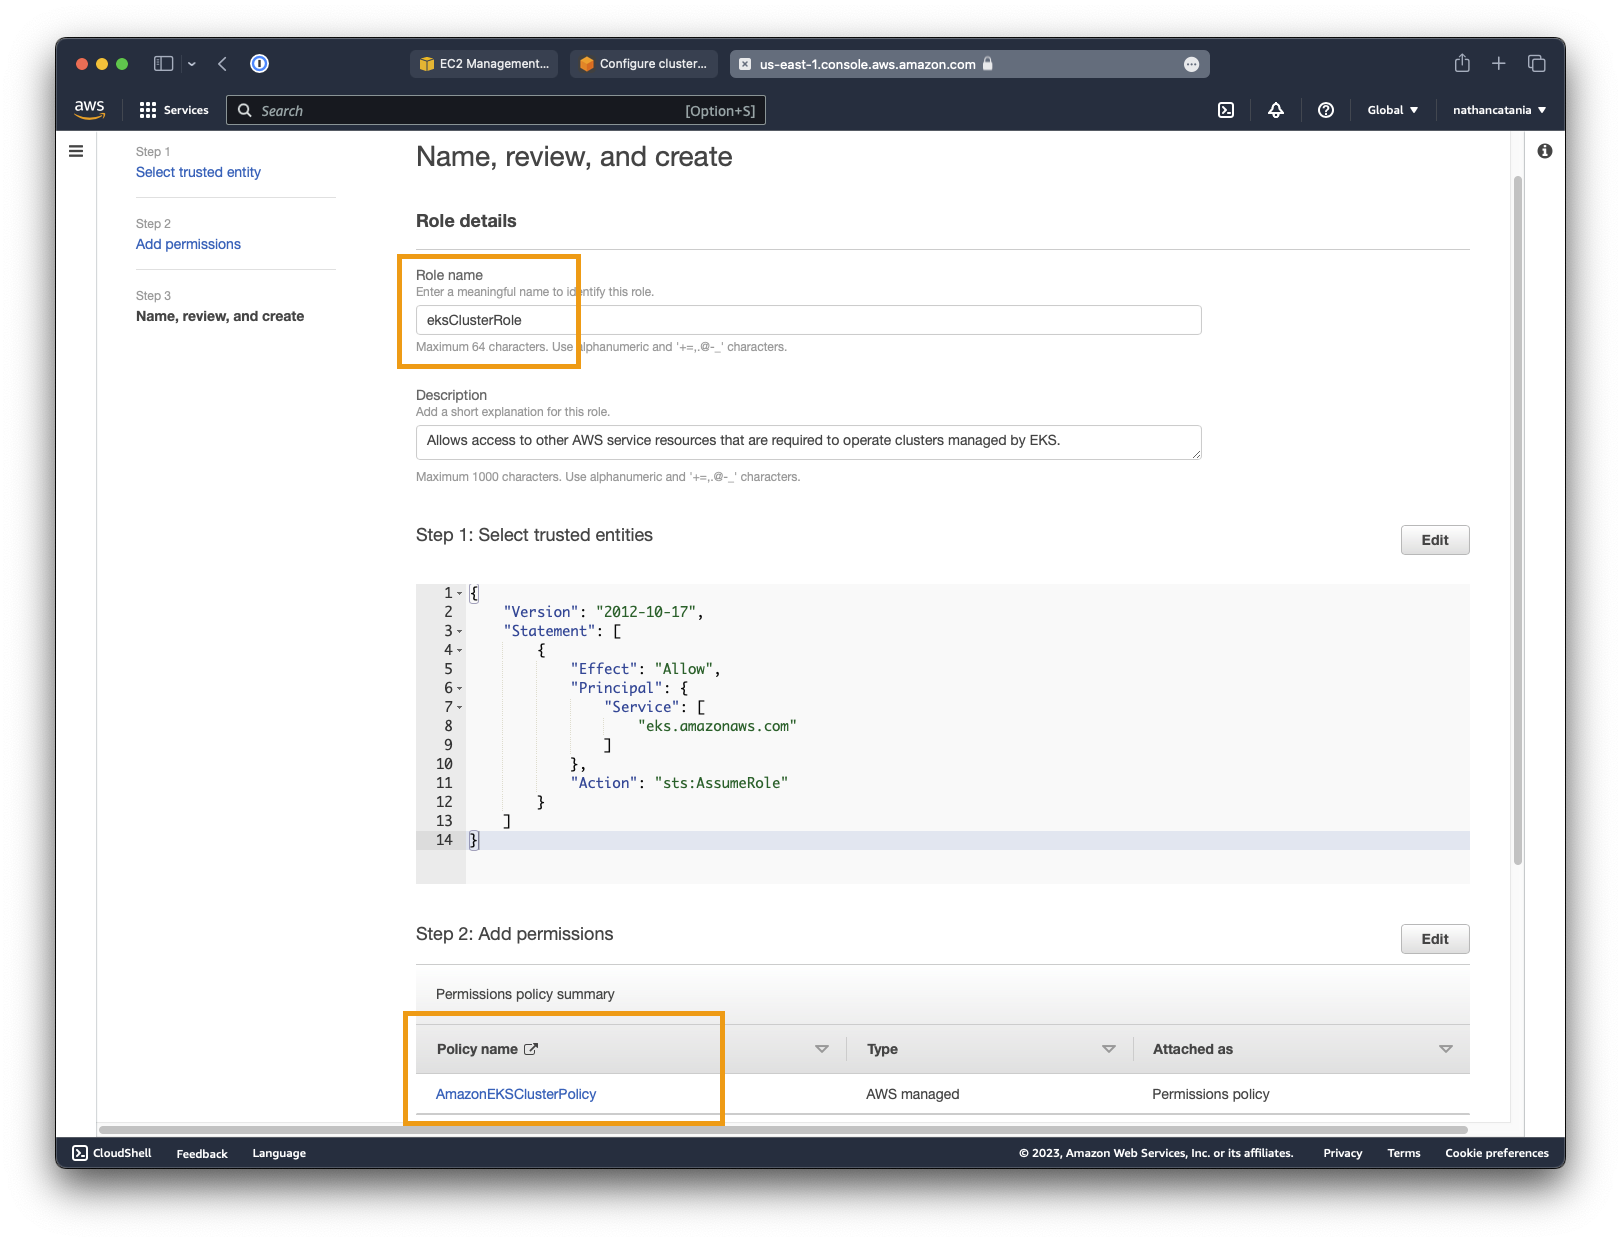
From the left-side menu, under Access Management, select Roles. On the next screen, select Create role:
- For Trusted entity type select AWS service.
- For Use case select EKS from the dropdown list, then select EKS - Cluster. Click Next.
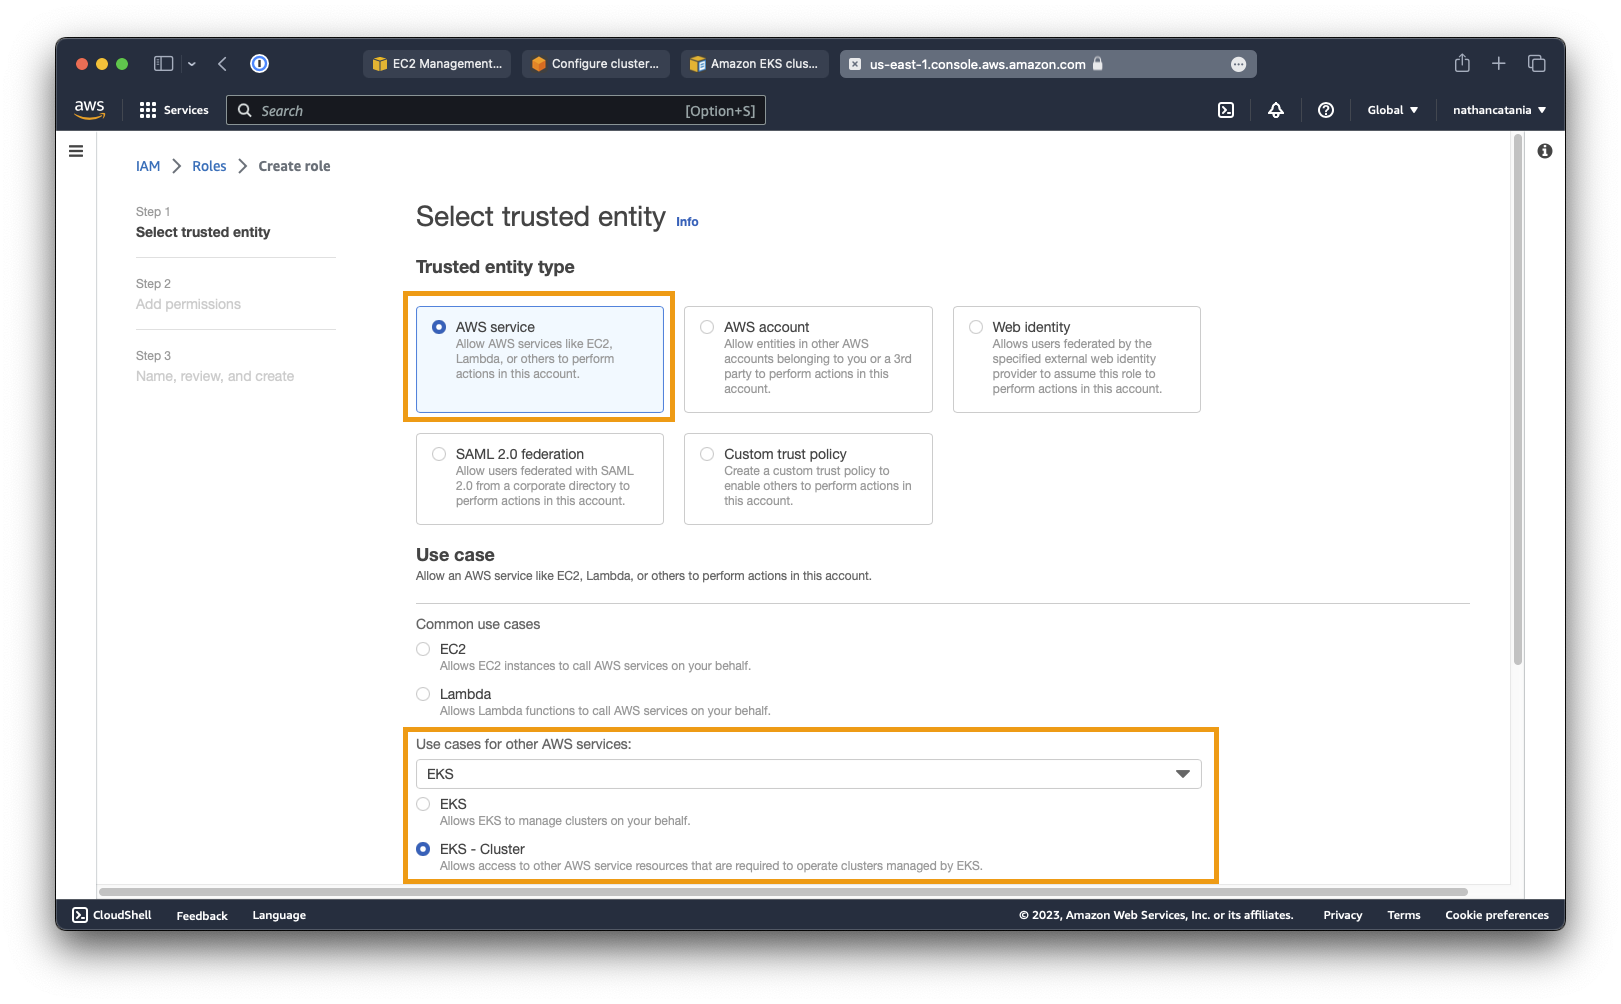
- On the Add permissions screen, don't change anything, just click Next again.
- On the next screen, set the role name as
eksClusterRoleand make sure that you seeAmazonEKSClusterPolicylisted as a policy name under the Add permissions table. Click Create role when you are ready to finish configuration.
Create an IAM Role for the Worker Node Group
We need to create a separate role with different permissions that will be assigned to the worker nodes that the Kubernetes cluster will manage.
- As we did in the previous step, open the IAM console, and under Access Management > Roles, click Create role.
- For Trusted entity type select AWS service.
- For Use case select EC2. Click Next.
- Select the following permissions, the click Next:
- AmazonEKS_CNI_Policy
- AmazonEKSWorkerNodePolicy
- AmazonEC2ContainerRegistryReadOnly
- Set the role name as EKSWorkerNodePolicy and click Create role to finish the configuration.
Create a new KMS Key
Kubernetes secrets allow sensitive information like passwords, credentials, and API keys that need to be leveraged by underlying services to be stored centrally within the Kubernetes API data store (etcd), and not within the application source code or config itself.
By default, secrets are stored in the Kubernetes API are unencrypted. EKS supports secrets encryption using an encryption key stored in the AWS Key Management Service (KMS), and it is best practice to enable this. To do so however, we need to create a symmetrical encryption key within KMS
- Go to the AWS KMS Console: https://console.aws.amazon.com/kms
- Click Create key.
- Select Symmetric as they Key type, and Encrypt and decrypt for the Key usage option. Click Next.
- Give the key a name and description, eg:
EKS_Secrets_Key, and click Next. - Leave all key administrators as blank and deselect the option to allow admins to delete the key. Click Next.
- For the Key usage permissions step, select the
eksClusterRoleyou created above. Click Next. - Click Finish on the summary page to create the key.
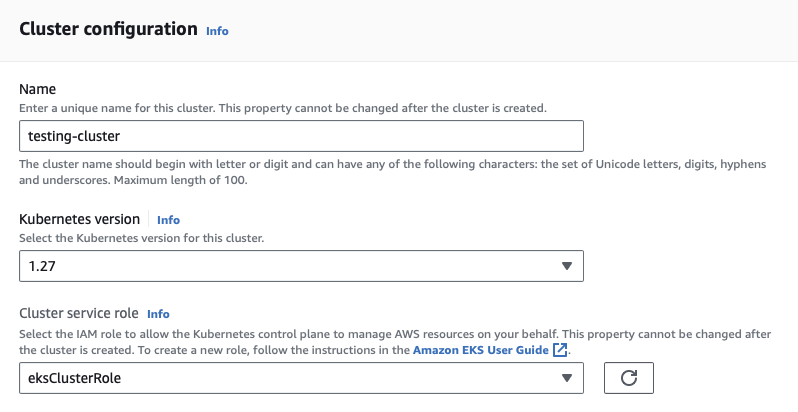
Create a new EKS Cluster
- Open the AWS EKS Console.
- From the Add cluster dropdown menu, select Create.
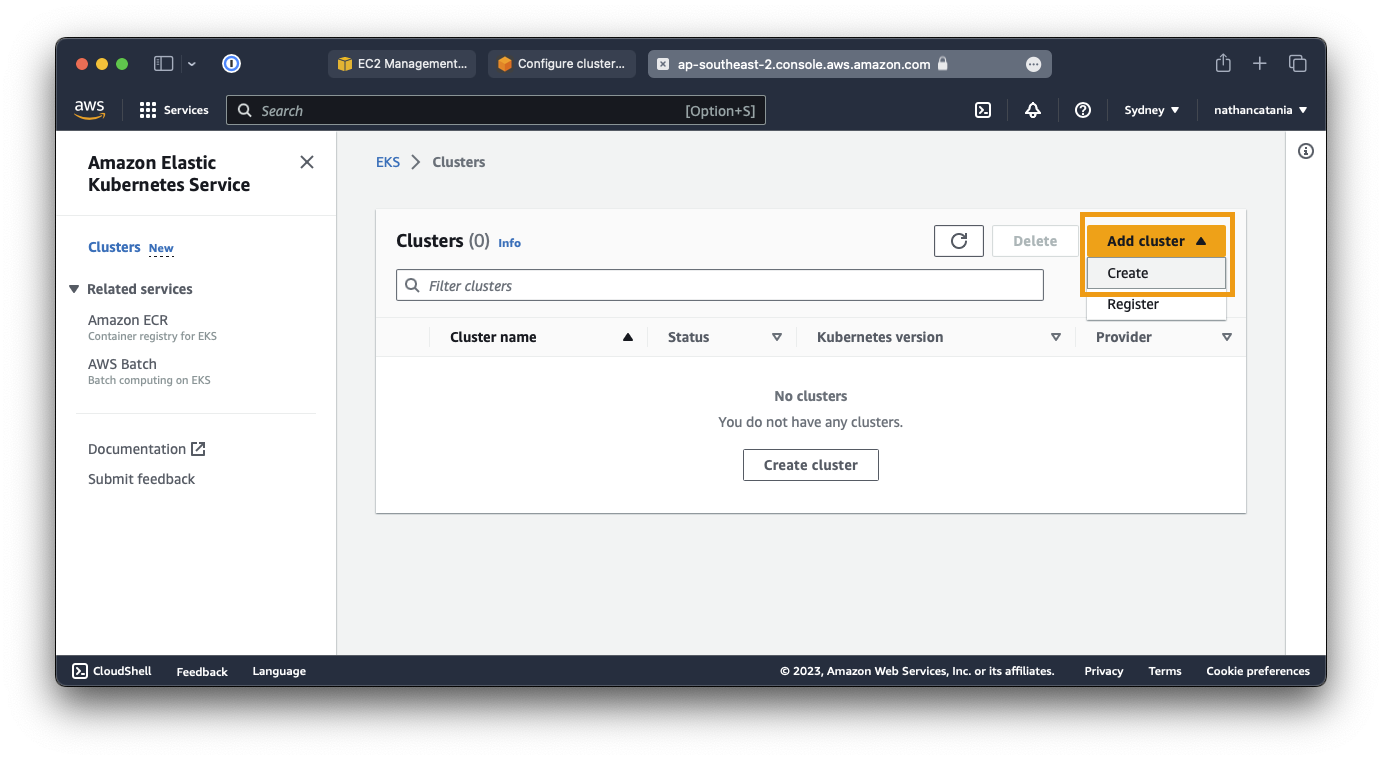
- For Name, enter
testing-cluster. - For Kubernetes version, select the highest version available (1.27 at the time of writing)
- For Cluster service role, select the
eksClusterRoleyou created earlier.
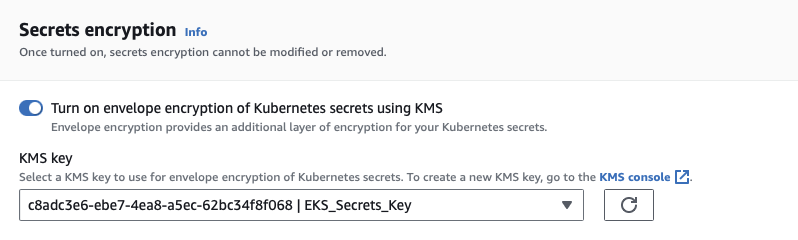
- Under Secrets encryption, check Turn on envelope encryption of Kubernetes secrets using KMS and select the
EKS_Secrets_Keythat you created earlier from the KMS key dropdown. Click Next to proceed.
- Under Networking select:
- The VPC that cluster resources will be provisioned in.
- The subnet(s) to be used by the cluster.
- The security group(s) to apply to worker nodes.
- Under Cluster endpoint access, select Public and private and enter an IP address (or block of IPs) to permit connections to the public API endpoint from. Click Next to continue.
- Choose which logs (if any) to send into CloudWatch. Note that CloudWatch usage attracts additional costs. Click Next to continue.
- For add-ons, leave the default CoreDNS, kube-proxy, and Amazon VPC CNI options selected and click Next. On the next screen, select the latest versions for your add-ons, and click Next.
- CoreDNS provides DNS services within your cluster allowing containers to discover and connect to each other.
- kube-proxy runs on each node in the cluster and allows access to the services defined in a cluster.
- Amazon VPC CNI allows pods to have the same IP address inside the pod as they do on the VPC network.
- On the summary page, click Create to provision your cluster.
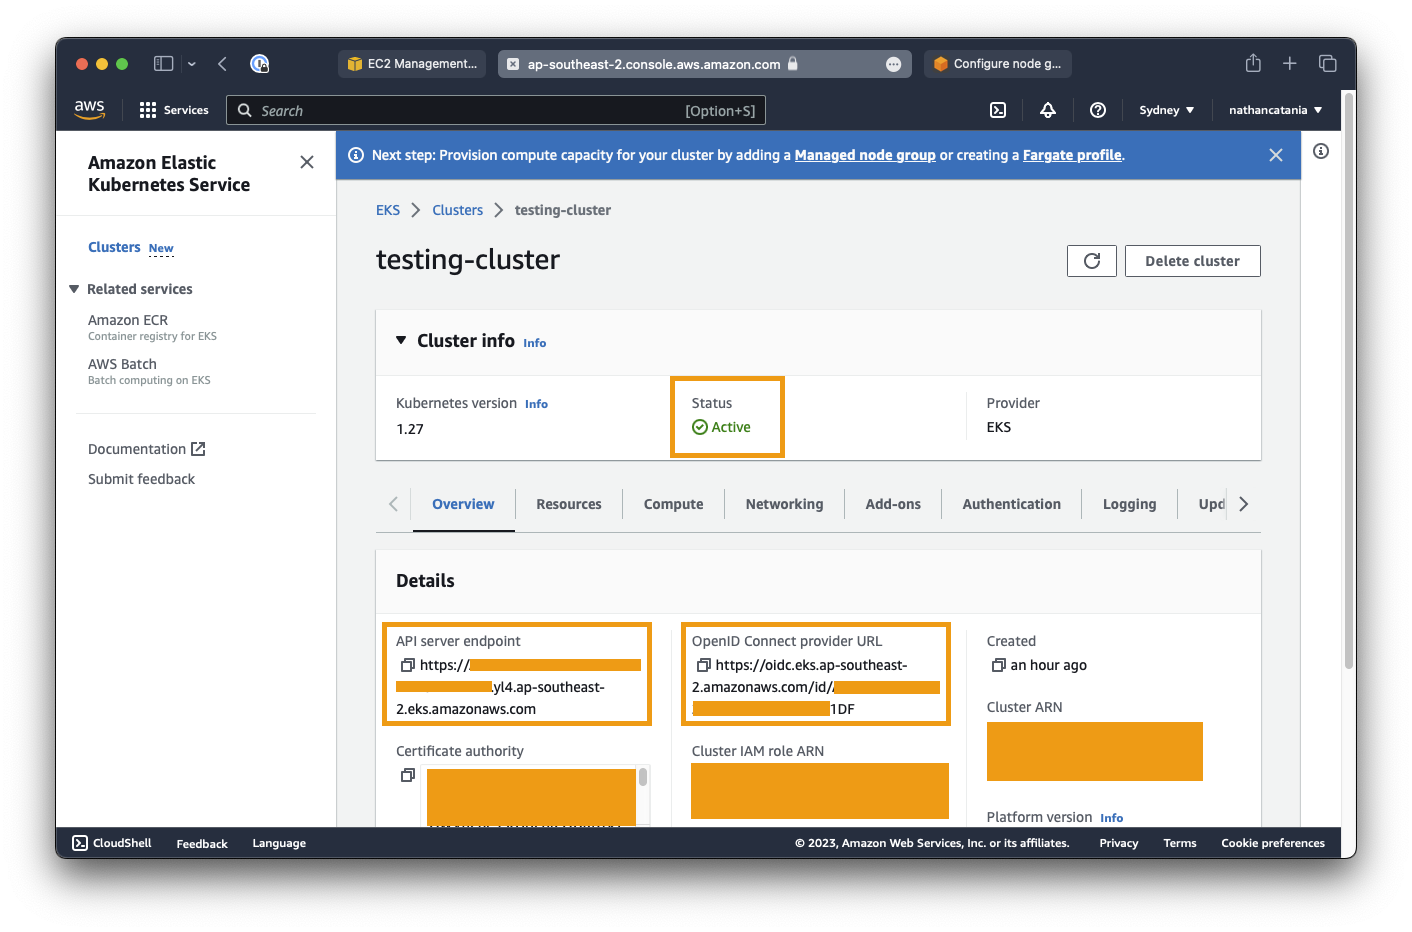
Your cluster will take several minutes to create, so now is the perfect time to take a break!
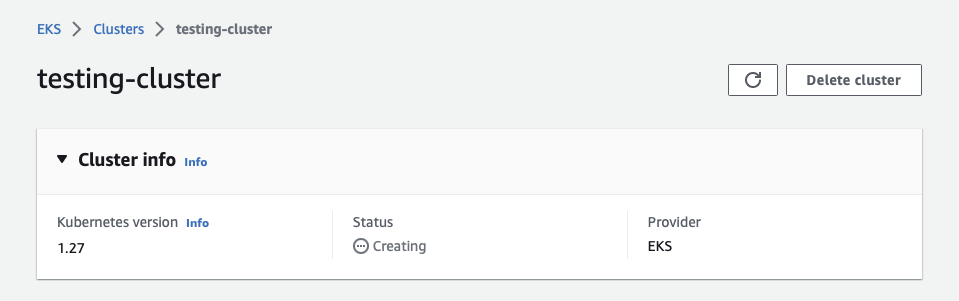
Once your cluster is created, take note of the API server endpoint and the OpenID Connect provider URL:
Copy the cluster config to kubectl
kubectl will be our primary way of interacting with the cluster, so we need to provide it with configuration to be able to securely authenticate and connect to the Kubernetes API of our cluster.
First, verify that your cluster is active and that your AWS CLI is authenticated correctly:
aws eks --region <your-region> describe-cluster --name <your-cluster-name> --query cluster.status
For example:
aws eks --region ap-southeast-2 describe-cluster --name testing-cluster --query cluster.status
...
"ACTIVE"
Next, use the AWS CLI to get the required config from our cluster and apply it to kubectl:
aws eks update-kubeconfig --name <cluster-name>
...
Eg: aws eks update-kubeconfig --name testing-cluster
Added new context arn:aws:eks:ap-southeast-2:6200[REDACTED]:cluster/testing-cluster to /Users/nathan/.kube/config
Lastly, test kubectl to verify that it has the correct config and can interact with the cluster:
kubectl get svc
...
NAME         TYPE        CLUSTER-IP   EXTERNAL-IP   PORT(S)   AGE
kubernetes   ClusterIP   10.100.0.1   <none>        443/TCP   107m
Create a new node group
In this step we will create the worker nodes that the master kubernetes node (deployed above) will orchestrate. A node group is simply a collection of worker nodes.
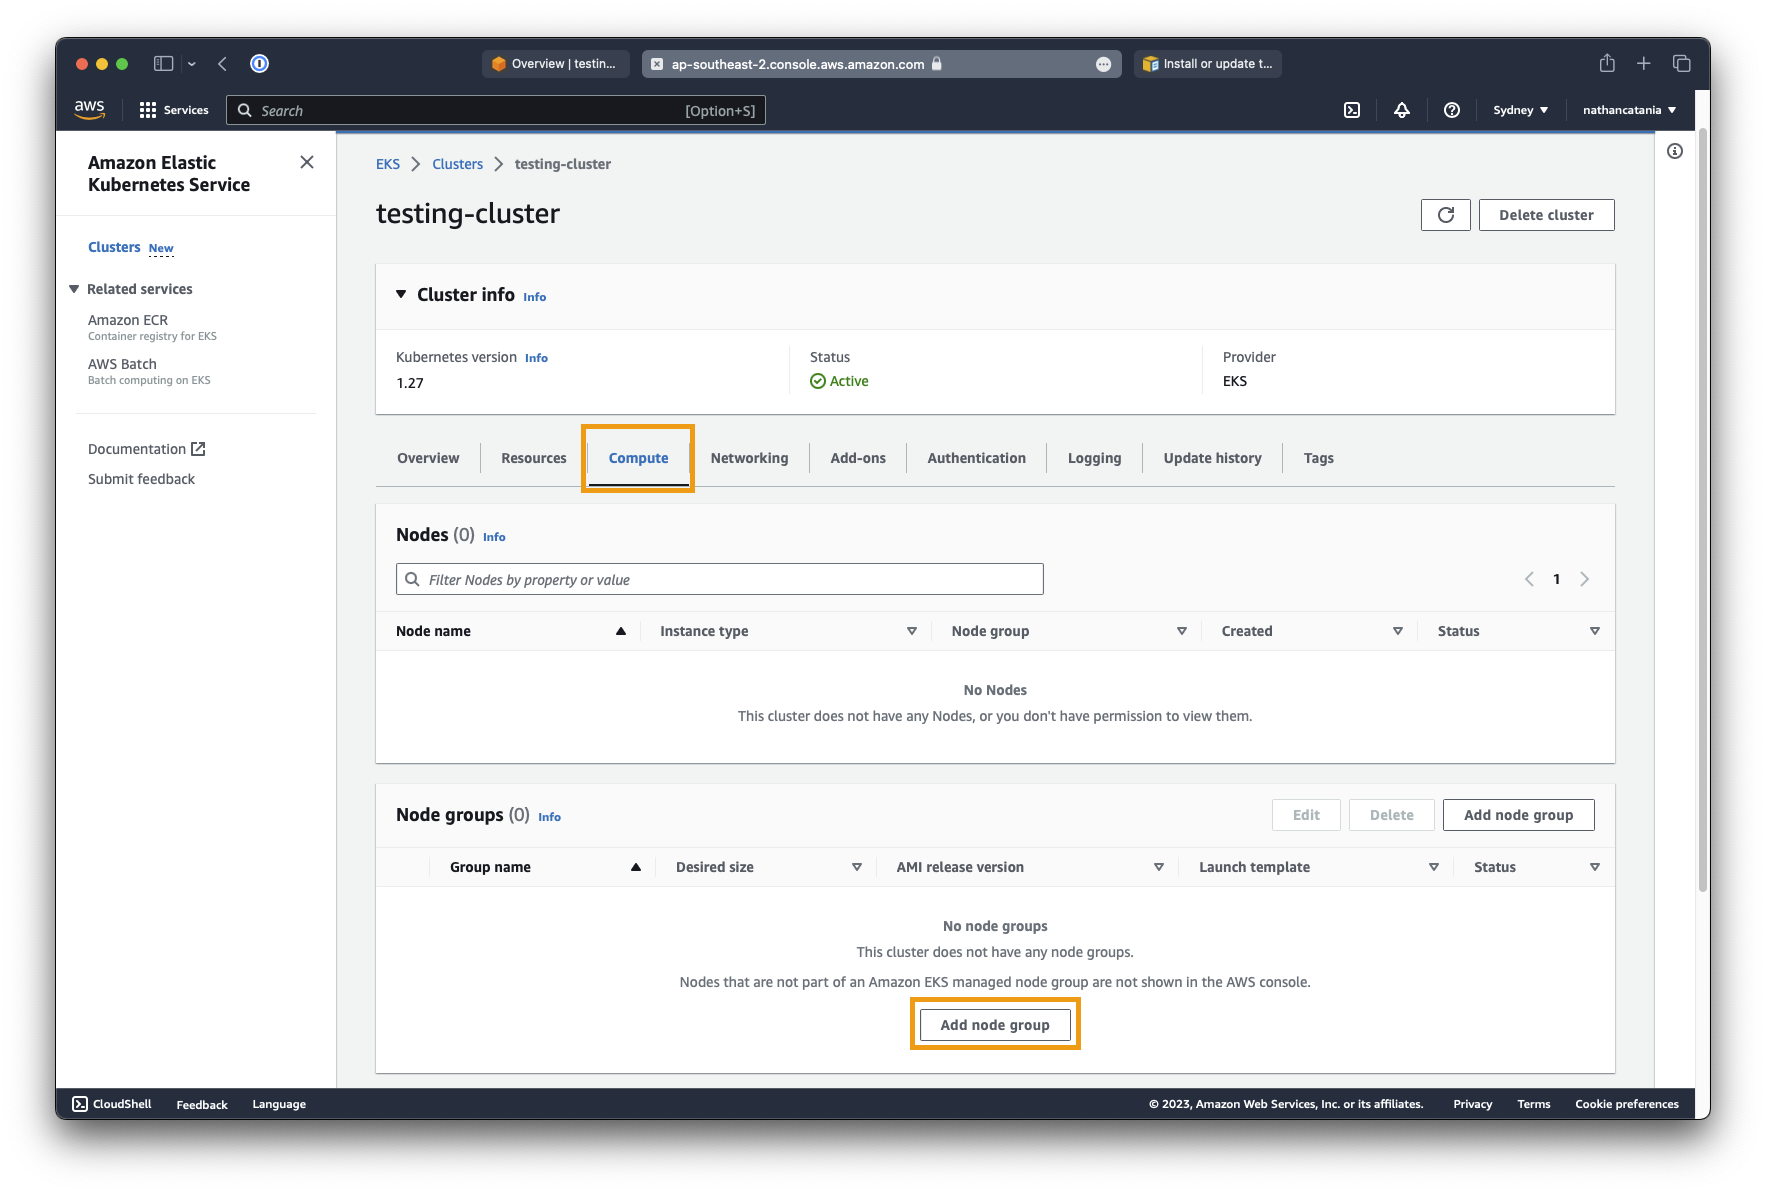
- From the
testing-clusterdetails page, click the Compute tab, then under Node groups, click Add node group:

- Set the node group name to node_group1.
- For Node IAM role, select the EKSWorkerNodePolicy role created earlier, then click Next.
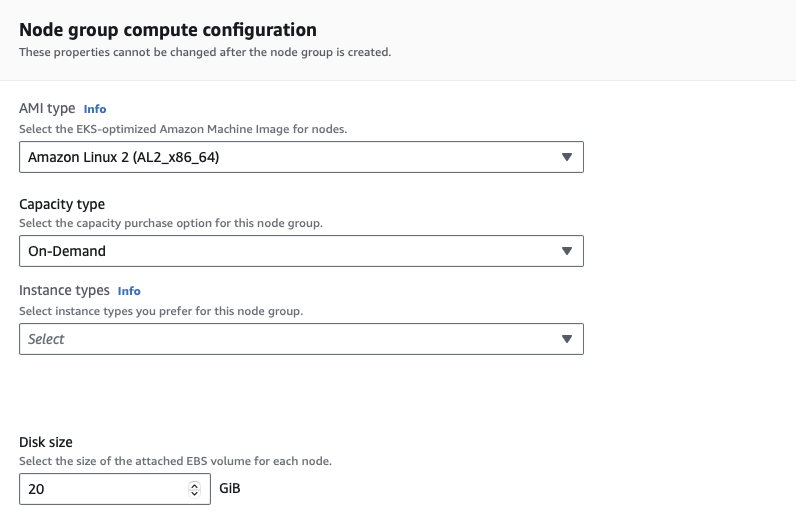
- On the next screen, under Node group compute configuration, leave Amazon Linux 2 selected, but change the Instance type to
t3.medium. This is the instance type of the worker nodes that the cluster will spin up/down as needed. - When picking an instance size, don't overly skimp out on compute here to save costs. Kubernetes is finicky with resources and going too small will result in failed pod deployments due to a lack of resources.
-
Under Node group scaling configuration, leave the default values as 2/2/2. Click Next.
-
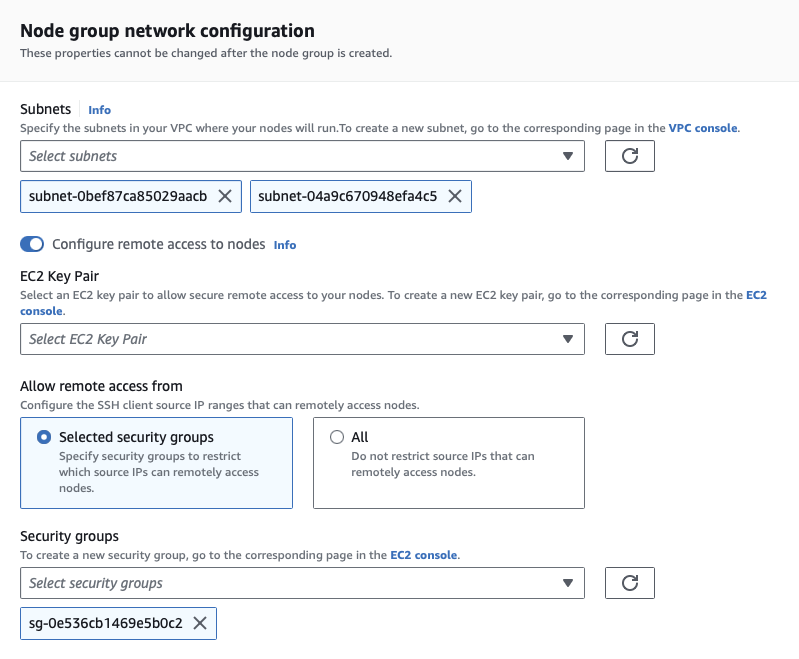
For Node group network configuration:
-
Select the subnets that the worker nodes will be deployed in. Normally you should deploy worker nodes to a separate subnet to the master node/EKS cluster, but for this project, we will keep them the same.
- Check the box Configure remote access to nodes. This is useful for troubleshooting, but does increase our attack surface a bit. When prompted, select the same EC2 key pair used for the MongoDB VM from before, and the same security group, mgmt-access. The latter will restrict remote access to only our own IP address.
- Click Next to continue.
- When you have finished reviewing the configuration, click Create to finish. This will begin the process to create the worker node(s) according to our config (which may take several minutes).
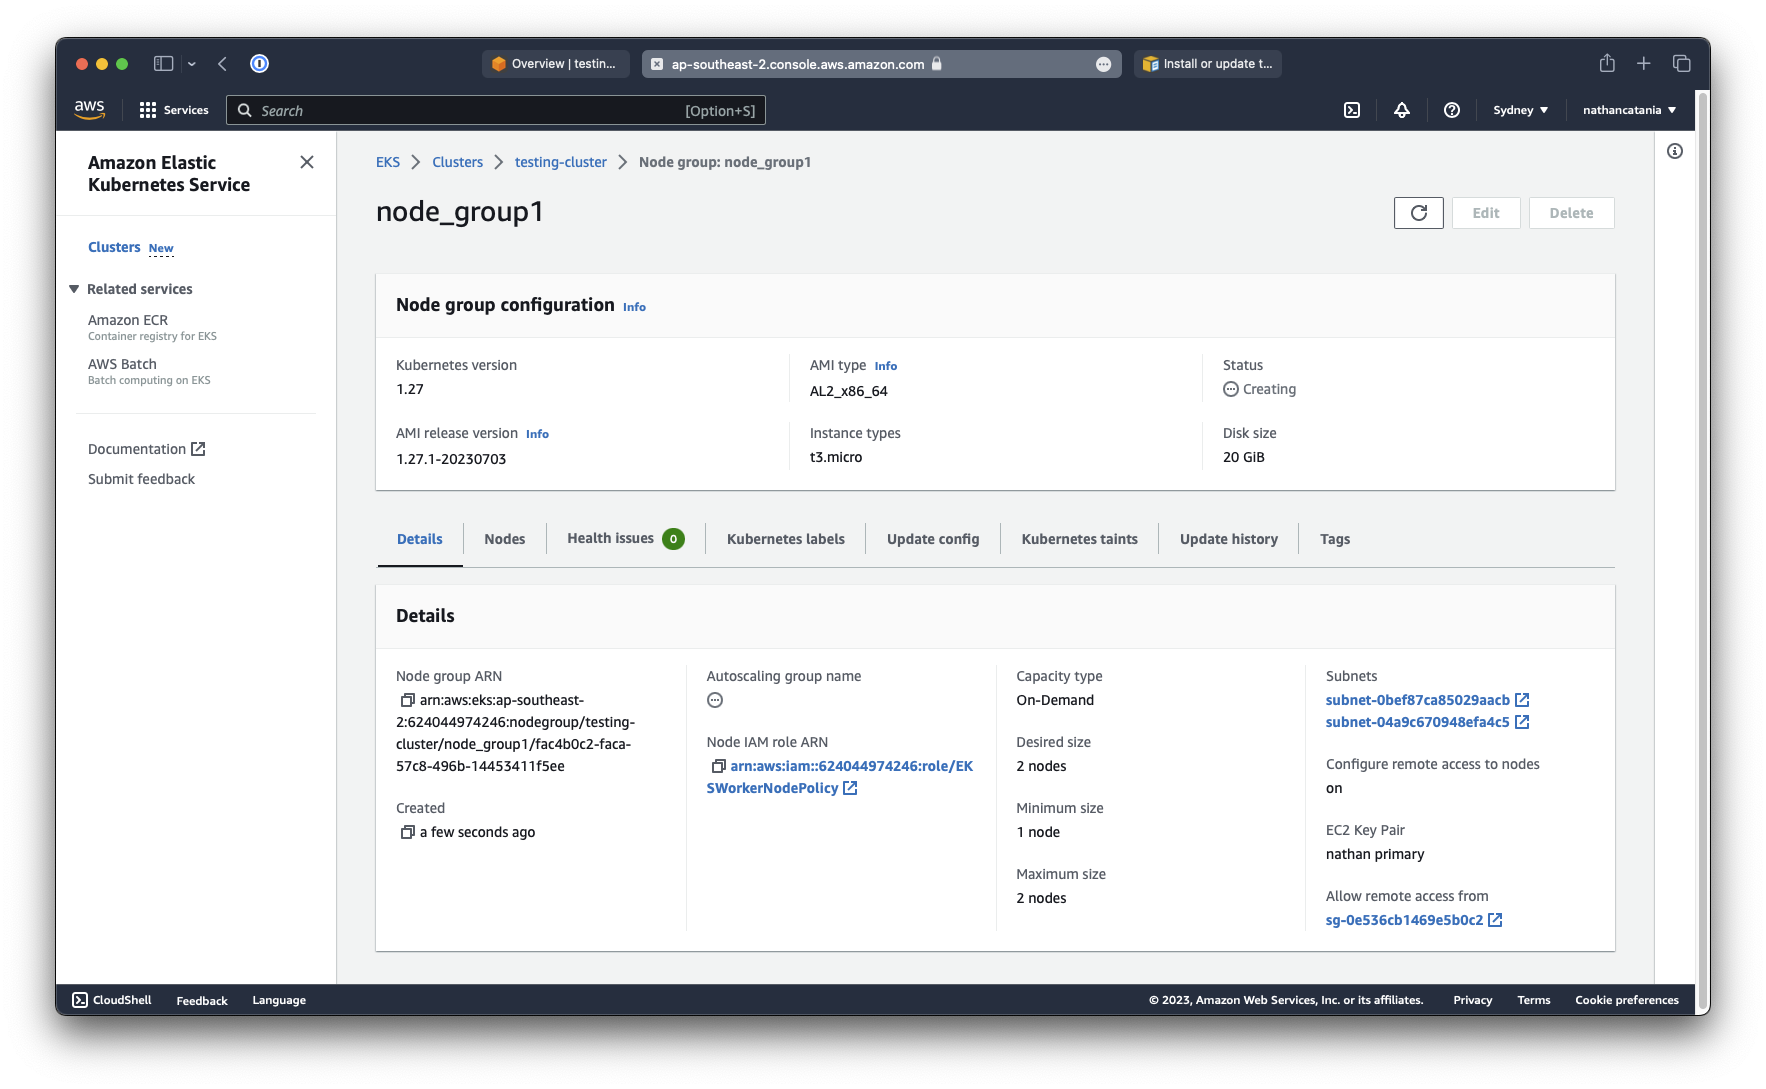
To verify that the worker nodes are active, we can use kubectl:
kubectl get nodes --watch
...
NAME                                               STATUS   ROLES    AGE   VERSION
ip-172-31-36-247.ap-southeast-2.compute.internal   Ready    <none>   19m   v1.27.1-eks-2f008fe
ip-172-31-7-192.ap-southeast-2.compute.internal    Ready    <none>   19m   v1.27.1-eks-2f008fe
Likewise, if you return to the details page of the EKS cluster and select the Compute tab, you will now see the node group and the provisioned worker nodes:

1.4 - Create a Public Amazon S3 Bucket
In this section, we will be creating a new S3 bucket to hold scripted backups from MongoDB. The bucket will be configured to allow for Public Read access; creating a point where data can be breached and siphoned.
Danger
Never do this in a real production environment or with real data!
Create a new public bucket
Go to the S3 Management Console and select Create Bucket.
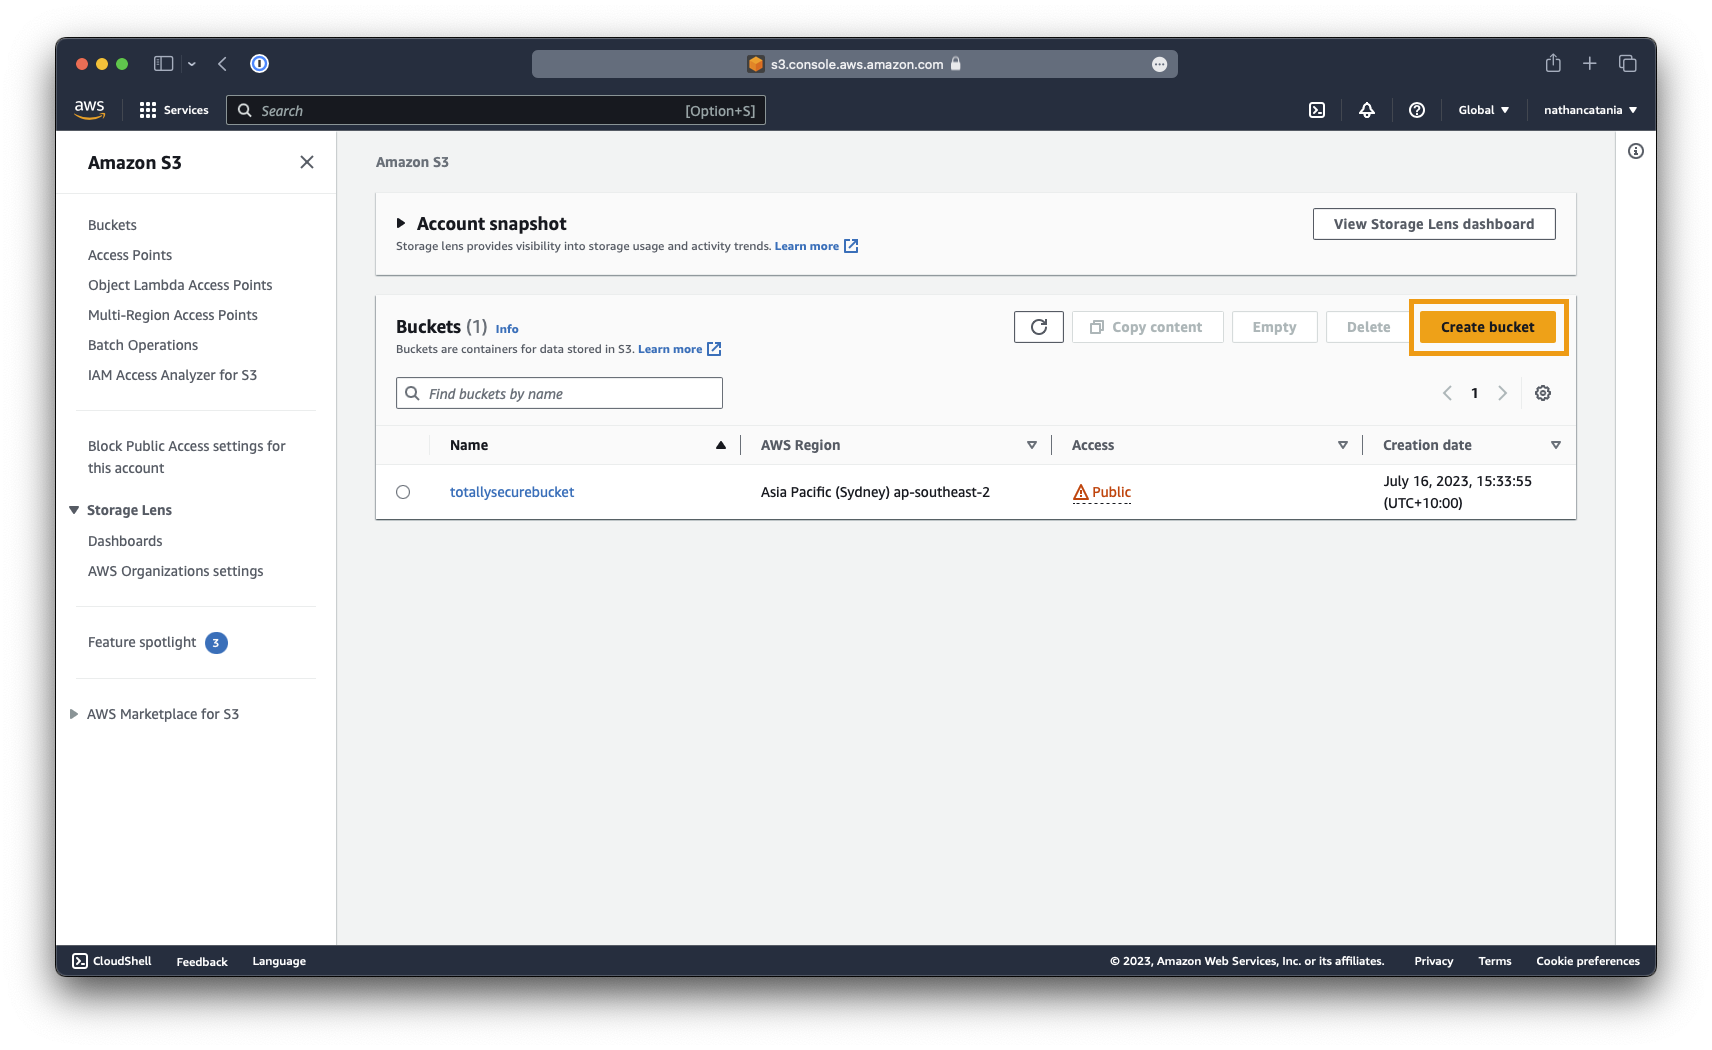
Provide a name for the bucket (eg: totallysecurebucket), select the region (eg: ap-southeast-2), and ensure (under Object Ownership) that ACLs are disabled.
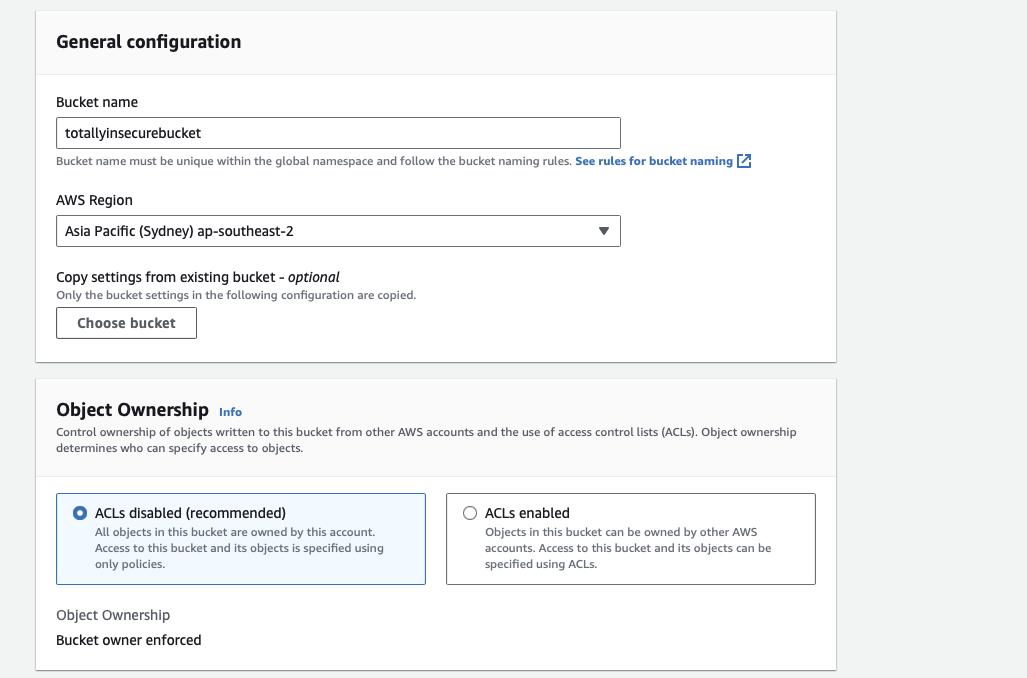
Under the section Block Public Access settings for this bucket, deselect the Block all public access checkbox and check the acknowledgement checkbox that appears at the bottom. This will make the bucket completely public.
Add a bucket policy
To make objects in the bucket publicly readable, we need to create and apply a policy to the bucket that grants everyone accessing it the s3:GetObject permission.
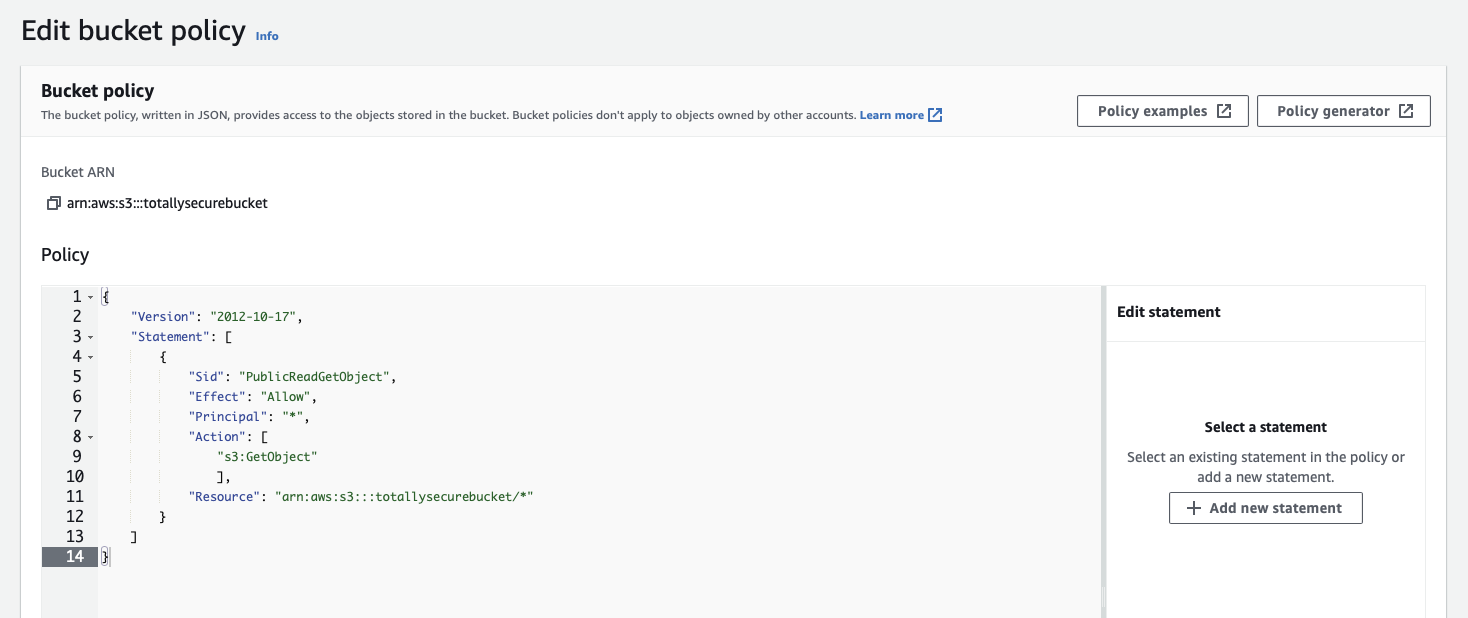
From the S3 Management Console, click the name of the bucket created above and select the Permissions tab. Scroll down and under the Bucket Policy section, click Edit.
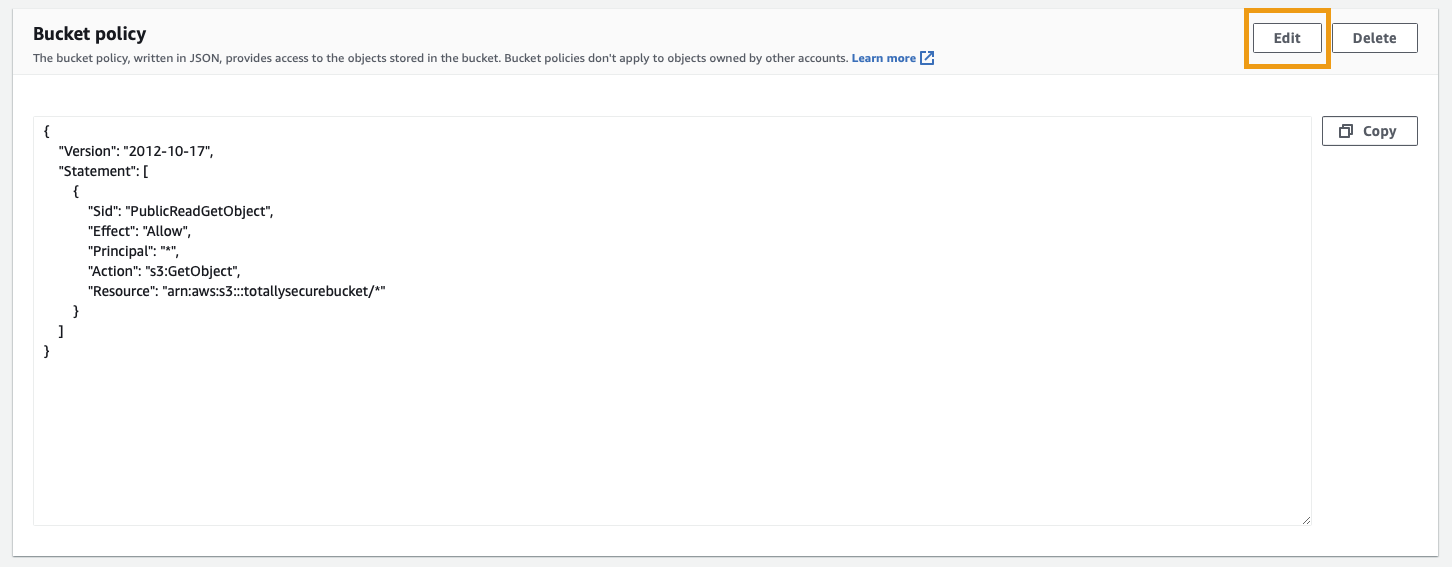
Paste in the following (overwriting all existing text) and substitute <your-bucket-name> with the name of your S3 bucket:
{
    "Version": "2012-10-17",
    "Statement": [
        {
            "Sid": "PublicReadGetObject",
            "Effect": "Allow",
            "Principal": "*",
            "Action": [
                "s3:GetObject"
                ],
            "Resource": "arn:aws:s3:::<your-bucket-name>/*"
        }
    ]
}
Click Save changes to finish.
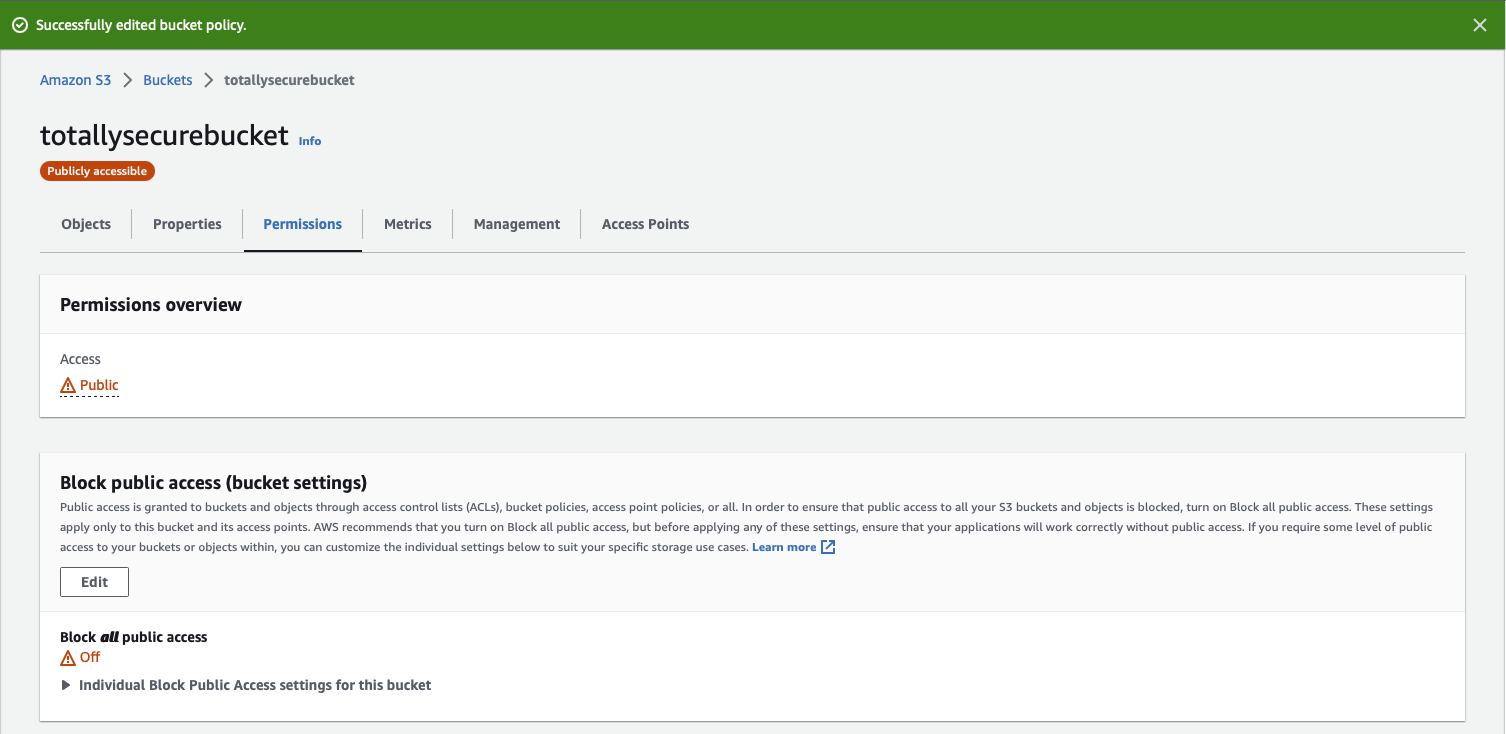
Your bucket will now have an orange Publicly accessible warning underneath it's name, and under the Permissions tab in the Permissions overview section, Access should now say Public.
1.5 - Deploy a Public Web App (Rocket.Chat)
The moment of truth is finally here: We can now use everything we have done so far to deploy the Rocket.Chat web app to our Kubernetes cluster! Rocket.Chat will sit behind nginx which will handle TLS for all connections between users and the web app.
About Ingresses, Ingress Controllers, and Load Balancers
In Kubernetes, an Ingress object is a set of rules to route external HTTP(S) traffic to internal services within the cluster. These rules can include things like "send all traffic for myapp.mydomain.com to the my-app service running in k8s". In our context, we will have an ingress that routes chat.domain.com to our Rocket.Chat service so that external users can reach the UI.
An Ingress Controller is effectively the "router" that enforces and implements any routes (Ingresses) defined. It is essentially a type of load balancer that can interpret the Ingress rules. Ingress rules are useless without an Ingress Controller to enforce them. In our context, we will be leveraging Nginx as the Ingress Controller.
To allow the outside world to reach our Nginx Ingress Controller, we will be creating a "LoadBalancer" service in Kubernetes. As our cluster is running in AWS, this results in an AWS Elastic Load Balancer (ELB) instance being created and used. The ELB distributes incoming application traffic across multiple targets, such as EC2 instances, and in this case, the NGINX Ingress Controller.
In summary and in relation to this exercise, the flow of our services will be:
External Traffic -> AWS ELB -> NGINX Ingress Controller (applies Ingress rules) -> Internal Kubernetes services (Rocket.Chat)
kubectl: Common commands and shortcuts
This section will make heavy use of kubectl on our local machine. The following commands will come in handy.
Get all pods running in the default namespace, specific namespace, and across all namespaces:
kubectl get pods
kubectl get pods -n <namespace>
kubectl get pods --all-namespaces
If we run the last command, we should see pods relating to the add-ons we selected when we created our EKS cluster:
nathan@arcanum ~ % kubectl get pods --all-namespaces
NAMESPACE       NAME                                                    READY   STATUS    AGE
kube-system     aws-node-bp2c4                                          1/1     Running   6d17h
kube-system     aws-node-khrfq                                          1/1     Running   6d17h
kube-system     coredns-866c7d785-dwmlg                                 1/1     Running   6d17h
kube-system     coredns-866c7d785-wrwsj                                 1/1     Running   6d17h
kube-system     kube-proxy-cktrg                                        1/1     Running   6d17h
kube-system     kube-proxy-pnlqd                                        1/1     Running   6d17h
Show all worker nodes running:
kubectl get nodes
...
NAME                                               STATUS   ROLES    AGE
ip-172-31-10-103.ap-southeast-2.compute.internal   Ready    <none>   6d17h
ip-172-31-38-215.ap-southeast-2.compute.internal   Ready    <none>   6d17h
Get logs for a specific pod (or previous instance of a pod) in a specific namespace:
kubectl logs -n <namespace> <pod-name> --previous
Provide details information about a specific pod in a specific namespace:
kubectl describe pod rocketchat-866fdd489-nwwzq --namespace rocket
Retrieve the details of the specified service in a specific namespace, and output the details in YAML.
kubectl get svc -n <namespace> <servicename> -o yaml
Create or update resources (ie: pods, services, etc) in a cluster as defined by the contents of the YAML file referenced:
kubectl apply -f <deployment-name>.yaml
Remove all resources in the cluster as defined by the contents of the YAML file referenced:
kubectl delete -f <deployment-name>.yaml
List all services in the specified namespace:
kubectl get svc -n <namespace>
Provide detailed information about a certificate object in a specific namespace:
kubectl describe certificate rocket-tls --namespace rocket
Install Helm and Add Repositories
Helm is a package manager for Kubernetes, and Helm Charts are published to Helm and describe how a package should be deployed.
Helm is installed on the local machine from which you are running kubectl commands from.
Install Helm (macOS):
brew install helm
Add the Rocket.Chat Helm Chart:
helm repo add rocketchat https://rocketchat.github.io/helm-charts
Update the Helm repository:
helm repo update
Install the Nginx Ingress Controller
Nginx will front-end the Rocket.Chat service and secure the connectivity between the user and app with TLS.
Add the ingress-nginx Helm repo:
helm repo add ingress-nginx https://kubernetes.github.io/ingress-nginx && helm repo update
Install the Nginx Ingress Controller and set the service type to be a LoadBalancer. This will automatically create a new LoadBalancer in our AWS environment. As per the recommended configuration, the Ingress Controller will also be installed in its own namespace:
helm install nginx-ingress ingress-nginx/ingress-nginx --set controller.service.type=LoadBalancer --namespace ingress-nginx --create-namespace
Run the following command and note down the external IP/hostname assigned to the ELB LoadBalancer under the EXTERNAL-IP column:
kubectl get svc -n ingress-nginx
...
NAME                                       TYPE           CLUSTER-IP       EXTERNAL-IP
nginx-ingress-nginx-controller             LoadBalancer   10.100.190.179   a51aca6bf603b441597c74851e09f1ef-206136540.ap-southeast-2.elb.amazonaws.com

nginx-ingress-nginx-controller-admission   ClusterIP      10.100.89.137    <none>
For example, in my case above the external hostname assigned to my LoadBalancer by ELB is:
a51aca6bf603b441597c74851e09f1ef-206136540.ap-southeast-2.elb.amazonaws.com
You will need this in the next step.
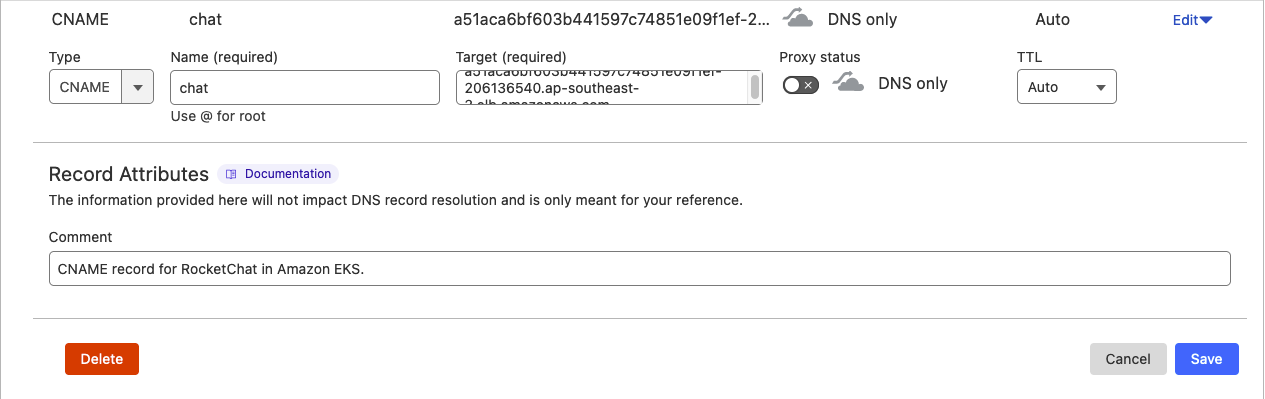
Configure External DNS
Next, we need to add a CNAME record for the domain/subdomain we wish to make the Rocket.Chat web app accessible at, eg: chat.domain.com. This record must point chat.domain.com to the ELB external hostname obtained above.
Note that you don't have to use chat as the subdomain. Use whatever you like as long as you own the domain and have access to the external DNS records for it.
In my case, I will be using the subdomain chat.lightwave.cloud, so I would add a CNAME record to my lightwave.cloud domain's DNS that points chat to a51aca6bf603b441597c74851e09f1ef-206136540.ap-southeast-2.elb.amazonaws.com:
You can check whether your record was added correctly by using nslookup:
nslookup chat.lightwave.cloud
...
Server:     10.0.100.20
Address:    10.0.100.20#53

Non-authoritative answer:
chat.lightwave.cloud    canonical name = a51aca6bf603b441597c74851e09f1ef-206136540.ap-southeast-2.elb.amazonaws.com.
Name:   a51aca6bf603b441597c74851e09f1ef-206136540.ap-southeast-2.elb.amazonaws.com
Address: 52.63.128.2
Name:   a51aca6bf603b441597c74851e09f1ef-206136540.ap-southeast-2.elb.amazonaws.com
Address: 13.54.214.128
You should see both your selected name and the ELB hostname present. DNS records can take some time to propagate (as long as 48 hours depending on configuration), so this might not resolve straight away.
Install Cert-Manager
Cert-Manager is a native Kubernetes certificate management controller which can help issue and manage SSL/TLS certificates from a variety of sources, such as Let's Encrypt, HashiCorp Vault, or Venafi. In our case, cert-manager will manage the SSL certificate for our Ingress controller (Nginx); allowing it to serve content securely over HTTPS.
Add the cert-manager Helm repository:
helm repo add jetstack https://charts.jetstack.io && helm repo update
Install the cert-manager Helm chart into its own namespace:
helm install cert-manager jetstack/cert-manager --namespace cert-manager --create-namespace --version v1.6.0 --set installCRDs=true
Check that cert-manager was installed correctly:
kubectl get pods --namespace cert-manager
...
NAME                                       READY   STATUS    RESTARTS   AGE
cert-manager-5fd7f4c668-8jsj5              1/1     Running   0          54s
cert-manager-cainjector-6548d8c645-t8nd5   1/1     Running   0          54s
cert-manager-webhook-6c8c98cc6-vmgpt       1/1     Running   0          54s
Next, we need to create configuration for cert-manager that tells it to use Let's Encrypt to issue certificates.
To do this, we will create and apply an Issuer configuration to cert-manager which Kubernetes uses to abstract certificate issuing details. Note that an Issuer is local to a specified namespace, whereas a ClusterIssuer works across all namespaces. In this case, because we only have the one app, we will use a standard Issuer.
Create a new YAML file:
nano issuer.yaml
Paste in the following; making sure to substitute [email protected] with your own email address:
apiVersion: cert-manager.io/v1
kind: Issuer
metadata:
  name: letsencrypt-prod
  namespace: rocket
spec:
  acme:
    # The ACME server URL
    server: https://acme-v02.api.letsencrypt.org/directory
    # Email address used for ACME registration
    email: [email protected]
    # Name of a secret used to store the ACME account private key
    privateKeySecretRef:
      name: letsencrypt-prod
    # Enable the HTTP-01 challenge provider
    solvers:
    - http01:
        ingress:
          class: nginx
Save the file (CTRL+X, then Y), then apply it with kubectl:
kubectl apply -f issuer.yaml --namespace rocket
Create an Ingress
The next step is to create an Ingress resource that references our web app (i.e.: Rocket.Chat). It will also use the Issuer we just created to handle the TLS certificate issuance.
Create a new YAML file called rocket-ingress.yaml:
nano rocket-ingress.yaml
Paste in the following ensuring that you substitute both instances of chat.domain.com with your actual domain/subdomain:
apiVersion: networking.k8s.io/v1
kind: Ingress
metadata:
  name: rocket-ingress
  namespace: rocket
  annotations:
    kubernetes.io/ingress.class: "nginx"
    cert-manager.io/issuer: "letsencrypt-prod"
spec:
  rules:
  - host: chat.domain.com
    http:
      paths:
      - pathType: Prefix
        path: "/"
        backend:
          service:
            name: rocketchat
            port:
              number: 3000
  tls:
  - hosts:
    - chat.domain.com
    secretName: rocket-tls
This file (when applied) creates an Ingress that routes incoming traffic to our Rocket.Chat service on port 3000 (Rocket.Chat is configured to listen on port 3000 for incoming connections by default).
Note that the configuration also includes a tls block that specifies a secretName. This secret, rocket-tls, is where cert-manager will store the issued certificate. The certificate will be automatically renewed by cert-manager as long as the Ingress exists.
Apply the Ingress:
kubectl apply -f rocketchat-ingress.yaml
Cert-manager will see this new Ingress resource, and because it has the cert-manager.io/issuer: "letsencrypt-prod" annotation, cert-manager will reach out to Let's Encrypt and request a certificate for chat.domain.com. This certificate is then stored in the secret named rocket-tls in the rocket namespace. To review and check the status of the issued certificate, run the command:
kubectl describe certificate rocket-tls --namespace rocket
Note that the certificate may not be ready straight away. When it is, the status message will indicate Certificate is up to date and has not expired.
Deploy the Web App
For our last step, we need to actually deploy the Rocket.Chat web app. To ensure high-availability, we will deploy it using both Deployment and Service capabilities in Kubernetes.
A Deployment in Kubernetes is an object that orchestrates the creation and management of Pod instances. A Deployment describes the desired state for Pods, such as the Docker image to use, the number of Pod replicas you want running, and other configuration details. Deployments use a template to create the necessary Pods and keep track of their status. If a Pod goes down, the Deployment will automatically create a new one to keep the desired number of replicas.
A Service in Kubernetes is an abstraction which defines a logical set of Pods (typically operated by a Deployment) and a policy by which to access them (sometimes called a microservice). Services enable communication between different parts of an application, or between different applications entirely, both inside and outside the cluster. They can also provide discovery and load balancing features for microservices.
Create a new YAML file called rocketchat-deployment.yaml:
nano rocketchat-deployment.yaml
Paste in the below content, ensuring that you substitute in the following values:
<mongodb-username>and<mongodb-password>with the username and password of the user you created in MongoDB in therocketchatdatabase.<mongodb-ip>with the IP address of the VM that the MongoDB deployment is running on.chat.domain.comwith the domain you have been using to make Rocket.Chat accessible on.
apiVersion: apps/v1
kind: Deployment
metadata:
  name: rocketchat
  namespace: rocket
spec:
  replicas: 1
  selector:
    matchLabels:
      app: rocketchat
  template:
    metadata:
      labels:
        app: rocketchat
    spec:
      containers:
      - name: rocketchat
        image: rocket.chat:latest
        env:
        - name: MONGO_URL
          value: mongodb://<mongodb-username>:<mongodb-password>@<mongodb-ip>:27017/rocketchat
        - name: ROOT_URL
          value: https://chat.domain.com
        - name: PORT
          value: "3000"
        ports:
        - containerPort: 3000
---
apiVersion: v1
kind: Service
metadata:
  name: rocketchat
  namespace: rocket
spec:
  type: ClusterIP
  selector:
    app: rocketchat
  ports:
  - port: 3000
    targetPort: 3000
Save the file (CTRL+X, then Y) and apply it to deploy Rocket.Chat:
kubectl apply -f rocketchat-deployment.yaml
Verify that the Rocket.Chat pod(s) are running:
kubectl get pods -n rocket
...
NAME                         READY   STATUS    RESTARTS   AGE
rocketchat-866fdd489-4j7zn   1/1     Running   0          48s
Optionally, review the details of the Rocket.Chat service:
kubectl describe service rocketchat -n rocket
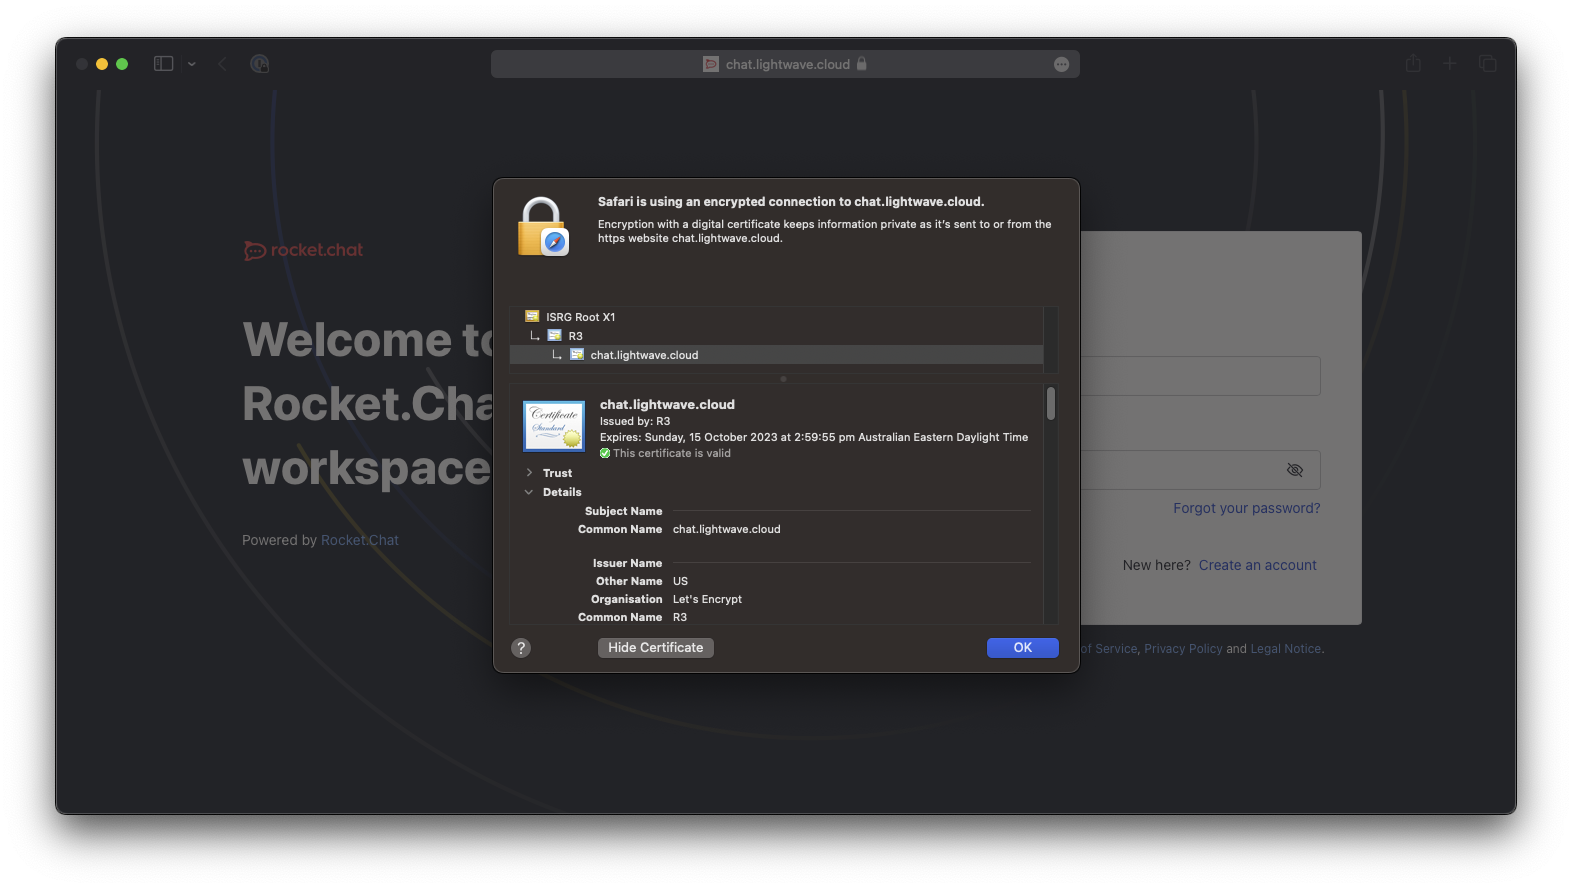
Validate that the Web App is live
We should not be able to go to visit our domain (chat.domain.com) in a browser to check that the web app is live. If everything is OK, then the Rocket.Chat UI should load and be secured with an SSL certificate issued from Let's Encrypt:
2.0 - Weakening Security
In this section we will further weaken the security of our deployment by opening up permissions on our containers and VMs, storing secrets insecurely on a container volume, and configuring MongoDB to back up to the public S3 bucket.
2.1 - Configure containers as cluster-admin
In Kubernetes, permissions are set through Role-Based Access Control (RBAC). We are going to set apply cluster-admin privileges to Rocket.Chat, which will allow it to perform any action against the Kubernetes API - including viewing secrets and modifying permissions.
Danger
NEVER DO THIS IN PRODUCTION OR IN A REAL ENVIRONMENT!
First, we need to create a new ClusterRoleBinding. A ClusterRoleBinding is an object that assigns a ClusterRole (essentially permissions at a cluster level) to a specified service account. A service account is a special kind of account that is intended to be used by a program running inside a Pod. Each Service Account is tied to a specific namespace, and it is automatically given an associated secret. This secret can be used to interact with the Kubernetes API.
In short: There is a service account that is already used by our Rocket.Chat app, so we need to elevate it's permissions to cluster-admin through the use of a ClusterRoleBinding.
Create and apply a new ClusterRoleBinding
To create a new ClusterRoleBinding (rocket-admin) and assign it to the appropriate service account (default) in our rocket namespace:
kubectl create clusterrolebinding rocket-admin --clusterrole=cluster-admin --serviceaccount=rocket:default
If you aren't sure of which service account to use:
kubectl get serviceaccounts -n <namespace>
To specifically see which service account is used by the Rocket.Chat deployment:
kubectl describe deployment <deployment-name> -n <namespace>
To find the deployment name:
kubectl get deployment -n <namespace>
To see which service account is being used by a specific pod:
kubectl describe pod <pod-name> -n rocket
Validate the ClusterRoleBinding
To verify that the ClusterRoleBinding was created and applied successfully, run the following command and look for the name you gave to your ClusterRoleBinding:
kubectl get clusterrolebindings
...
NAME                    ROLE                             AGE
[..snip..]
rocket-admin            ClusterRole/cluster-admin        1m34s
[..snip..]
Double check that the ClusterRoleBinding rocket-admin now has the default service account and rocket namespace as its subject:
kubectl describe clusterrolebinding rocket-admin
...
Name:         rocket-admin
Labels:       <none>
Annotations:  <none>
Role:
  Kind:  ClusterRole
  Name:  cluster-admin
Subjects:
  Kind            Name     Namespace
  ----            ----     ---------
  ServiceAccount  default  rocket
2.2 - Set the MongoDB VM to have elevated privileges
AWS uses a service called Identity and Access Management (IAM) to handle access control. An IAM role is an identity that can be assigned permissions and then attached to resources (like EC2 instances) so that these resources can take actions in AWS on your behalf.
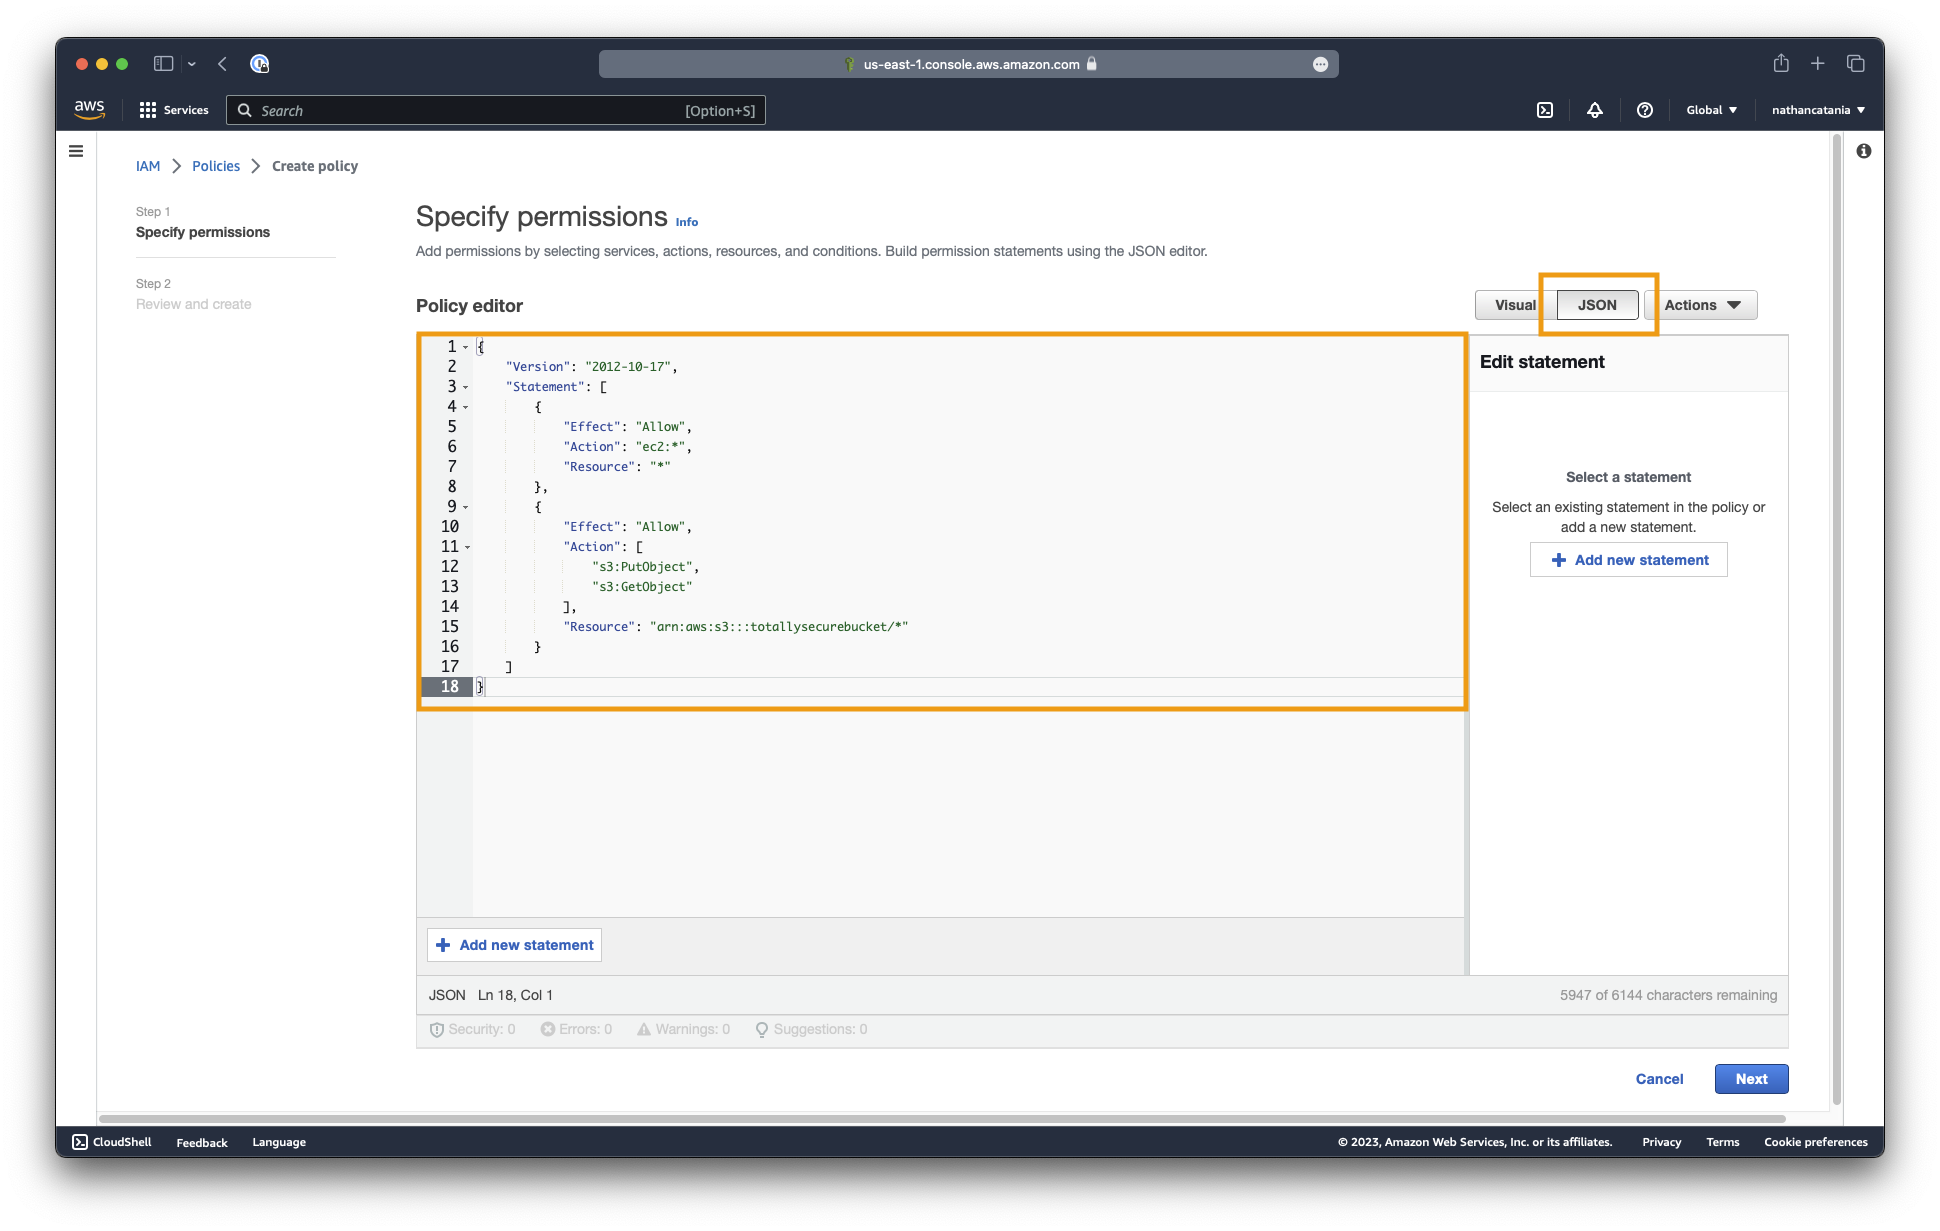
In this section we will create a new IAM role with policy ec2:* which allows any action to be taken on any EC2 resource by anything assigned with this role (which is incredibly dangerous!). We will also assign PutObject and GetObject permissions towards our Public S3 bucket so that we can configure MongoDB to back up to the bucket (see section 2.4 further below).
Create the policy
Open the AWS IAM Console, select Policies from the left sidebar, and click the Create policy button.
Click JSON and paste the following into the policy editor:
{
    "Version": "2012-10-17",
    "Statement": [
        {
            "Effect": "Allow",
            "Action": "ec2:*",
            "Resource": "*"
        },
        {
            "Effect": "Allow",
            "Action": [
                "s3:PutObject",
                "s3:GetObject"
            ],
            "Resource": "arn:aws:s3:::your-bucket-name/*"
        }
    ]
}
Click the Review policy button to continue.
On the next screen, name your policy EC2FullAccess and provide it with a meaningful description. EG: A very bad role that grants a resource full control of EC2 resources. For testing/demo purposes only.
Both EC2 and S3 should be referenced as services defined in the policy. AWS will have derived these up from the JSON entered above:
- For EC2 ensure that the access level is Full access, and the resource is All resources.
- For S3 ensure that the access level is Limited: Read, Write, and the resource references your bucket name.
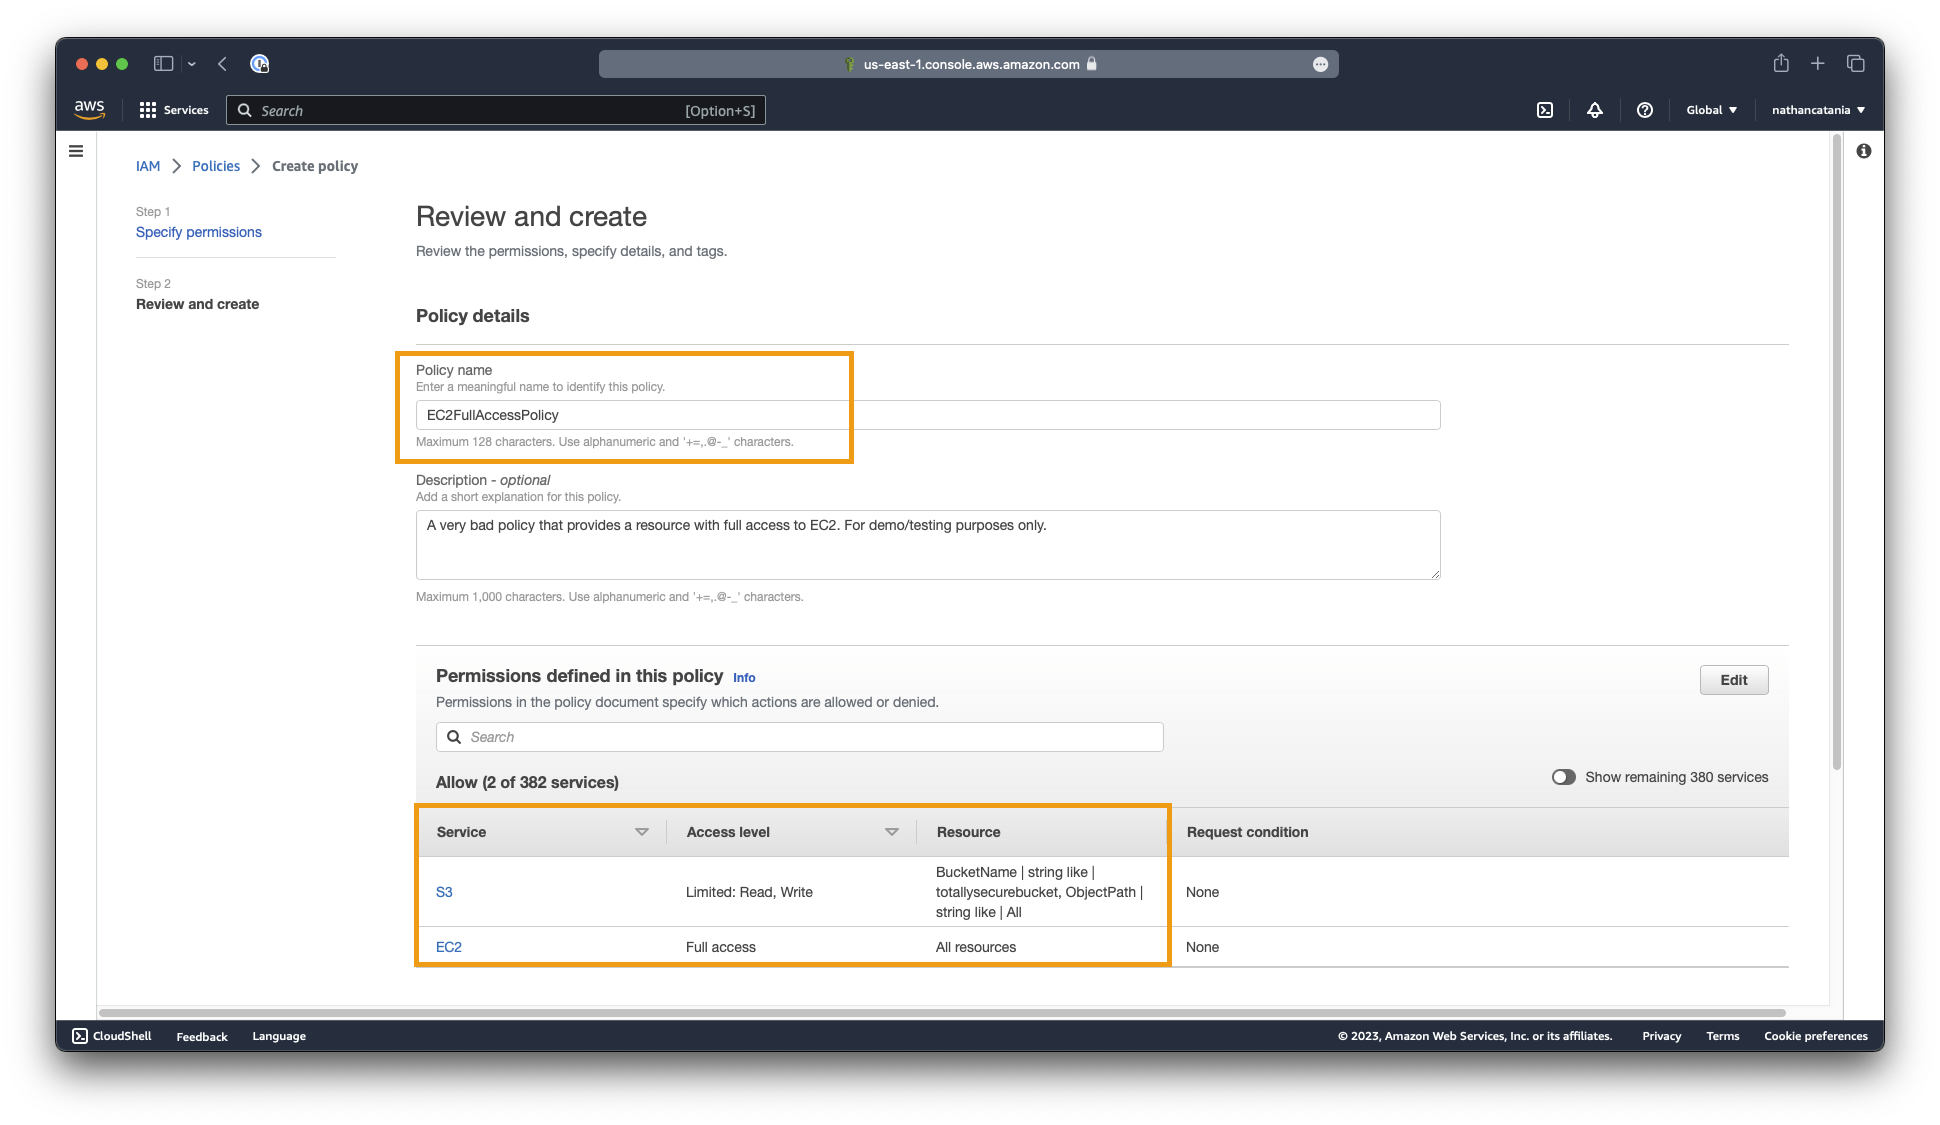
Once you are satisfied, click the Create policy button.
Create the role
From the IAM Console, this time select Roles in the left sidebar, then click the Create role button.
For Step 1 - Select trusted entity, ensure that AWS service is selected as the entity type, and EC2 is selected as the use case.

Click next to continue.
On the next screen (Step 2 - Add permissions), select the EC2FullAccess policy you created (you may need to search for it).
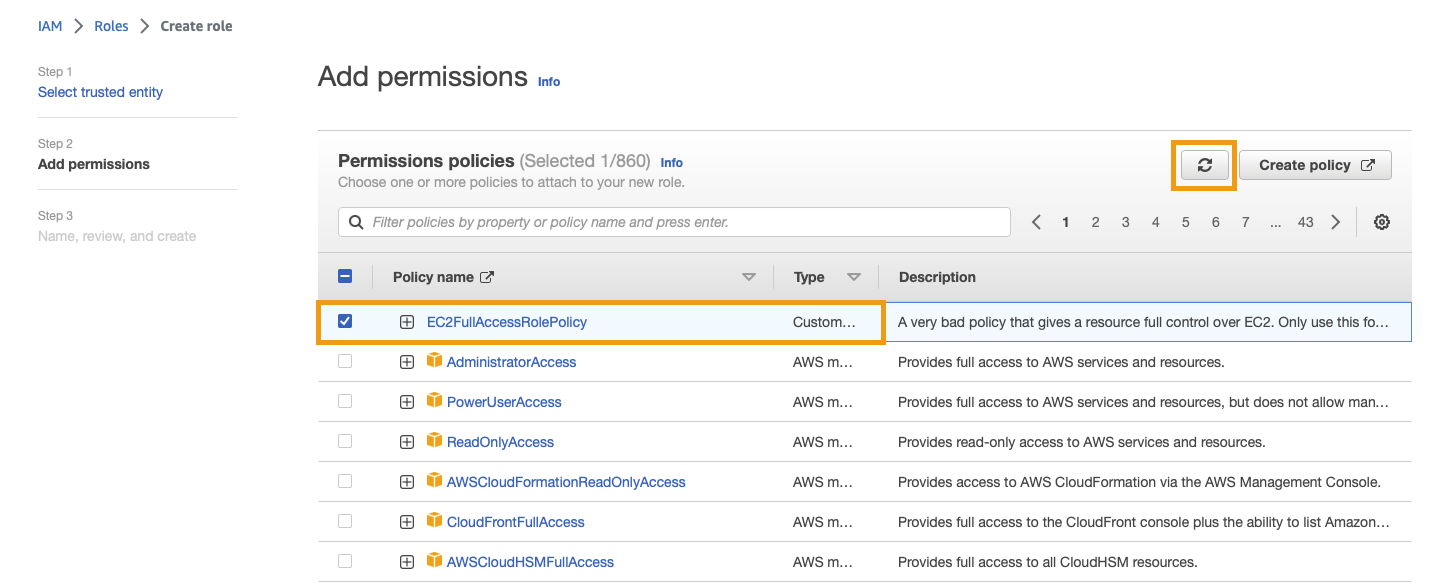
Click next to continue.
On the final screen, name the role EC2FullAccessRole, optionally provide a description, then click the Create role button.

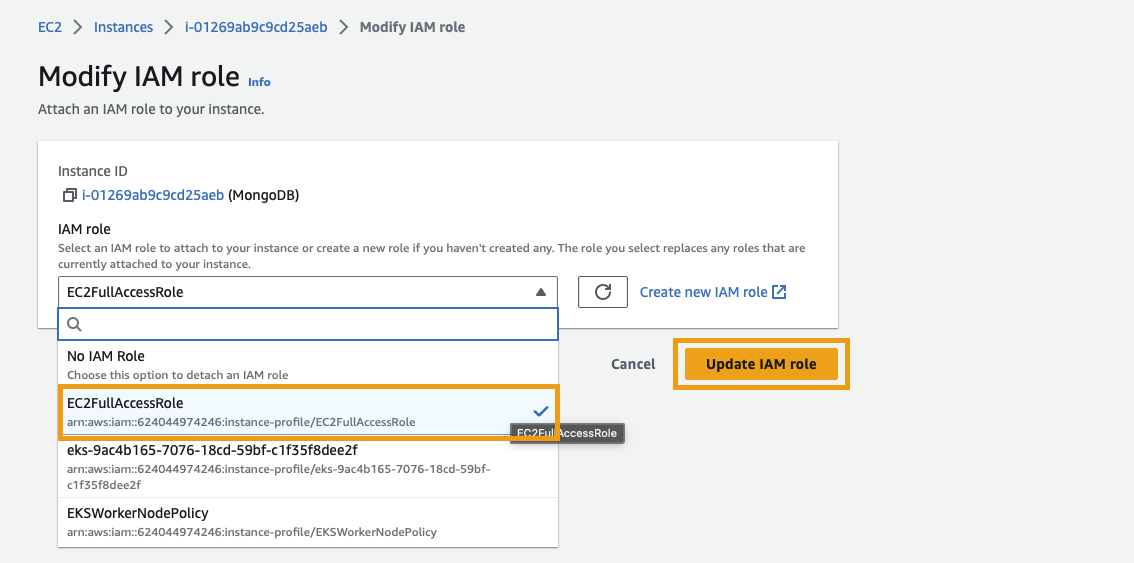
Attach the role to the VM
In the EC2 Console, select the VM that you deployed MongoDB to. Click on the Actions button and navigate to Security > Modify IAM role:
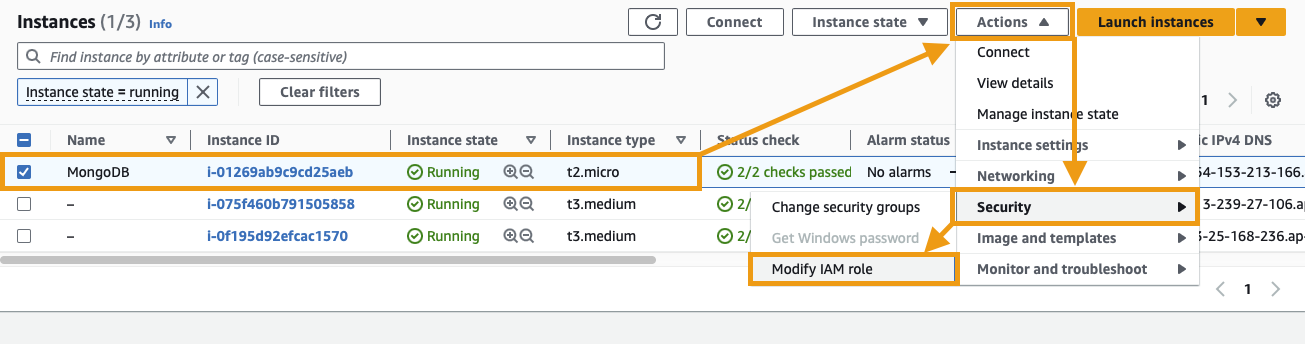
In the IAM role dropdown, find and select the EC2FullAccessRole role that was created above. Click Update IAM role to save your changes.
2.3 - Store a set of credentials insecurely
Kubernetes Secrets exists as a means to securely communicate sensitive values (ie: passwords, API keys, private keys, etc.) to pods; preventing the need to store these in ENV variables or config files within the container. To further increase the vulnerability of our deployment, we will do the latter and use a ConfigMap to store our MongoDB connection string. This ConfigMap will then be mounted to our Rocket.Chat container as a volume.
Create a ConfigMap
A ConfigMap allows configuration to be decoupled from image content, which helps keep containers portable. ConfigMaps are not secure however as they don't provide confidentiality or encryption.
Using the MongoDB connection string from earlier, run the following command to create a ConfigMap called mongo-config; making sure to substitute your own values in the string below:
kubectl create configmap mongodb-config --from-literal=connectionstring='mongodb://<username>:<password>@<mongodb-ip>:27017/rocketchat' -n rocket
Note that the ConfigMap must be created in the same namespace as the Rocket.Chat pod, else it won't be able to see the ConfigMap and mounting the volume will fail.
Mount the ConfigMap as a Volume
Next, update your rocketchat-deployment.yaml file to include the ConfigMap as a volume and mount it to the container:
apiVersion: apps/v1
kind: Deployment
metadata:
  name: rocketchat
  namespace: rocket
spec:
  replicas: 1
  selector:
    matchLabels:
      app: rocketchat
  template:
    metadata:
      labels:
        app: rocketchat
    spec:
      containers:
      - name: rocketchat
        image: rocket.chat:latest
        env:
        - name: MONGO_URL
          value: mongodb://rocketchat:[email protected]:27017/rocketchat
        - name: ROOT_URL
          value: https://chat.lightwave.cloud
        - name: PORT
          value: "3000"
        ports:
        - containerPort: 3000
        volumeMounts:
        - name: mongodb-config-volume
          mountPath: /etc/credentials
      volumes:
      - name: mongodb-config-volume
        configMap:
          name: mongodb-config
---
apiVersion: v1
kind: Service
metadata:
  name: rocketchat
  namespace: rocket
spec:
  type: ClusterIP
  selector:
    app: rocketchat
  ports:
  - port: 3000
    targetPort: 3000
Note the new volumeMounts and volumes sections. This will create a file at /etc/credentials/connectionstring with the contents being the full MongoDB connection string.
Apply the new configuration to the running pod:
kubectl apply -f rocketchat-deployment.yaml
Kubernetes will notice that the deployment configuration has changed, and it will start a rolling update. It will gradually take down the old pod and bring up a new pod with the updated configuration (resulting in a minimal disruption to service).
If kubectl responds to say that the YAML file is unchanged, you can force Kubernetes to replace the current deployment. Just note that this will cause disruption as old pods are deleted first before new ones are created.
kubectl replace --force -f rocketchat-deployment.yaml
Verify the credentials are visible in the pod
To validate that ConfigMap and Volume are mounted correctly, we can connect to the pod and verify the file contents.
Find the name of the pod running:
kubectl get pods -n rocket
...
NAME                         READY   STATUS    RESTARTS   AGE
rocketchat-5878f57494-rcn9c  1/1     Running   0          6d22h
Connect to the container and start a bash session:
kubectl exec -it rocketchat-5878f57494-rcn9c -n rocket -- /bin/bash
View the contents of the connectionstring file and verify that it matches what you entered when defining the ConfigMap:
cat /etc/credentials/connectionstring
...
mongodb://rocketchat:[email protected]:27017/rocketchat
2.4 - Configure MongoDB to back up to the Public S3 Bucket
We will now configure MongoDB to automatically back up to the S3 bucket we created at the start of this document (the one with public read access). The VM has already been configured with permissions to read and write to the bucket as part of the policy and role we assigned to it in Section 2.2. All that is left to do is create a script and cronjob to manage the backup. mongodump will be used to create the backups and this was automatically installed on the system alongside MongoDB.
Danger
Storing backups in a public bucket is a really dumb and stupid idea. Never do this!
Install AWS CLI
Our backup script will leverage the AWS CLI to perform the upload to the S3 bucket, so it needs to be installed on the VM.
Connect to the MongoDB VM using your SSH key pair:
ssh ubuntu@<your-vm-public-ip>
Install AWS CLI:
sudo apt install awscli -y
Create the Backup Script
Create a folder to store the backups:
mkdir $HOME/backups
Create a new script file called backup_mongodb.sh:
nano backup_mongodb.sh
Paste in the following, replacing your-bucket-name with the name of your target S3 bucket:
#!/bin/bash

# specify date for backup
DATE=$(date +%Y%m%d%H%M)

# specify where backup will be stored locally
BACKUP_DIR="$HOME/backups"

# specify your S3 bucket
S3_BUCKET="your-bucket-name"

# create backup with mongodump
mongodump --out $BACKUP_DIR/mongodb-$DATE

# create tarball of the backup
tar -zcvf $BACKUP_DIR/mongodb-$DATE.tar.gz $BACKUP_DIR/mongodb-$DATE

# remove the backup directory
rm -rf $BACKUP_DIR/mongodb-$DATE

# upload tarball to S3
aws s3 cp $BACKUP_DIR/mongodb-$DATE.tar.gz s3://$S3_BUCKET/

# remove the local tarball
rm $BACKUP_DIR/mongodb-$DATE.tar.gz
Save and close the file (CTRL+X, then Y)
The script uses mongodump to create a backup of the MongoDB database. It then compresses the backup into a tarball with tar -zcvf, removes the uncompressed backup directory with rm -rf, uploads the tarball to your S3 bucket with aws s3 cp, and then removes the local tarball.
Because the VM was given an IAM role that included S3 read/write access to the bucket, there is no need to configure the AWS CLI or provide credentials: The AWS SDK and AWS CLI tools will automatically use the attached IAM role to get temporary credentials. AWS then automatically rotates these credentials multiple times per day to ensure ongoing security.
Test the Backup Script
Ensure that the script is executable:
chmod +x backup_mongodb.sh
chmod +x backup_mongodb.sh
Run the script and check the S3 bucket from the [S3 console](console.aws.amazon.com/s3/) to make sure that the backup was successfully uploaded:

#### Automate the Backup with Cron
Currently, the backup script must be manually invoked, however we can use `cron` to run the script on a schedule.
Check that `cron` is running:
Edit the crontab (the configuration file that the `cron` service uses):
Paste the following at the bottom of the crontab:
Assuming nano is your text editor, save and exit using CTRL+X, then Y.
The text tells cron to automatically run a backup at 3am every day. It redirects all output into a log file called backup.log which can be reviewed if troubleshooting is required.
Finish
🥳 Congratulations! You now have an insecure deployment of Rocket.Chat on a managed Kubernetes cluster in Amazon AWS.